background image

www.airkinglimited.com

6728002 Rev. F 1-11

3 of 12

4.  Install an approved wire connector to the electrical knockout of the hood and 

guide the electrical cable through the hood, allowing at least 6" of wire for 

connections and tighten.

NOTE

: If installing into existing construction and you will not have access to the 

ductwork once the hood is in place, make ducting connections at this point. Refer to 

the Ducting Section for instructions.

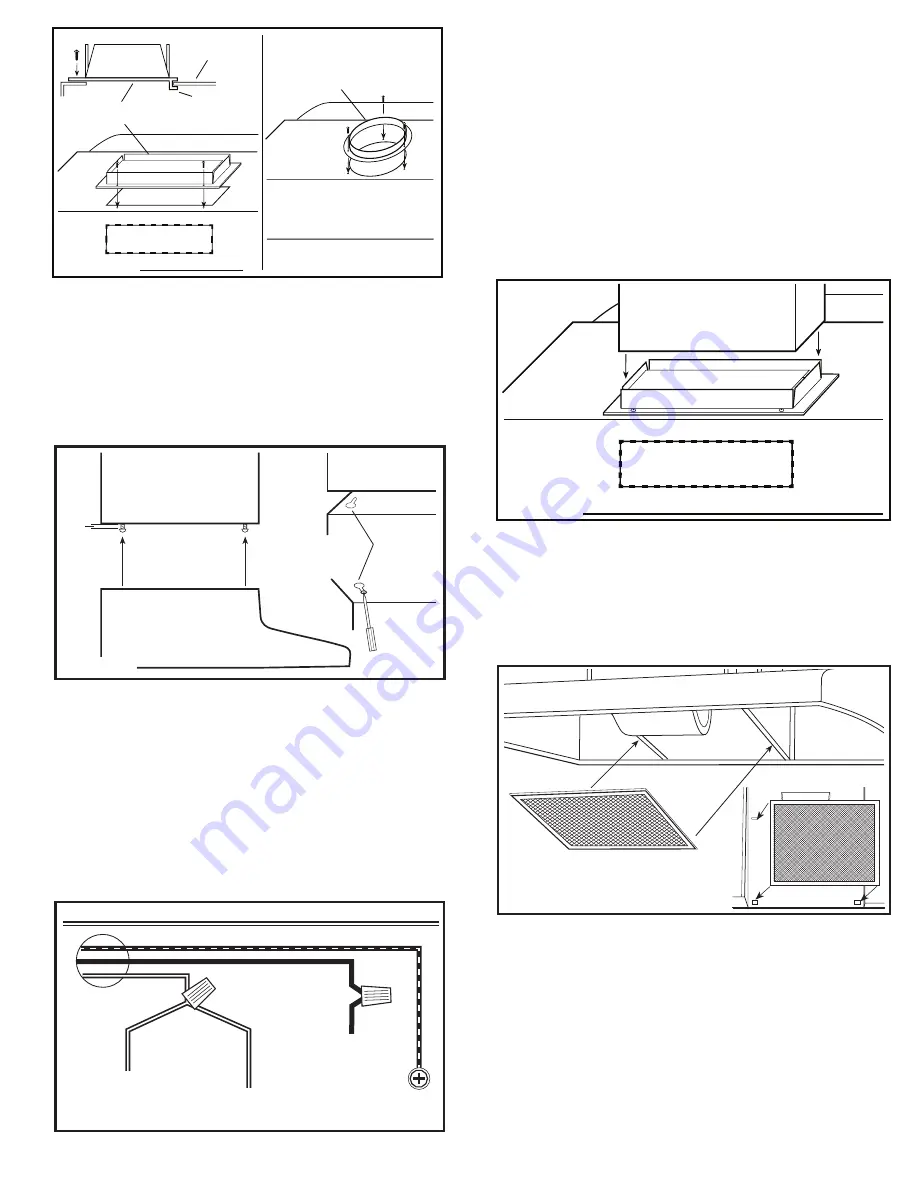
4.  Install the 4 mounting screw at the previously marked locations. Leave 

approximately 1/8" clearance. Slide the hood in place through the keyhole slots 

and align the front of the hood so that it is flush with the front of the cabinets. 

Tighten all screws securely 

(Figure 6).

SECTION 6

Wiring

CAUTION:

 ALL ELECTRICAL CONNECTIONS MUST BE MADE IN 

ACCORDANCE WITH LOCAL CODES, ORDINANCES, OR NATIONAL ELECTRICAL CODE. 

IF YOU ARE UNFAMILIAR WITH METHODS OF INSTALLING ELECTRICAL WIRING, 

SECURE THE SERVICES OF A QUALIFIED ELECTRICIAN.

1.  Connect the 2 loose White wires from the range hood to the White wire from the 

supply, and the loose Black wire from the range hood to the Black wire of the 

supply. Connect the ground wire (green or bare) from the supply to the green 

ground screw of the hood. Use approved methods for all connections 

(Figure 7).

Figure 6

1/8

"

Keyhole

NOTE: DO NOT

 disconnect any wiring that has already been crimped with a wire 

connector from the factory.

2.  Install the wire compartment cover and tighten screw. Make sure all wiring is 

securely contained within the wire compartment.

SECTION 7

Ducting

CAUTION:

 ALL DUCTING MUST COMPLY WITH LOCAL AND NATIONAL 

BUILDING CODES.

WARNING:

  TO REDUCE THE RISK OF FIRE, USE ONLY METAL DUCTWORK.

1.  Connect the ducting to the hood’s duct collar and damper. Secure in place using 

tape to seal all joints 

(Figure 8).

CAUTION:

 ALWAYS DUCT THE FAN TO THE OUTSIDE THROUGH A WALL 

OR ROOF CAP.

SECTION 8

Finishing the Installation

1.  Install the appropriate filter sliding the back side of the filter into the tab and 

pressing the front of the filter into place 

(Figure 9).

2.  Turn switches to the “OFF” position and restore power. Test that the light and the 

fan are operating properly.

3.  If there is any vibration noise, check for the source and try to tighten fasteners. 

Figure 7

Neutral 

(White)

from Light

Hot (Black)

Ground 

(Green or Bare)

Neutral (White)

from Motor

Figure 9

Tab

Figure 5

Damper

Hood

Body

E-22A/RCD7

Figure 8

Summary of Contents for AV1213

Page 1: ...tilities CAUTION FOR GENERAL VENTILATING USE ONLY DO NOT USE TO EXHAUST HAZARDOUS OR EXPLOSIVE MATERIALS AND VAPORS CAUTION TO REDUCE THE RISK OF FIRE AND TO PROPERLY EXHAUST AIR BE SURE TO DUCT AIR OUTSIDE DO NOT VENT EXHAUST AIR INTO SPACES WITHIN WALLS OR CEILINGS OR INTO ATTICS CRAWL SPACES OR GARAGES d Ducted fans must always be vented to the outdoors e This unit must be grounded f To avoid m...

Page 2: ...air back into the kitchen with the addition of a model RF34 Charcoal Filter not included or vented through a 7 round duct with the addition of a model E 22a or RDC7 Duct Collar not included Figure 3 2a Horizontal or Vertical Remove the square knockout by inserting a screw driver under the edge and break the tabs holding it in place Peel back with pliers Figure 4 2b Ductless Remove the hood s front...

Page 3: ... hood to the Black wire of the supply Connect the ground wire green or bare from the supply to the green ground screw of the hood Use approved methods for all connections Figure 7 Figure 6 1 8 Keyhole NOTE DO NOT disconnect any wiring that has already been crimped with a wire connector from the factory 2 Install the wire compartment cover and tighten screw Make sure all wiring is securely containe...

Page 4: ...55 Combination Odor Grease Filter www airkinglimited com 6728002 Rev F 1 11 4 of 12 Troubleshooting Guide Trouble Probable Cause Suggested Remedy 1 Hood does not operate when the switch is on 1a A fuse may be blown or a circuit tripped 1a Replace fuse or reset circuit breaker 1b Wiring is not connected properly 1b Turn off power to unit Check that all wires are connected 2 Hood is operating but ai...

Page 5: ...KING S LIABILITY UNDER ANY EXPRESS OR IMPLIED WARRANTY INCLUDE I INCIDENTAL OR CONSEQUENTIAL DAMAGES FROM ANY CAUSE WHATSOEVER OR II REPLACMENT OR REPAIR OF ANY HOUSE FUSES CIRCUIT BREAKERS OR RECEPTACLES NOTWITHSTANDING ANYTHING TO THE CONTRARY IN NO EVENT SHALL AIR KING S LIABILITY UNDER ANY EXPRESS OR IMPLIED WARRANTY EXCEED THE PURCHASE PRICE OF THE PRODUCT AND ANY SUCH LIABILITY SHALL TERMINA...

Page 6: ... 1 Switch Plate White 5S1421003 1 Biscuit 5S1421004 1 Almond 5S1421005 1 Black 5S1421006 15 1 Motor Switch White 5S1418003 1 Biscuit 5S1418004 1 Almond 5S1418005 1 Black 5S1418006 REPLACEMENT PARTS DIAGRAM Qty Description Replacement Part 16 1 Light Switch White 5S1419003 1 Biscuit 5S1419004 1 Almond 5S1419005 1 Black 5S1419006 17 1 Wrapper 21 5S1427010 1 24 5S1427020 1 30 5S1427030 1 36 5S1427040...

Page 7: ...L EXTÉRIEUR NE PAS ÉVACUER L AIR DANS DES ESPACES DANS LES MURS LES PLAFONDS OU LES GRENIERS LES GALERIES TECHNIQUES OU LES GARAGES AVERTISSEMENT POUR USAGE DE VENTILATION GÉNÉRALE EXCLUSIVEMENT NE PAS UTILISER POUR ÉVACUER DU MATÉRIEL ET DES VAPEURS DANGEREUSES OU EXPLOSIVES d Les ventilateurs avec conduits doivent toujours être évacués vers l extérieur e Cette unité doit être mise à la terre f P...

Page 8: ...x 10 po Il peut être modifié pour devenir sans conduit recirculation de l air dans la cuisine avec l addition d un filtre au charbon modèle RF34 non inclus ou soufflé au travers d un conduit rond de 17 78 cm 7 po avec l addition d un clapet modèle E 22a ou RDC7 non inclus Figure 3 2a Horizontal ou Vertical Enlever l alvéole défonçable en insérant un tournevis sous le contour et casser les attaches...

Page 9: ...entation Connecter le fil de mise à la terre vert ou dénudé de l alimentation à la vis verte de mise à la terre de la hotte Utiliser des méthodes de connexion approuvées pour toutes les connexions Figure 7 REMARQUE NE PAS déconnecter quelque fil qui ait déjà été serti avec un connecteur de fil à l usine 2 Placez le couvercle du compartiment de fils et serrez la vis Assurez vous que tous les fils s...

Page 10: ...N GARDE ASSUREZ VOUS QUE L ALIMENTATION ÉLECTRIQUE EST COUPÉE À PARTIR DU PANNEAU DE DISTRIBUTION AVANT DE COMMENCER L INSTALLATION Filtres Filtre à graisses Un filtre à graisses en aluminium est inclus avec votre hotte et il devrait être nettoyé dans l eau chaude avec du détergent une fois par mois Renverser les instructions dans la section terminer l installation des instructions pour retirer le...

Page 11: ...U TACITE POUR I DES DOMMAGES ACCIDENTELS OU INDIRECTS DE N IMPORTE QUELLE CAUSE OU II LE REPLACEMENT OU LA RÉPARATION DE TOUS FUSIBLES DISJONCTEURS OU RÉCEPTACLES DE MAISON MALGRÉ N IMPORTE QUOI À L EFFET CONTRAIRE DANS AUCUN CAS LA RESPONSABILITÉ D AIR KING SOUS UNE GARANTIE EXPRESSE OU TACITE NE DÉPASSERA LE PRIX D ACHAT DU PRODUIT ET UNE TELLE RESPONSABILITÉ SE TERMINERA AVEC L EXPIRATION DE LA...

Page 12: ...Plaque d interrupteur Blanc 5S1421003 1 Biscuit 5S1421004 1 Amande 5S1421005 1 Noir 5S1421006 15 1 Interrupteur du moteur Blanc 5S1418003 1 Biscuit 5S1418004 1 Amande 5S1418005 1 Noir 5S1418006 de pièce Qte Description de remplacement 16 1 Interrupteur de lumière Blanc 5S1419003 1 Biscuit 5S1419004 1 Amande 5S1419005 1 Noir 5S1419006 17 1 Bande de recouvrement 53 34 cm 21 po 5S1427010 1 60 96 cm 2...

Reviews: