12
MN-751
WirelessONE
HOW TO SYNC THE RECEIVER TO THE TRANSMITTER
(ONLY NEEDED WITH A REPLACEMENT TRANSMITTER)
1. Turn ignition on.
2. Locate the sync wire in the wire harness.
• It will be the yellow wire that is looped with a yellow cap around it.
3. Remove the yellow wire from the cap leaving the cap attached to the harness.
4. Disconnect power to the receiver.
• Unplug the connector on the top.
5. Connect power to the receiver while grounding the sync input.
6. Listen for 3 clicks of the internal solenoid, then one click every second.
• This will indicate that you are now in the “sync mode”.
• Sync mode will last for 30 seconds total.
• Within the 30 seconds press any button on the transmitter to send a message
to the receiver.
• Once the receiver has received a message it will sync with that transmitter and
stop clicking the solenoid in 1 second intervals.
7. Re-insert the yellow wire terminal into the molded cap.
CHECKING THE SYSTEM
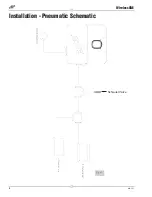
1. Pressurize the system to check for leaks.
2. Inspect all air line connections with a solution of 1/5 dish soap to 4/5 water. If a leak is
detected in a push-lock-fitting, cut the hose end square and reinstall the air line to the
fitting. Make sure the air line is cut off squarely and that the air line is completely pushed
into the fitting.
3. If the compressor or the solenoid fails to function, check the 15 AMP fuse and ground
connection. Repair and replace as necessary.
FCC INFORMATION TO USER
THIS DEVICE COMPLIES WITH PART 15 OF THE FCC RULES. OPERATION IS SUBJECT
TO THE FOLLOWING TWO CONDITIONS: (1) THIS DEVICE MAY NOT CAUSE HARMFUL
INTERFERENCE, AND (2) THIS DEVICE MUST ACCEPT ANY INTERFERENCE
RECEIVED, INCLUDING INTERFERENCE THAT MAY CAUSE UNDESIRED OPERATION.
NOTE:
THE MANUFACTURER IS NOT RESPONSIBLE FOR ANY RADIO OR TV
INTERFERENCE CAUSED BY UNAUTHORIZED MODIFICATIONS TO THIS EQUIPMENT.
SUCH MODIFICATIONS COULD VOID THE USER’S AUTHORITY TO OPERATE THIS
EQUIPMENT.
FCC ID: YHT-BRM920AJM1017


