23
en
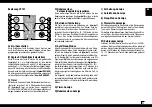
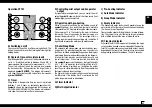
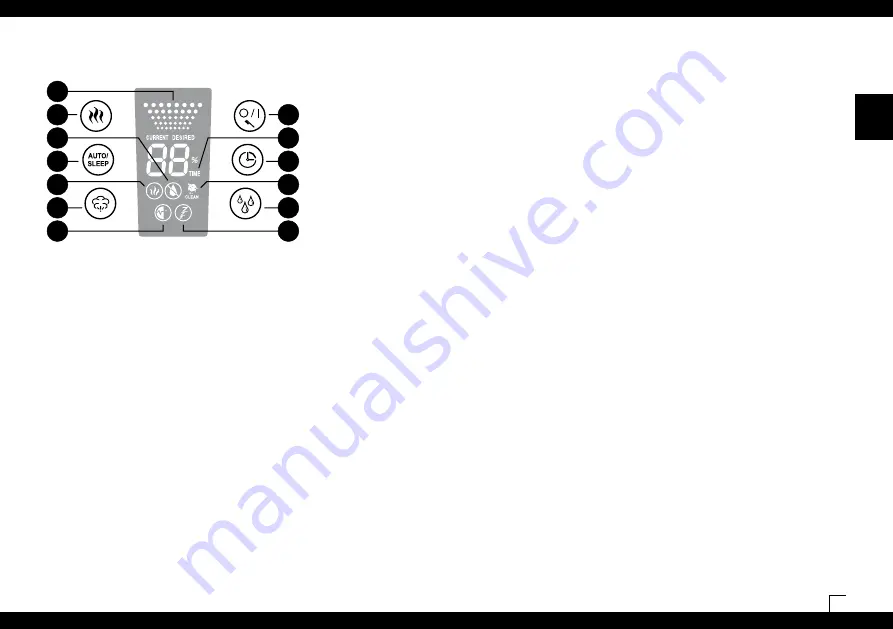
D) Controlling mist output and Evaporator
output
By repeatedly pressing button D you can control the mist
output.
Symbol H
shows which of the three levels (low/
medium/high) you have selected.
E) Operation with pre-heating
Button E is used for switching the pre-heating on and off
(
symbol I
lights up). As a result, the water is pre-heated to
a temperature of 80 °C before entering the nebuliser space.
It takes approx. 10 to 15 minutes for the water in the base
to warm up. The mist now leaves the nebuliser space at a
pleasant temperature of 40 °C. The advantage of this is
that the room temperature does not drop and, in addition, it
significantly improves the water quality maintenance.
F) Auto/Sleep Mode
The automatic and sleep modes can be activated by pres
-
sing button F. By pressing the button once, the automatic
function is switched on (
symbol J
appears on the display),
maintaining the optimum humidity subject to the tempera
-
ture. Control takes place by means of output quantity and
pre-set target value. If the sleep function is switched on
(the
symbol K
appears on the display), the target humidity
is 50 – 65%; the operation time is automatically set at 6
hours; the heating is switched on. In addition, the output
quantity is also controlled subject to the difference between
the target value and the actual value.
The hygrostat and mist output settings cannot be changed
in either mode. If the buttons B or D are pressed, the unit
will no longer be in auto or sleep mode.
G) Timer Indicator
H) Mist Output Indicator
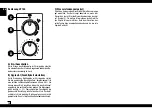
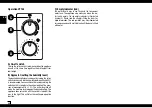
A) Switching on/off
You can switch the unit on or off by pressing button A. This
button is also used to reset the cleaning indicator light (by
holding down).
B) Hygrostat (pre-set moisture level)
By pressing button B you can set the desired moisture le
-
vel in %. A relative moisture of between 40 and 60% is
recommended. The accuracy of measurement is +/- 5%.
The unit will switch off when the moisture level exceeds
the desired setting. During selection the target value is
displayed (
symbol DESIRED
). The display will automati
-
cally show the current humidity value after a few seconds
(
symbol CURRENT
).
C) Timer
Using button C, the operation time can be set – adjustable
between 1 and 8 hours, or continuous operation (CO).
Symbol G
shows the operating period that has been set
(1h/2h/3h/4h/5h/6h/7h/8h/CO). The display will automati
-
cally show the current value after a few seconds.
Operation U7147
I) Pre-heating Indicator
J) Auto Mode Indicator
K) Sleep Mode Indicator
L) Empty indicator
The transparent water tank makes it possible to see the
water level well. Furthermore, the unit shows on the display
(L) when water must be added.
Please read the chapter «Filling the tank» for more informa
-
tion. The symbol L may stay illuminated for some seconds
with a refilled tank until the base is filled with water.
M) Cleaning indicator
If symbol M and «CLEAN» appear on the display, the appli
-
ance should be cleaned as recommended by the manufac
-
turer. This symbol comes on automatically every 2 weeks,
depending on the level of use. The display can be cancelled
by depressing button A for between 10 and 15 seconds.
D
E
F
H
I
J
L
A
B
C
G
K
M
Summary of Contents for U7145
Page 1: ...U7145 U7147 ...
Page 2: ......
Page 4: ...4 ...
Page 5: ...5 de Gebrauchsanweisung ...
Page 7: ...7 de 3 7 9 2 5 1 6 4 8 ...
Page 15: ...15 de 39 29 30 31 32 33 34 36 38 35 37 40 ...
Page 17: ...17 en Instructions for use ...
Page 19: ...19 en 3 7 9 2 5 1 6 4 8 ...
Page 27: ...27 en 39 29 30 31 32 33 34 36 38 35 37 40 ...
Page 29: ...29 fr Instructions d utilisation ...
Page 31: ...31 fr 3 7 9 2 5 1 6 4 8 ...
Page 39: ...39 fr 39 29 30 31 32 33 34 36 38 35 37 40 ...
Page 41: ...41 it Istruzioni per l uso ...
Page 43: ...43 it 3 7 9 2 5 1 6 4 8 ...
Page 51: ...51 it 39 29 30 31 32 33 34 36 38 35 37 40 ...
Page 53: ...53 nl Gebruiksaanwijzing ...
Page 55: ...55 nl 3 7 9 2 5 1 6 4 8 ...
Page 63: ...63 nl 39 29 30 31 32 33 34 36 38 35 37 40 ...
Page 65: ...65 es Instrucciones para el uso ...
Page 67: ...67 es 3 7 9 2 5 1 6 4 8 ...
Page 75: ...75 es 39 29 30 31 32 33 34 36 38 35 37 40 ...
Page 77: ...77 hu Használati útmutató ...
Page 79: ...79 hu 3 7 9 2 5 1 6 4 8 ...
Page 87: ...87 hu 39 29 30 31 32 33 34 36 38 35 37 40 ...
Page 89: ...89 pl Instrukcja obsługi ...
Page 91: ...91 pl 3 7 9 2 5 1 6 4 8 ...
Page 99: ...99 pl 39 29 30 31 32 33 34 36 38 35 37 40 ...
Page 101: ...ru 101 Инструкция по эксплуатации ...
Page 103: ...ru 103 3 7 9 2 5 1 6 4 8 ...
Page 111: ...ru 111 39 29 30 31 32 33 34 36 38 35 37 40 ...
Page 114: ...ru 114 ...
Page 115: ...se 115 Bruksanvisning ...
Page 117: ...se 117 3 7 9 2 5 1 6 4 8 ...
Page 125: ...se 125 39 29 30 31 32 33 34 36 38 35 37 40 ...
Page 127: ...fi 127 Käyttöohje ...
Page 129: ...fi 129 3 7 9 2 5 1 6 4 8 ...
Page 137: ...fi 137 39 29 30 31 32 33 34 36 38 35 37 40 ...
Page 139: ...dk 139 Brugsanvisning ...
Page 141: ...dk 141 3 7 9 2 5 1 6 4 8 ...
Page 149: ...dk 149 39 29 30 31 32 33 34 36 38 35 37 40 ...
Page 151: ...no 151 Bruksanvisning ...
Page 153: ...no 153 3 7 9 2 5 1 6 4 8 ...
Page 161: ...no 161 39 29 30 31 32 33 34 36 38 35 37 40 ...
Page 163: ......

