background image


Your pump is set to inflate only. Do not tamper with the  


pump and do not attempt to use the pump to deflate your  

    AIR 

OPUS

®


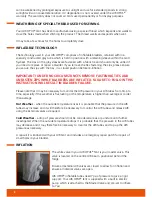
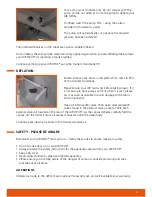
To inflate switch the pump ‘ON’ - using the button 


provided in the electrics panel. 


The pump will automatically cut out once the required  

    pressure 

has 

been 

achieved. 

The internal AIR valves on the tubes are open to enable inflation.

Once inflated, these should be closed and only opened again when you are deflating/taking down 
your AIR OPUS

®

 (or replacing a faulty bladder). 

Continue setting up your AIR OPUS

®

 using the Owner’s Handbook P9

DEFLATION


Ensure interior pack-down is completed first - refer to P24  

    of 

the 

Owner’s 

Handbook. 


Please ensure your AIR tent is dry before taking down. If it  


is necessary to pack away your tent while it is wet, please  


dry it as soon as possible to avoid damage to the fabric  

    and 

components. 


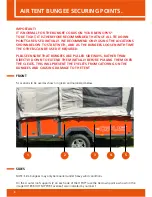
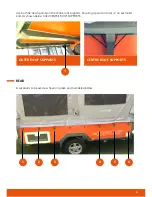
Open all internal AIR valves. Then open all external AIR  


valves found in the external valve pockets. There are 5 

external valves all located on the rear of the AIR OPUS

®

. As the canvas deflates carefully fold the 

canvas into the trailer. Ensure all canvas is housed inside the trailer body.

Continue pack-down procedure in the Owner’s Handbook. 

SAFETY - PLEASE BE AWARE

Remember your AIR OPUS

®

 tent can burn - follow these rules to ensure maximum safety. 

•  

Do not smoke near or in your AIR OPUS

®

.

  Always observe the safety instructions for the appliances used within your AIR OPUS

®

.

  Keep exits clear.

  Never allow children to play near lighted appliances. 

  Please ensure you are fully aware of the dangers of carbon monoxide poisoning and take 

    precautions at all times. 

ALTERATIONS

Alterations made to the AIR tent are made at the owner’s risk and will invalidate your warranty.


4

Summary of Contents for OFC195B-102

Page 1: ...AIR TENT AWNING HANDBOOK Tent Model No OFC195B 195 Awning Model No OFC195B 102 OFC195C AO UM 0717 Rev B...

Page 2: ......

Page 3: ...Down 4 Weathering Fabric 5 Inflation 6 Deflation 7 Safety AIR TENT BUNGEE SECURING POINTS AIR AWNING 1 Parts List 2 Assembly 3 Pack Down TROUBLESHOOTING 1 Pump 2 Other WARRANTY WOOD MAINTENANCE IF FIT...

Page 4: ...e the pump will automatically cut out 9 Disconnect pump hose from inflation valve and fit inflation valve screw cap to prevent any loss of tent pressure 10 Close all internal valves keep valves closed...

Page 5: ...t damp canvas will develop mildew mould very quickly and damage your canvas permanently The inside and outside of your AIR tent can be cleaned but only with fresh clean water and a damp cloth UNDER NO...

Page 6: ...STRUCTION WILL RESULT IN BLADDER FAILURE Please note that it may be necessary to monitor the AIR pressure in your AIR tubes from time to time especially if the weather is fluctuating or the temperatur...

Page 7: ...it is wet please dry it as soon as possible to avoid damage to the fabric and components Open all internal AIR valves Then open all external AIR valves found in the external valve pockets There are 5...

Page 8: ...ENSURE THAT BUNGEES ARE PULLED SIDEWAYS RATHER THAN DIRECTLY DOWN TO EXTEND THEM INITIALLY BEFORE PULLING THEM OVER THE CLEATS THIS WILL PREVENT THE EYELETS FROM CATCHING ON THE BUNGEES AND CAUSING DA...

Page 9: ...centre roof supports Securing 4 points in total 2 on each bed end As shown below titled CENTRE ROOF SUPPORTS REAR 6 Locations to be used as shown in green and numbered below OUTER ROOF SUPPORTS CENTR...

Page 10: ...R awning onto the zip on the front of the AIR tent The zip is located under the flap above the front door 5 Temporarily peg the 4 corners of the flysheet in line with your AIR OPUS tent You may need t...

Page 11: ...ays and entrances Adjust the guy lines and storm straps as necessary 14 Your AIR awning includes a groundsheet which may be used by carefully matching its Velcro to the relevant Velcro on the awning f...

Page 12: ...the Velcro patches attaching the AIR tent and the AIR awning Then unzip the AIR awning from the front zip located on the AIR tent 4 Carefully fold the AIR awning canvas and place it back into carry st...

Page 13: ...e Ensure that all external AIR release valves are in the closed position Ensure that your AIR OPUS leisure battery is fully charged The awning is taking a longer time than usual to inflate Ensure that...

Page 14: ...e resulting from improper storage or maintenance Negligence or damage resulting from unauthorised repairs Bladder damage including but not limited to over inflation unnecessary release of the sealed z...

Page 15: ...or commercial use by rental companies Transportation or shipment costs to and from the manufacturer or their recognised agents dealers for repair or assessment against a warranty claim THIS DOES NOT A...

Page 16: ...RE The surfaces of the timber worktops have been finished with specifically formulated oil The oil is formulated to be safe for the preparation of food and to enhance the wood colour and grain pattern...

Page 17: ...s Conditions and Warranty information can be found online at www opuscamper co uk terms conditions html Photographs and diagrams are for illustration purposes only Actual product may vary and any spec...

Reviews: