background image

8

PREFLIGHT INSTRUCTIONS

The pocket drone is assembled and ready for use. Always follow preflight 
instructions and ensure battery pack is fully charged.

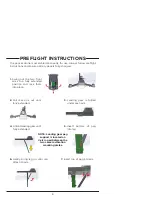
1.  

Swing  out  the  two  front 
arms to a fully extended 
position  and  lock  them 
into place. 

2. 


Pull rear arm out until 
fully extended.

3.  

Landing gear is folded 
under each arm.

4. 

 Unfold landing gear until 
fully extended. 

5. 

 Insert  bottom  of  peg 
into leg.

6. 

 Gently  bring  leg  up  until  can 
attach to arm. 

7. 

Insert top of peg into arm.

NOTE: Landing gear peg 

support is located on 

Velcro pad between the 

two camera vibration 

mounting plates.

Summary of Contents for Pocket Droid

Page 1: ...OPERATIONS MANUAL Version 1 0 ...

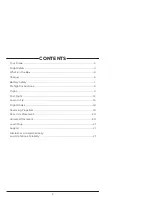
Page 2: ...6 Battery Safety 7 Preflight Instructions 8 Flight 11 Post Flight 12 Learn to Fly 13 Flight Modes 18 Replacing Propellers 19 Rear Arm Placement 20 Camera Attachment 20 Learn More 21 Support 21 Disclaimer Limited Warranty and Limitation of Liability 21 CONTENTS ...

Page 3: ...ng your flying experience to new heights The Pocket Drone is the world s first multicopter that is powerful enough to carry a high quality action camera and folds up smaller than a 7 inch tablet Your personal flying robot will enable you to capture breathtaking aerial video and photos everywhere you go Please read all instructions carefully before turning on your drone for the first time and happy...

Page 4: ...emities near propellers while the drone is armed This can cause severe damage to yourself as well as to the drone Always turn on the controller before turning on the drone This will help you avoid the drone making any uncontrolled movements Do not turn off the transmitter until you have disconnected the battery When the battery is connected always assume the vehicle is live and the motors are arme...

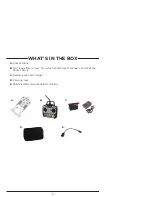
Page 5: ...A Pocket Drone B RC Transmitter Flysky T6 which allows direct manual control of the Pocket Drone C Battery pack and Charger D Carrying case E USB telemetry module USB OTG cable WHAT S IN THE BOX A B C E D ...

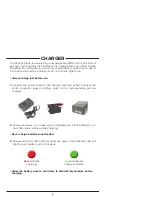
Page 6: ...rger and wall outlet Connect the white connector plug on battery pack to the corresponding port on charger 2 Charge batteries in an open well ventilated area Place batteries on a non flammable surface while charging 3 Charge until all 3 LED indicator lights are green One indicator LED will light for each battery cell in the pack Red indicates charging Green indicates charge complete Always charge ...

Page 7: ...tteries in series Always charge a battery pack individually Store batteries in a cool dry place at room temperature between 40 and 80 degrees F for best results Never store batteries in a vehicle in extreme temperatures Do not expose battery packs to direct sunlight or heat Before charge or use of batteries always make a visual inspection of the battery pack Look for any damaged leads connectors b...

Page 8: ... a fully extended position and lock them into place 2 Pull rear arm out until fully extended 3 Landing gear is folded under each arm 4 Unfold landing gear until fully extended 5 Insert bottom of peg into leg 6 Gently bring leg up until can attach to arm 7 Insert top of peg into arm NOTE Landing gear peg support is located on Velcro pad between the two camera vibration mounting plates ...

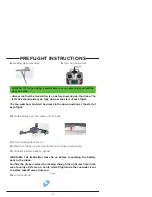
Page 9: ...ll be preset in the down position at the start of each flight WARNING The transmitter must be on before connecting the battery pack to the drone Confirm the drone is armed by looking through the right rear hole in the case to verify LED s are on Verify which flight mode the controller is set to before takeoff away from you 14 Arm the drone 10 Slide battery box into place until it locks 11 Point an...

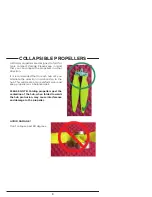
Page 10: ...on It is recommended that for each hub set you alternate the direction in relationship to the hub This will create a more uniform wear and keep propellers as a balanced pair AVOID DAMAGE Don t collapse past 90 degrees PLEASE NOTE Folding propellers past the centerline of the hub when folded towards the hub protrusion may cause interference and damage to the propeller ...

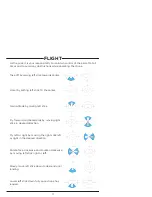
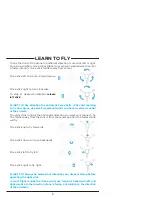
Page 11: ... by setting left stick To the center Gain altitude by raising left stick Fly forward and backwards by moving right stick in desired direction Fly left or right by moving the right stick left or right in the desired direction Rotate face clockwise and counter clockwise by moving left stick right or left Slowly move left stick down to descend until landing Lower left stick down fully once drone has ...

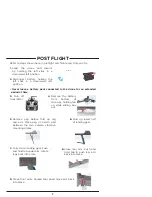
Page 12: ...ck into place 8 Close rear arm Push and hold tab to push rear arm back into place 5 Remove peg before fold up leg and arm Place peg on Velcro pad between the two camera vibration mounting plates 6 Fold up lower half of landing gear 3 Turn off transmitter 4 Remove the battery from bottom of drone by holding tab up while sliding box out Disarm 1 Land the drone and disarm by holding the left stick in...

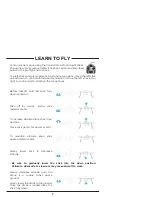
Page 13: ...he drone faces Before takeoff hold left stick fully down centered Take off by gently raising stick towards center To maintain altitude keep stick approximately center To increase altitude place stick in up position Move stick gently for slower accent Slowly lower stick to decrease altitude Slowly decrease altitude until the drone is a couple inches above ground Slowly lower the drone to the ground...

Page 14: ...ll move forward backward left and right relative to the direction drone is facing not relative to the direction of the operator The right stick controls the horizontal direction you want your drone to fly The further away from the stick is from the center position the faster drone will fly Move stick left to turn counterclockwise Move stick right to turn clockwise To stop at desired orientation re...

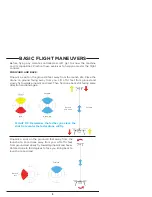
Page 15: ... feet from ground and slowly fly towards pinpoint and land Then fly drone back still facing same direction and land again Lift off Forward Land Backward FLIGHT TIP Remember the farther you place the stick from center the faster drone will fly Rotate and back Forward Forward Rotate left Pinpoint a spot on the ground 8 feet away from the launch site Face drone away from you Lift off 4 feet from grou...

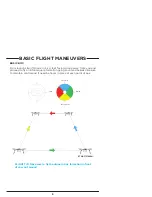
Page 16: ...oceed to fly an 8 foot square formation going counter clockwise Be sure to maintain control and if need be hover in place at each point of box Forward Backwards Right Left START FINISH FLIGHT TIP Make sure to fly the drone in box formation in front of you not around BASIC FLIGHT MANEUVERS ...

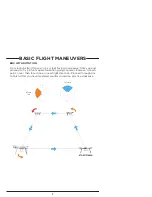
Page 17: ...eet facing drone away from you and proceed to fly a 8 foot square formation going counter clockwise At each point hover then face drone in new flight direction Proceed through box to finish After you have mastered counter clockwise practice clockwise Forward Rotate left START FINISH ...

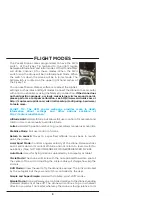
Page 18: ...d Holds altitude but allows full user control of movement and rotation User can manually override altitude Loiter Holds GPS position relative to ground Allows manual user override Stabilize Mode Full user control of drone Return to Launch Moves to a specified altitude moves back to launch point then lands Acro Sport Mode Controls angular velocity of the drone Release sticks and it will maintain it...

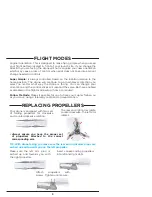
Page 19: ...same Both are enabled or disabled in the flight mode setup from a computer Follow Me Mode Makes it possible for you to have your copter follow you as you move using a telemetry radio and a ground station REPLACING PROPELLERS Your drone is equipped with two sets of folding propellers for clockwise and counterclockwise rotation The rear and right arms rotate counterclockwise The left arm rotates Alw...

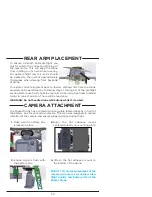
Page 20: ...le using free hand to adjust motor to correct position There will be resistance WARNING Do not handle drone while drone while it is armed FLIGHT TIP Correct placement of the camera will ensure a smoother video flight quality and battery life of the Pocket Drone CAMERA ATTACHMENT The Pocket Drone has a camera mounting plate located directly in front of the battery box for your action camera This ar...

Page 21: ...duct or other property and cause serious injury Please read this disclaimer carefully before using the Product By keeping your Product you agree to be bound by the terms set forth herein and agree that you are responsible for your conduct while operating the Product and for any resulting injury or damage If you do not agree to these terms do not keep your Product and contact Air Droids Inc for a r...

Page 22: ...placed free of charge Service or replacement decisions are at the sole discretion of Air Droids Inc E Questions Assistance and Services Your local hobby store cannot provide warranty support or service for the Product Once assembly setup or use of the Product has been started you must contact AirDroids Inc directly This will enable Air Droids Inc to better answer your questions in the event that y...

Page 23: ...you agree that you are responsible for the attachment and use of any camera in connection with the Product and for any resulting claims for damages by any third party arising out of or related to the attachment and use of any such camera B Do not use the Product to defame abuse harass stalk threaten or infringe in any way upon the legal rights of others C Do not photograph or film people on privat...

Page 24: ...24 For the most up to date flight and control information register your product with AIrDroids and check the AirDroids website for updates Printed December 2014 ...

Page 25: ...Click below to find more Mipaper at www lcis com tw Mipaper at www lcis com tw ...

Reviews: