background image


OPERATING THE FAN 

Check the fan before switching it on! 

Risk of injury:

 The fan can only be operated if no defects have been found upon inspection.   

In case a part is defective, it will have to be replaced before using the fan. 

Check that the fan is in safe operating condition: 

-

  Check to make sure that there are no visible defects. 

-

  Verify that all parts are properly installed and fastened.


Remote Control 

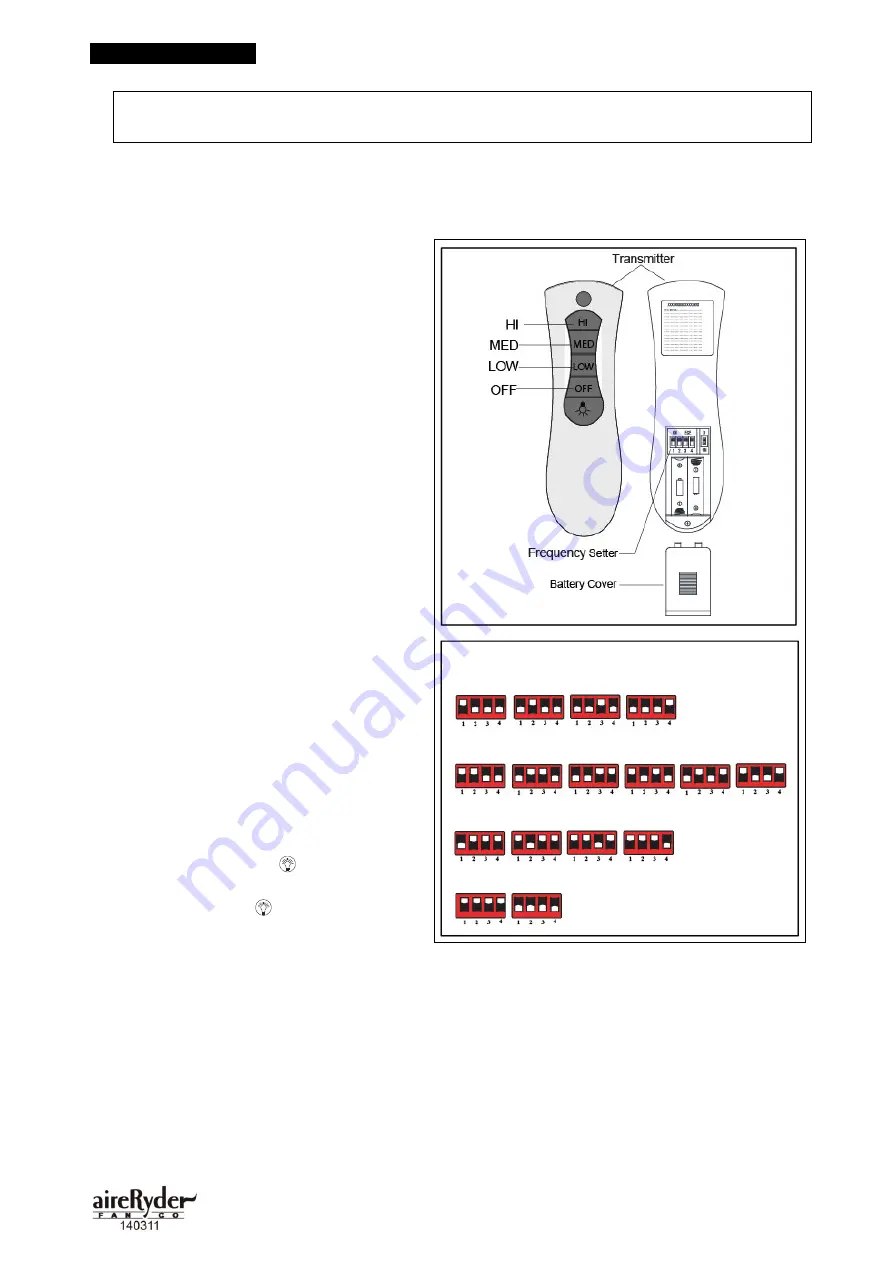
Step 1: Set the frequency 

The frequency setter is located under the 
battery cover. 
Initially, all 4 keys are set in upward position. If 
more than one remote-controlled fan is installed 
or if frequency interference occurs, the fan may 
function abnormally. In this situation, reset the 
fan frequency as follows: 
1. Remove battery cover. 
2. Use a pen (or any convenient tool) to switch 
keys to select a frequency mode which will not 
interfere with other electronic devices. There 
are 15 frequency modes available excluding 
the original ex-factory mode (see illustration). 
Note: Set different remote-controlled fans in 
one building at different frequency modes. 

Step 2: Program the fan 

1. Install two AAA batteries (not included) into 
the transmitter. 
2. Turn on the power to the fan. 
3. Within 30 seconds after power is turned on, 
press and hold the "OFF" button for 5 seconds. 
Once the code has been set successfully, the 
fan will make a "beep" sound.   

Step 3: Operate the transmitter 

* Press "HI" to turn on the fan to high speed. 
* Press "MED" to turn the fan to medium speed. 
* Press "LOW" to turn the fan to low speed. 
* Press "OFF" button to turn off the fan. 
* Press and release the            button quickly 
to turn on or turn off the light.   
* Press and hold the            button to dim or 
brighten lights to the desired level. 
 

Important: Energy saving (CFL) light bulbs are not recommended for this item. 


Note: 

This remote control has a memory function for the fan light.


If the fan light is switched off using the remote control, it will return to the same level of 
brightness when switched on again. 


If the power is switched off using the main power switch, the light will turn back on to full 
brightness when the main power is switched on again. 


1 key in upward position: 

2 keys in upward position: 

3 keys in upward position: 

4 keys in upward or downward position: 

Summary of Contents for eFan FN4113 Series

Page 1: ...ts are prohibited This product is not intended for use by persons including children with reduced physical sensory or mental capabilities or lack of experience and knowledge unless they have been given supervision or instruction concerning the use of the product by a person responsible for their safety Children should be supervised to ensure that they do not play with the product Electrical safety...

Page 2: ...as to be kept clear of any objects at all times Be careful when working near the rotating blades FAN OVERVIEW 1 Fan assembly 2 Blade set 3 Canopy 4 Fan light housing 5 Glass shade UNPACK THE FAN Unpack the fan and check that contents are complete Dispose of packaging see also Disposal Important When unpacking and installing the ceiling fan do not rest the fan on its blades Pressure on the blade se...

Page 3: ...sition 4 Hang the fan assembly with the ball joint onto the mounting bracket Make sure the guide pin of the bracket is fitted into the corresponding slot of the ball joint You should feel the guide pin setting into the slot of the ball joint Note For slope ceiling installation make sure the guide pin of the hanger bracket is toward the floor 5 Terminal block wire connections First loosen the screw...

Page 4: ...d fans in one building at different frequency modes Step 2 Program the fan 1 Install two AAA batteries not included into the transmitter 2 Turn on the power to the fan 3 Within 30 seconds after power is turned on press and hold the OFF button for 5 seconds Once the code has been set successfully the fan will make a beep sound Step 3 Operate the transmitter Press HI to turn on the fan to high speed...

Page 5: ...can lead to the fan not functioning safely This can cause a hazard for yourself and your environment Most malfunctions are caused by small errors which you can easily resolve by yourself Please check the following table before contacting your retailer This way you can spare yourself a lot of effort and cost Malfunction Underlying cause error Solution Fan does not turn Fan switched off Switch on fa...

Page 6: ...eien Betrieb sicherzustellen Umbauten eigenmächtige Veränderungen am Gerät sowie die Verwendung nicht zugelassener Teile sind untersagt Kinder Personen mit eingeschränkten geistigen Fähigkeiten sowie Personen mit mangelnder Kenntnis oder Erfahrung im Umgang mit dem Deckenventilator sind vom Gerät fernzuhalten Elektrische Sicherheit Eine Elektroinstallation darf nur durch eine Elektrofachkraft unte...

Page 7: ...AS GERÄT IM ÜBERLICK 1 Ventilatorgerät 2 Rotoreinheit 3 Abdeckung 4 Leuchtengehäuse 5 Leuchtenschirm AUSPACKEN Gerät auspacken und auf Vollständigkeit prüfen Verpackung entsorgen siehe auch Entsorgung Wichtig Stellen Sie das Gerät beim Auspacken und der Installation auf keinen Fall auf den Rotorblättern ab Druck kann die Rotoreinheiten verformen was im Betrieb Vibrationen verursacht Lieferumfang I...

Page 8: ...e die Decken ventilatoreinheit mit der Kugel aufhängung an den Montagebügel Stellen Sie sicher dass der Stift am Montagebügel in die Nut der Kugelaufhängung einrastet Hinweis Bei Anbringung an einer schrägen Decke müssen Nut und Stift an der unteren Seite sein 5 Lüsterklemmenverbindung Lösen Sie zunächst die Schrauben an den Lüsterklemmen so dass die Kabel aufgenommen werden können Stellen Sie sic...

Page 9: ...Geräte im selben Gebäude Schritt 2 Programmieren des Gerätes 1 Setzen Sie zwei AAA Batterien nicht im Lieferumfang enthalten in die Fernbedienung ein 2 Schalten Sie die Stromzufuhr zum Decken ventilator ein 3 Drücken sie innerhalb von 30 Sekunden die OFF Taste halten Sie diese für 5 Sekunden gedrückt Bei erfolgreicher Programmierung gibt das Gerät einen Piepton ab Schritt 3 Bedienung der Fernbedie...

Page 10: ...nd ihre Umgebung Oft sind es nur keline Fehler die zu einer Störung führen Meistens können Sie diese leicht selbst beheben Bitte sehen Sie zuerst in der folgenden Tabelle nach bevor Sie sich an den Verkäufer wenden So können Sie sich viel Mühe und eventuell auch Kosten ersparen Fehler Störung Ursache Abhilfe Gerät läuft nicht Gerät ausgeschaltet Gerät einschalten Keine Netzspannung Sicherung prüfe...

Reviews: