background image

If you have difficulty operating your new ceiling fan, it may be the result of incorrect assembly, installation 

or wiring. If you experience any faults, please check this Trouble Shooting Guide. If a problem cannot be 

remedied or you are experiencing difficulty in installation, please call our Customer Service Department 

(1-800-887-6326). 

PROBLEM

1. If fan does not start:

2. If fan sounds noisy:

3. If fan wobbles:

4. If light does not work:

1. Check main and branch circuit fuses or circuit breakers.

2. Make sure forward/reverse switch is firmly in bottom or top position. Fan will not 

    operate when switch is in the middle.

3. Make sure that the wall control is turned "ON".  

4. Check line wire connections to fan and switch wire connections in switch housing.

    CAUTION: Make sure main power is turned off.

1. Make sure all screws in motor housing are snug. (not over tightened)

2. Make sure the screws which attach the fan blade bracket to the motor are tight.

3. Make sure wire connectors in switch housing are not rattling against each 

    other or against the interior wall of the switch housing.


CAUTION: Make sure main power is turned off before accessing switch housing.

4. If using an optional ceiling fan light kit, make sure the screws securing 

    the glassware are finger tight. Make sure light bulb is tight in socket and 

    not touching glass shade(s). If vibration persists from glass, remove glass and

    install a 1/4 in. Wide rubber band on glass neck to act as an insulator. Replace 

    glass and tighten screws against rubber band.

5. Some fan motors are sensitive to signals from Solid State variable speed 

    controls. DO NOT USE a Solid State variable speed control.

6. Allow "break-in" period of 24 hours. Most noises associated with a new fan will 

    disappear after this period. 

All blades are weighed and grouped by weight. Natural woods vary in density 

which could cause the fan to wobble even though all blades are weight-matched. 

The following procedures should eliminate most of the wobble. Check for wobble 

after each step.

1. Check that all blades are screwed firmly into blade holders.

2. Check that all blade brackets are tightened securely to motor.

3. Make sure that canopy and hanger bracket are tightened securely to ceiling

    junction box and junction box is mounted firmly to ceiling joist.

4. Most wobble problems of fan are caused when blades are not in equal level. To 

    check the blade levels, select a point on the ceiling above the tip of any blade. 

    Measure the distance from the ceiling to the blade tip, to an accuracy of 1/8 

    inch. Rotate the blades until the next blade is in the measuring position. Repeat 

    measurement for each blade. If all blade levels are not equal, you can adjust 

    blade levels by the following procedure. To adjust a blade tip down, insert a 

    washer (not supplied) between the blade and blade bracket at the screw

    closest to the motor. To adjust a blade tip up, insert washer (not supplied) 

    between the blade and blade bracket at the two screws farthest from the motor.

5. Interchanging two adjacent blades could redistribute the weight and possibly result 

    in smoother operation.

1. Check blue wire from fan to make sure it is connected to hot wire from supply wire 

    coming out of the ceiling.

2. Check for loose or disconnected wires in fan switch housing.

3. Check for loose or disconnected wires in light kit.

4. Check for faulty light bulbs.


CAUTION: Make sure main circuit is turned off before entering switch housing. 


SUGGESTED  REMEDY

F   A   N         C   O

180725

PAGE: 8 / 9

Trouble Shooting Guide

Summary of Contents for F0003

Page 1: ...vices If the original purchaser ceases to own the Fan this warranty and any implied warranty including but not limited to any implied warranty of merchantability or fitness for a particular purpose become void This warranty and any implied warranty including but not limited to any implied warranty of merchantability or fitness for a particular purpose do not cover glass globes light bulbs or finis...

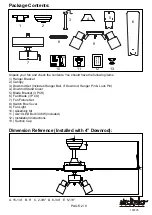
Page 2: ... Stand Cover 5 Blade Bracket 3 PCS 6 Fan Blade 3 PCS 7 Fan Fixture Set 8 Switch Box Cover 9 Fan Light 10 Assembly Kit 11 GU10 LED Bulb 3X6W included 12 Installation Instructions 13 Suction Cap Package Contents Dimension Reference Installed with 4 Downrod A 15 1 4 B 8 C 2 3 8 D 6 3 4 E 5 1 8 Installation Instructions 1 5 6 8 7 9 2 3 4 X10 10 11 12 13 F A N C O 180725 PAGE 2 9 ...

Page 3: ...t Up to 23 degrees Exploded View Detail Dual Mount Options Hanger Bracket Canopy Downrod Downrod Stand Cover Hanger Ball Collar Lock Pin Housing Hanger Pin Blade Bracket Switch Box Blade Fan Light Light Bulb F A N C O 180725 PAGE 3 9 ...

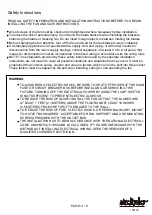
Page 4: ...eant to cover all possible conditions and situations that may occur It must be understood that common sense caution and care are factors which can not be built into this product These factors must be supplied by the person s installing caring for and operating the fan TO AVOID RISK OF ELECTRIC SHOCK BE SURE TO SHUT OFF POWER AT THE MAIN FUSE OR CIRCUIT BREAKER BOX BEFORE INSTALLING OR SERVICING TH...

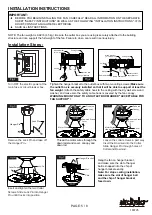
Page 5: ...hip of hanger bracket face down Remove the Lock Pin and take off the Hanger Pin Fig 3 Insert and tighten the two Collar Screws Slide Lock Pin into Hanger Pin until it locks into position Fig 6 Lock Pin Collar Screws Slot Chip Hanger Bracket Fig 7 Loosen the collar screws in part way Insert the Downrod into the Collar Slide Hanger Pin through holes of Collar and Downrod Hanger Pin Motor Wires Downr...

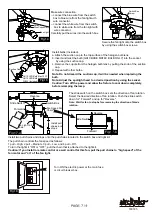
Page 6: ...ld be spread apart with the grounded wires on one side of the outlet box and the ungrounded wires on the other side of the outlet box After the connections have been made the wires should be turned upward and pushed carefully up into the outlet box Decorative Cap Rubber washer Fig 13 Switch Box Screw Switch Box Cover Install without fan light Make sure the wires of the fan light in the switch box ...

Page 7: ...re to cool down completely before relamping the lamp Secure the fan light onto the switch box by using the switch box screws GU10 LED Bulb Max 10W GU10 LED Bulb 3X6W included Suction Cap Fig 16 Switch Box Fan Light Wire Connector Fig 14 The slide switch on the switch box sets the direction of fan rotation Select the desired direction of fan rotation Push the slide switch down for Forward and up fo...

Page 8: ...ol 6 Allow break in period of 24 hours Most noises associated with a new fan will disappear after this period All blades are weighed and grouped by weight Natural woods vary in density which could cause the fan to wobble even though all blades are weight matched The following procedures should eliminate most of the wobble Check for wobble after each step 1 Check that all blades are screwed firmly ...

Page 9: ...low Turn the fan off Select one blade and place the plastic clip on it where the plastic clip locates is halfway between the blade bracket and the blade tip on the edge of the blade Caution The plastic clip should be placed on the windward edge of the blade for fear of clip s flying off Turn the fan on set the speed that causes the wobble most Observe if the wobble is better or worse Turn the fan ...

Reviews: