background image

PAGE: 7 / 9

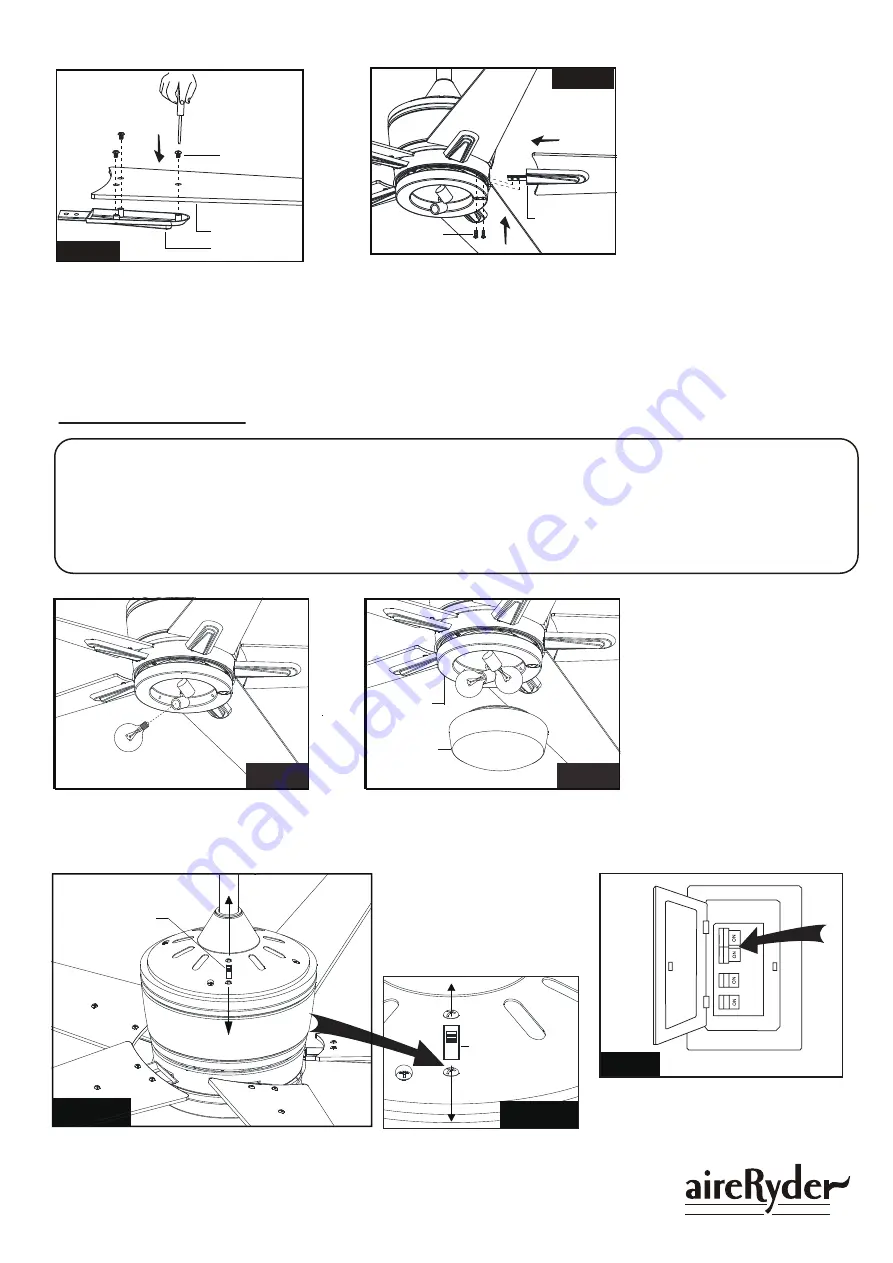
Fig.19

Turn ON the electric circuit at the 

main fuse or circuit breaker box.

The slide switch sets the direction of fan rotation. Select the desired 

direction of fan rotation. Push the slide switch bottom for " Forward" 

and top for "Reverse".

Reverse

Forward

Reverse

Forward

Fig.18-a

Slide Switch

Slide Switch

Install bulbs (included). See relamping

label at socket area or packaging for

maximum wattage.

Bulb Type G Max.60W 

       (included)

Fan Light Installation:

WARNING:

As per EPACT 2005 requirements, this fan light has a built-in current limiting device to conserve

energy. The fan light will not operate if the combined wattage of the installed bulbs exceeds 190

Watts. If the fan light shuts off shortly after being switched on, it may be due to excessive current

demand. You should replace the light bulbs with lower wattage bulbs.

Fig.16

Fig.17

Glass Shade

Fan Fixture

Outside rim of glass shade has 

three raised strips separated by 

three flat areas. To lock glass 

shade to fan fixture, align the 

three bumps on inner rim of fan 

fixture with three flat areas on 

outside rim of glass shade and 

carefully raise glass shade into 

fan fixture. Hold and twist glass 

shade clockwise until the glass 

shade is firmly locked in place. 

Fig.18-b

F   A   N        C   O

140819

Insert the blade bracket through the 

slot on the fan fixture set. Align holes 

and fasten blade bracket to the fan 

fixture set with screws. Repeat for 

remaining blade brackets.

Suggest: Using magnetic Philips 

screwdriver.

Thread the blade screws through the

blade and the blade bracket. Tighten 

all blade screws securely. Repeat to 

other blade. 

Fig.14

Blade
Blade Bracket

Blade Screw

Screw

Blade Bracket

Fig.15

Summary of Contents for F0028

Page 1: ...es If the original purchaser ceases to own the Fan this warranty and any implied warranty including but not limited to any implied warranty of merchantability or fitness for a particular purpose become void This warranty and any implied warranty including but not limited to any implied warranty of merchantability or fitness for a particular purpose do not cover glass globes light bulbs or finish o...

Page 2: ...5 PCS 6 Fan Blade 5 PCS 7 Fan Fixture Set 8 Glass Shade 9 Assembly Kit 10 Remote Control Set Includes Transmitter Receiver 11 Type G Bulb Max 60W 2 PCS 12 Installation Instructions Package Contents Dimension Reference Installed with 6 Downrod A 19 1 4 B 14 C 2 1 8 D 9 1 2 E 5 7 8 12 Installation Instructions 1 5 6 8 7 9 2 3 4 11 PAGE 2 9 FA N O F F LIGHT ON OFF DIMMER H I M E D L O W 10 F A N C O ...

Page 3: ... 23 degrees Exploded View Detail Triple Mount Options Hanger Bracket Canopy Downrod Downrod Stand Cover Hanger Ball Collar Lock Pin Fan Fixture Set Hanger Pin Blade Bracket Blade Glass Shade Light Bulb Ceiling Mount F A N C O 140819 PAGE 3 9 ...

Page 4: ...ion instructions are not meant to cover all possible conditions and situations that may occur It must be understood that common sense caution and care are factors which can not be built into this product These factors must be supplied by the person s installing caring for and operating the fan TO AVOID RISK OF ELECTRIC SHOCK BE SURE TO SHUT OFF POWER AT THE MAIN FUSE OR CIRCUIT BREAKER BOX BEFORE ...

Page 5: ...he Collar Slide Hanger Pin through holes of Collar and Downrod Hanger Pin Motor Wires Downrod Downrod Stand Cover Collar Canopy Fig 6 Motor Wires Downrod Downrod Stand Cover Canopy Fig 5 BEFORE YOU BEGIN INSTALLATION CAREFULLY READ ALL INFORMATION PROVIDED ON THE SAFETY INSTRUCTIONS AND INSTALLATION INSTRUCTIONS IF IN DOUBT CONSULT A QUALIFIED ELECTRICIAN SAVE ALL INSTRUCTIONS Fig 3 Fan Fixture Se...

Page 6: ...the green ground wire from the Hanger Bracket with a wire nut Make sure all of wire nuts are connected firmly Put all wire nuts and wires carefully up into the Outlet Box EXCEPT antenna which should remain outside Outlet Box Fig 10 Move ground wires a outlet box wires b and motor wires c away from the center of the hanger bracket Then slide receiver through hanger bracket as shown Antenna end firs...

Page 7: ... it may be due to excessive current demand You should replace the light bulbs with lower wattage bulbs Fig 16 Fig 17 Glass Shade Fan Fixture Outside rim of glass shade has three raised strips separated by three flat areas To lock glass shade to fan fixture align the three bumps on inner rim of fan fixture with three flat areas on outside rim of glass shade and carefully raise glass shade into fan ...

Page 8: ...rn the fan in medium speed Press LOW button to turn the fan in low speed Press FAN OFF button to turn off the fan Press and release the LIGHT ON OFF DIMMER button quickly to turn on or off the light Press and hold the LIGHT ON OFF DIMMER button to dim or brighten lights to the desired level and release and the brightness level will be memorized Turn on the light again then fan light will restore o...

Page 9: ...a Solid State variable speed control 6 Allow break in period of 24 hours Most noises associated with a new fan will disappear after this period All blades are weighed and grouped by weight Natural woods vary in density which could cause the fan to wobble even though all blades are weight matched The following procedures should eliminate most of the wobble Check for wobble after each step 1 Check t...

Page 10: ...to be in line with the other blades After following all the steps and if the wobbling problem is not solved a dynamic balancing needs to be done by balancing kit Follow the procedure listed below Turn the fan on and adjust the speed control usually high speed setting to the speed which creates the greatest wobble Turn the fan off Select one blade and place the balance clip on it halfway between th...

Reviews: