background image

DYNAMIC BLADE BALANCING KIT

PREFACE

Your ceiling fan may sometimes have wobbling problems when operating due to irregularity in the

blades or the blade brackets. Improper assembly in the mounting system may cause some additional 

problems. This balancing kit can be used to fix wobbling problems. 

DYNAMIC BLADE BALANCING KIT FOR CEILING FANS

1. Make sure that all blades are firmly screwed into the blade brackets.

2. Make sure that all blade brackets are firmly secured to the 

motor housing

.

3. By looking up at the fan from below, check and be certain that none of the blade brackets are bent 

    and that none of the blades are out of position. 

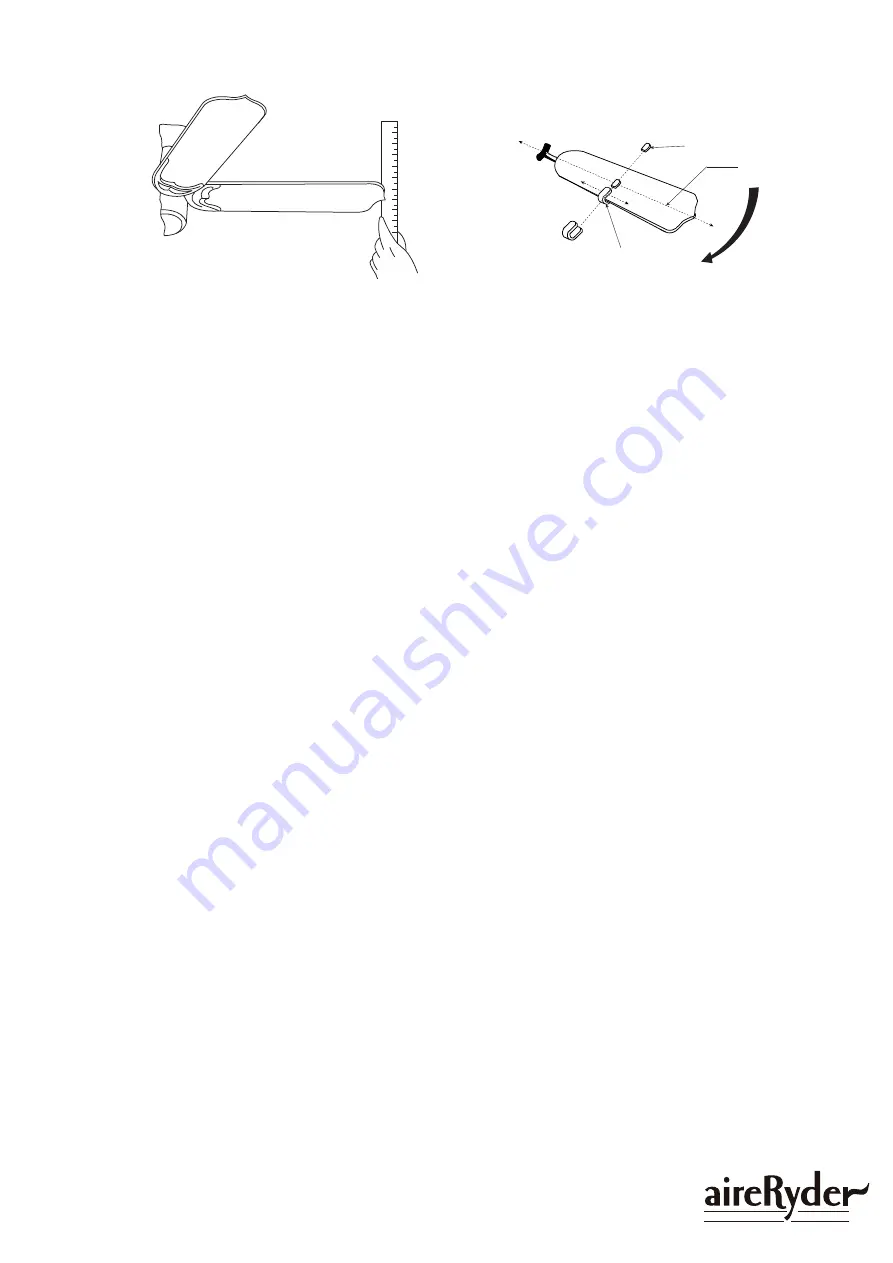
4. Use a yardstick to check the blade tracking. Put the yardstick up against the ceiling vertically and 

    against the outside leading edge of a blade. Note the distance of the edge of blade to the ceiling. 

    Carefully turn the blades slowly by hand to check the remaining blades. 

All distances should be

    the same.

Operate the fan ten minutes. After following all the steps and if the wobbling problem is not solved, a 

dynamic balancing needs to be done by balancing kit. Follow the procedure listed below:

● Turn the fan off. Select one blade and place the plastic clip on it, where the plastic clip locates is 

   halfway between the blade bracket and the blade tip on the edge of the blade.


 Caution: The plastic clip should be placed on the windward edge of the blade for fear of

   clip’s flying off.

● Turn the fan on (set the speed that causes the wobble most). Observe if the wobble is better or

    worse. Turn the fan off and move the clip to the next blade. Do the same for all blades and note

    on which blade the clip reduces the wobble most. Place the clip on the blade which showed the

    most improvement. Move the clip inward and outward on this blade and operate the fan to find 

    the position where the clip gives the most improvement.


Caution: Stay clear of the blades. If the clip, for any reason, is not secure, injury could result .

● Once the exact position is determined, place a weight on the top of the blade, on its centerline and 

    most close to the clip. Peel the paper off of the back of the weight and press firmly to ensure that 

    it is securely attached to the blade. Remove the clip.  

    Caution: Clean the surface of fan blade before placing the balancing weight so that the 

    balancing weight can be firmly attached on it.

BALANCING WEIGHT

MEASURING

POINT

YARDSTICK

PLASTIC CLIP

CENTERLINE

COUNTER-

CLOCKWISE

1
2
3
4
5
6
7
8
9

PAGE: 9 / 9

F   A   N        C   O

171120

Summary of Contents for F0050

Page 1: ...lation services If the original purchaser ceases to own the Fan this warranty and any implied warranty including but not limited to any implied warranty of merchantability or fitness for a particular purpose become void This warranty and any implied warranty including but not limited to any implied warranty of merchantability or fitness for a particular purpose do not cover glass globes light bulb...

Page 2: ...ownrod Hanger Pin Lock Pin 6 Fan Motor Assembly 7 Fan Blades 6 PCS 8 Blade Holder 6 PCS 9 Decorative Plate 6 PCS 10 LED Module 11 Glass Holder 12 Glass Shade 13 Assembly Kit 14 Remote Hand Held Includes battery 15 Blade Balancing Kit 16 Installation Instructions Package Contents 1 Installation Instruction Dimension Reference Installed with 6 Downrod A 15 3 5 B 13 2 5 C 60 for F0050 72 for F0051 D ...

Page 3: ...Ball Hanger Pin Decorative Cap Collar Lock Pin Glass Holder Blade Holder LED Module Glass Shade Exploded View Detail PAGE 3 9 Downrod Mount Slope Ceiling Mount Up to 23 degrees Dual Mount Drawing Fan Blade Fan Motor Assembly Decorative Plate F A N C O 171120 ...

Page 4: ...h can not be built into this product These factors must be supplied by the person s installing caring for and operating the fan TO AVOID RISK OF ELECTRIC SHOCK BE SURE TO SHUT OFF POWER AT THE MAIN FUSE OR CIRCUIT BREAKER BOX BEFORE INSTALLING OR SERVICING THIS FIXTURE TURNING OFF THE ELECTRICAL POWER BY USING THE LIGHT SWITCH IS NOT SUFFICIENT TO PREVENT ELECTRICAL SHOCK TO REDUCE THE RISK OF INJ...

Page 5: ...anopy WARNING MOUNT ONLY TO AN OUTLET BOX MARKED ACCEPTABLE FOR FAN SUPPORT Fig 5 Fig 2 Ceiling Hanger Bracket Ceiling Joist Wood Member 2 x 4 Approx Junction Box Washer Safety Cable Hook Dry Wall Screw Ceiling Hanger Bracket Ceiling Joist Wood Member 2 x 4 Approx Junction Box Thread the motor wires through the downrod stand cover decorative cap canopy and downrod Collar Collar Hanger Pin Hanger P...

Page 6: ... hole in hanger bracket finally secure the canopy to hanger bracket with Fig 11 Fig 11 Fig 12 Motor Screw Washer Blade Holder Remove the motor screws and washers from the motor assembly Secure blade holders to the motor with washers and motor screws previous canopy screw and tighten the other canopy screw Attach the decorative cap to canopy rotate it counterclockwise until tight Decorative Plate B...

Page 7: ...onds press and hold SET button nearby switches The setup is completed after the light of the ceiling fan flashes twice 3 D and ON dip switch The ON selection is the light dimmable selection The D selection is the light on only no dimming function Note The receiver provides protection in the following two situations 1 Lock protection The receiver has a built in protection against obstruction during...

Page 8: ...oods vary in density which could cause the fan to wobble even though all blades are weight matched The following procedures should eliminate most of the wobble Check for wobble after each step 1 Check that all blades are screwed firmly into blade holders 2 Check that all blade holders are tightened securely to motor 3 Make sure that canopy and hanger bracket are tightened securely to ceiling outle...

Page 9: ...low Turn the fan off Select one blade and place the plastic clip on it where the plastic clip locates is halfway between the blade bracket and the blade tip on the edge of the blade Caution The plastic clip should be placed on the windward edge of the blade for fear of clip s flying off Turn the fan on set the speed that causes the wobble most Observe if the wobble is better or worse Turn the fan ...

Reviews: