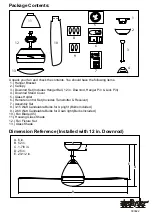
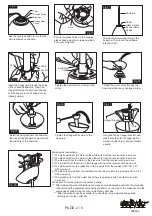
background image

Package Contents:

8

11

13

12

3

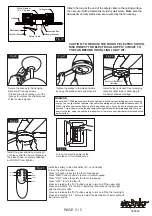
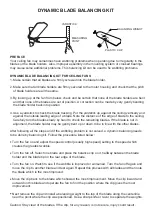
 Dimension Reference (Installed with 12 in. Downrod)

E

B

D

C

2

1

5

4

7

REMOTE 

    CONTROL

U/L

D/L

OFF

HI

MED

LOW

6

F      A      N                     C       O

F      A      N                     C       O

090622

Unpack your fan and check the contents. You should have the following items.
 1.) Hanger Bracket
 2.) Canopy
 3.) Downrod Set (Includes Hanger Ball, 12 in. Downrod, Hanger Pin & Lock Pin)
 4.) Downrod Stand Cover
 5.) Glass Holder
 6.) Remote Control Set (Includes Transmitter & Receiver)
 7.) Assembly Set 
 8.) 3-15 Watt Candelabra Bulbs for Up light (Bulbs Included)
 9.) 2-60 Watt Candelabra Bulbs for Down light (Bulbs Included)
10.) Fan Blade (X5)
11.) Housing Glass Shade
12.) Fan Fixture Set
13.) Glass Shade

9

10

A. 6 in.
B. 52 in.
C. 1-7/8 in.
D. 26 in.
E. 23-1/2 in.

Summary of Contents for FN52238

Page 1: ...stallation services If the original purchaser ceases to own the Fan this warranty and any implied warranty including but not limited to any implied warranty of merchantability or fitness for a particular purpose become void This warranty and any implied warranty including but not limited to any implied warranty of merchantability or fitness for a particular purpose do not cover glass globes light ...

Page 2: ...owing items 1 Hanger Bracket 2 Canopy 3 Downrod Set Includes Hanger Ball 12 in Downrod Hanger Pin Lock Pin 4 Downrod Stand Cover 5 Glass Holder 6 Remote Control Set Includes Transmitter Receiver 7 Assembly Set 8 3 15 Watt Candelabra Bulbs for Up light Bulbs Included 9 2 60 Watt Candelabra Bulbs for Down light Bulbs Included 10 Fan Blade X5 11 Housing Glass Shade 12 Fan Fixture Set 13 Glass Shade 9...

Page 3: ...t Canopy Downrod Glass Holder Housing Glass Shade Hanger Ball Lock Pin Socket Glass Shade Downrod Stand Cover Fan Fixture Set Blade Collar Bulb Type B Max 15W included Bulb Type B Max 60W included Hanger Pin F A N C O F A N C O 090622 ...

Page 4: ...conditions and situations that may occur It must be understood that common sense caution and care are factors which can not be built into this product These factors must be supplied by the person s installing caring for and operating the fan TO AVOID RISK OF ELECTRIC SHOCK BE SURE TO SHUT OFF POWER AT THE MAIN FUSE OR CIRCUIT BREAKER BOX BEFORE INSTALLING OR SERVICING THIS FIXTURE TURNING OFF THE ...

Page 5: ...ctric power at the main fuse or circuit breaker box PAGE 1 5 Gently attach the glass holder onto the housing glass shade Glass Holder Housing Glass Shade Bulb Type B Max 15W included Socket Thread the wires through the assembled housing glass shade Then attach the assembled housing glass shade to the fan fixture set by inserting the collar Adjust the housing glass shade to make the reverse switch ...

Page 6: ...o the black wire from the receiver with a wire nut 3 The blue wire from the motor to the blue wire from the receiver with a wire nut 4 The red wire from the motor to the orange wire from the receiver with a wire nut 5 The white wire from the outlet box to the red wire from the receiver with AC in N with a wire nut 6 The black hot wire from the outlet box to the red wire from the receiver with AC i...

Page 7: ...lower light Press and hold the D L button to adjust the illumination of lower light with the dimmer switch CAUTION TO REDUCE THE RISK OF ELECTRIC SHOCK DISCONNECT THE ELECTRICAL SUPPLY CIRCUIT TO THE FAN BEFORE INSTALLING LIGHT KIT R E M O T E C O N T R O L U L D L O F F H I M E D L O W Turn on the electric power at the main fuse or circuit breaker box F A N C O F A N C O 090622 Fig 19 Attach the ...

Page 8: ...t matched The following procedures should eliminate most of the wobble Check for wobble after each step 1 Check that all blades are screwed firmly into blade holders 2 Check that all blade holders are tightened securely to motor 3 Make sure that canopy and mounting bracket are tightened securely to ceiling junction box and junction box is mounted firmly to ceiling joist 4 If blade wobble is still ...

Page 9: ...reaker box Downrod Stand Cover Downrod Screwdriver Set Screw Glass Holder Housing Glass Shade Housing Glass Shade Bulb Adjust the housing glass shade to make the reverse switch locate in the big notch of the glass holder Secure the glass holder to the collar using the set screw Fig 5 Fig 1 Fig 4 Fig 7 Fig 3 Fig 2 Collar Screwdriver Set Screw Glass Holder Housing Glass Shade Place the housing glass...

Page 10: ...quency modes for selection excluding the original ex factory mode See Fig 2 NOTE Do not set the remote controlled fans at the same frequency in the same building 3 Install a 9V battery not included into the transmitter 4 Turn on the power 5 Press button to operate the fan Please note to change the frequency setters in the transmitter receiver at the same time at the same key position Step 1 Make w...

Page 11: ...to be in line with the other blades After following all the steps and if the wobbling problem is not solved a dynamic balancing needs to be done by balancing kit Follow the procedure listed below Turn the fan on and adjust the speed control usually high speed setting to the speed which creates the greatest wobble Turn the fan off Select one blade and place the balance clip on it halfway between th...

Reviews: