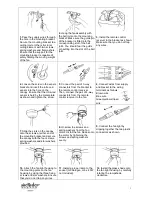
background image


4


OPERATING THE FAN 

Check the fan before switching it on! 

Risk of injury:

 The fan can only be operated if no defects have been found upon inspection.  

In case a part is defective, it will have to be replaced before using the fan. 

Risk of injury:

 Before changing the fan rotating direction, the fan has to be switched off and 

come to a complete stop. 

Check that the fan is in safe operating condition: 

-

  Check to make sure that there are no visible defects. 

-

  Verify that all parts are properly installed and fastened.
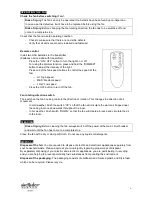


Remote control 

Install two AAA batteries to the transmitter  
(batteries not included with transmitter). 

-

  Press the "ON / OFF" button to turn the light on or off.  

-

  For using the dimmer function, press and hold the "DIMMER" 

button to adjust the intensity of the light. 

-

  Press one of the fan speed buttons to control the speed of the 

fan: 

o

 HI: 

High 

speed 

o

  MED: Medium speed 

o

  LOW: Low speed 

-

  Press the OFF button to turn off the fan. 


Fan rotating direction switch 

The switch on the fan housing controls the direction of rotation. This changes the direction of air 
movement: 

-

  In cold weather: Push the switch “UP” so that the fan will circulate the warm air trapped near 

the ceiling to move downwards throughout the room. 

-

  In hot weather: Push switch “DOWN” so that the fan will create a breeze and circulate the air 

to the room. 


CLEANING 

Risk of injury:

 Before cleaning the fan, always switch off the power at the main circuit breaker 

and wait until the fan has come to a complete stop. 

Clean the fan with a dry or damp soft cloth. Do not use any liquids or detergents.  


DISPOSAL


Disposal of the fan:

 You are required to dispose of electric and electronic appliances separately from 

your household waste. Please inquire at your municipality regarding proper ways of disposal. 

By separately disposing of your electric and electronic appliances, you are participating in recycling 
and you are helping to prevent potentially toxic substances from polluting the environment.  

Disposal of the packaging:

 The packaging consists of cardboard and marked plastic and Styrofoam 

which can be recycled. Please recycle. 


Summary of Contents for PEPEO-FN51133

Page 1: ...ts are prohibited This product is not intended for use by persons including children with reduced physical sensory or mental capabilities or lack of experience and knowledge unless they have been given supervision or instruction concerning the use of the product by a person responsible for their safety Children should be supervised to ensure that they do not play with the product Electrical safety...

Page 2: ...otor housing 2 Fan blades 3 Canopy 4 Fan light housing 5 Glass shade 6 Switch for rotating direction UNPACK THE FAN Unpack the fan and check that contents of are complete Dispose of packaging see also Disposal Contents of packaging Instructions for installation and use Canopy Mounting bracket Screws Motor housing Spring washers Fan blades Flat washers Fan light housing Transmitter for remote contr...

Page 3: ...screw 5 Connect the pair of 3 way connectors from the bracket to the remote control receiver Then connect the pair of 4 way connectors from the remote control receiver to the fan 6 Connect wires from supply and bracket to the wiring terminals as follows Brown wire Blue wire Green yellow striped wire 7 Slide the slots on the canopy onto the screws at either end of the mounting bracket and secure th...

Page 4: ...rection switch The switch on the fan housing controls the direction of rotation This changes the direction of air movement In cold weather Push the switch UP so that the fan will circulate the warm air trapped near the ceiling to move downwards throughout the room In hot weather Push switch DOWN so that the fan will create a breeze and circulate the air to the room CLEANING Risk of injury Before c...

Page 5: ...an does not turn Fan switched off Switch on fan No mains voltage Check circuit breaker Batteries of remote control empty Install new batteries Fan vibrates Fan not installed properly Install fan thoroughly according to installation instructions Light does not work Lamp defective Exchange lamp If you can not resolve the malfunction yourself please ask your retailer directly Please note that the war...

Page 6: ...eien Betrieb sicherzustellen Umbauten eigenmächtige Veränderungen am Gerät sowie die Verwendung nicht zugelassener Teile sind untersagt Kinder Personen mit eingeschränkten geistigen Fähigkeiten sowie Personen mit mangelnder Kenntnis oder Erfahrung im Umgang mit dem Deckenventilator sind vom Gerät fernzuhalten Elektrische Sicherheit Eine Elektroinstallation darf nur durch eine Elektrofachkraft unte...

Page 7: ...use 5 Leuchtenschirm 6 Richtungsschalter AUSPACKEN Gerät auspacken und auf Vollständigkeit prüfen Verpackung entsorgen siehe auch Entsorgung Lieferumfang Gebrauchsanweisung Abdeckung Montagebügel Schrauben Motorgehäuse Federringe Rotorblätter Unterlegscheiben Leuchtengehäuse Fernbedienung Leuchtenschirm Empfänger für Fernbedienung Hinweis Sollte eines der Teile fehlen oder beschädigt sein wenden S...

Page 8: ...ntagebügel und Empfänger der Fern bedienung wie abgebildet Verbinden Sie dann die 4 poligen Stecker zwischen Empfänger und Deckenventilator 6 Verbinden Sie die Zuleitungs kabel mit denen des Montage bügels an der Lüsterklemme wie folgt Braun Blau Grün gelb gestreift 7 Befestigen Sie die Abdeckung am Montagebügel indem Sie die Einschnitte in der Abdeckung auf die Schrauben an beiden Seiten des Büge...

Page 9: ... Gerätes die OFF Taste an der Fernbedienung drücken Richtungsschalter Betätigen Sie den Richtungsschalter am oberen Teil des Motorgehäuses um die Drehrichtung des Deckenventilators zu ändern Dies ändert die Richtung der Luftumwälzung Bei warmem Wetter Richtungsschalter nach unten drücken um eine kühle Brise zu erzeugen Bei kaltem Wetter Richtungsschalter nach oben drücken um die warme Luft von der...

Page 10: ... einschalten Keine Netzspannung Sicherung prüfen Batterien der Fernbedienung leer Neue Batterien einsetzen Gerät vibriert Gerät nicht richtig montiert Gerät sorfgfältig gemäß Installationsanleitung montieren Beleuchtung funktioniert nicht Leuchtmittel defekt Leuchtmittel austauschen Können Sie den Fehler nicht selbst beheben wenden Sie sich bitte direkt an den Verkäufer Beachten Sie bitte dass dur...

Reviews: