background image

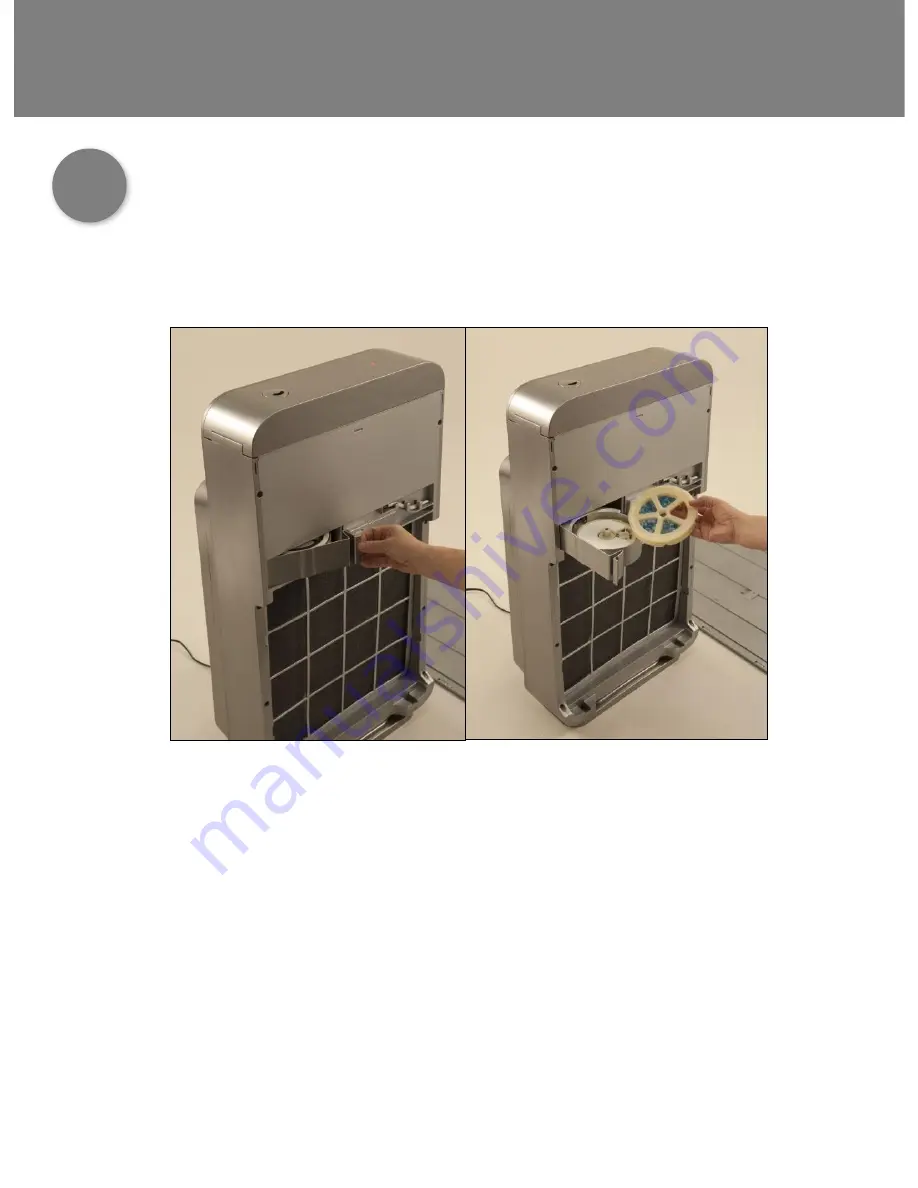
FLOOR UNIT SETUP

1.

Grasp aroma door handle and press to left to release and pull 
open. [Part F]

2.

Remove aroma wheel from packaging. [Part 4]

3.

Place aroma wheel into aroma tray. [Part F]  (CAUTION: The 
wheel is keyed to fit only one way on the aroma tray spindle, 
DO NOT FORCE)

4.

Push aroma door closed until locked in place.

5

Insert aroma tray

F

4

8

F

Summary of Contents for ASWRB100

Page 1: ...ASWRB100 ASWRB300 USE CARE GUIDE ...

Page 2: ... Names 4 Touchscreen Remote Features 5 Floor Unit Setup 10 Care and Maintenance 12 Alerts 13 Error Messages 15 Helpful Hints 16 Important Safety Instructions 18 Floor Unit Specs 19 Touchscreen Remote Specs TABLE OF CONTENTS 1 ...

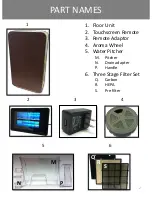
Page 3: ...RT NAMES 1 2 1 Floor Unit 2 Touchscreen Remote 3 Remote Adaptor 4 Aroma Wheel 5 Water Pitcher M Pitcher N Drain adapter P Handle 6 Three Stage Filter Set Q Carbon R HEPA S Pre filter 3 4 5 6 Q R S N 2 P M ...

Page 4: ... D E F G H J K A Mist Output Port B LED Functionality Indicators C Water Tank Latch D Water Tank Lock E Aroma Tray F Water Drain G Piezo Cleaning Brush H Front Panel J Air Outlet K Carrying Handle L Air Intake 3 L C ...

Page 5: ...TOUCHSCREEN REMOTE FEATURES 1 2 3 4 5 6 7 1 Air Purifier 2 Humidifier 3 Aroma 4 Soundscapes 5 Turn All Off Reset Energy Saver 6 Feature Controls 7 Speakers on back of unit 4 ...

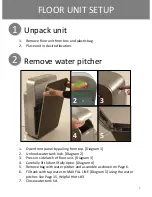
Page 6: ...ly lift lid until fully open Diagram 4 5 Remove bag with water pitcher and assemble as shown on Page 6 6 Fill tank with tap water to MAX FILL LINE Diagram 5 using the water pitcher See Page 15 Helpful Hints 3 7 Close water tank lid 2 Remove water pitcher 5 1 Unpack unit 1 Remove floor unit from box and plastic bag 2 Place unit in desired location 1 2 3 4 5 ...

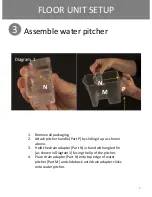
Page 7: ...shown above 3 Hold the drain adapter Part N in hand with angled fin as shown in Diagram 1 facing the lip of the pitcher 4 Place drain adapter Part N onto top edge of water pitcher Part M and slide back until drain adapter clicks onto water pitcher 3 Assemble water pitcher N M 6 P Diagram 1 N ...

Page 8: ...ers 3 Insert Carbon filter Part Q 4 Insert HEPA air filter Part R 5 Insert washable Pre filter Part S Note When installing the filters use pull tabs located on top front of all filters pre filter has side tabs that hold all filters in place These tabs should all be facing outward 4 Install the filters Q R S 7 ...

Page 9: ...se and pull open Part F 2 Remove aroma wheel from packaging Part 4 3 Place aroma wheel into aroma tray Part F CAUTION The wheel is keyed to fit only one way on the aroma tray spindle DO NOT FORCE 4 Push aroma door closed until locked in place 5 Insert aroma tray F 4 8 F ...
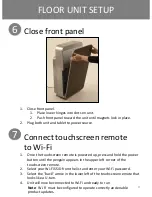
Page 10: ...d up press and hold the power button until the penguin appears in the upper left corner of the touchscreen remote 2 Select your Wi Fi SSID from the list and enter your Wi Fi password 3 Select the back arrow in the lower left of the touchscreen remote that looks like a U turn 4 Unit will now be connected to Wi Fi and ready to run Note Wi Fi must be configured to operate correctly and enable product...

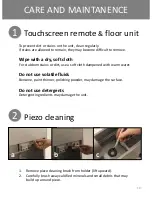
Page 11: ...t use a soft cloth dampened with warm water Do not use volatile fluids Benzene paint thinner polishing powder may damage the surface Do not use detergents Detergent ingredients may damage the unit 1 Touchscreen remote floor unit 2 Piezo cleaning 1 Remove piezo cleaning brush from holder lift upward 2 Carefully brush away calcified minerals and small debris that may build up around piezo a b c 10 ...

Page 12: ...forward to engage fins of water pitcher fully into rails 6 Place one hand on top of the unit and press the water pitcher forward to engage water valve water will drain into water pitcher 7 When pitcher is full pull backward on pitcher to stop water flow 8 Repeat process until the water tank is empty Note Hold pitcher firmly when removing pitcher is heavy when full 9 Reverse steps 1 6 to close drai...

Page 13: ...ALERTS GREEN LED Unit has power and ready to use Please Close the Front Panel RED LED Action Required Front Panel Open Top Lid Open Refill Water Unit Unstable Floor unit unplugged Aroma Tray Open 12 ...

Page 14: ...ners of the Coal filter 3rd filter 5 Replace the HEPA filter and gently push on all four corners so all four corners are properly in position 6 Replace the pre filter and gently push on all four corners so all four corners are properly in position 7 Replace front panel 13 Note Please contact SUPPORT AIRESPA COM for added support Aroma tray error If an AROMA TRAY ERROR displays on the touchscreen r...

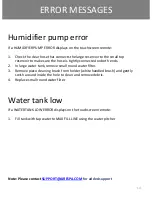
Page 15: ...ervoir to make sure the hose is tightly connected on both ends 2 In large water tank remove small round water filter 3 Remove piezo cleaning brush from holder white handled brush and gently swish around inside the hole to clean and remove debris 4 Replace small round water filter Humidifier pump error If a WATER TANK LOW ERROR displays on the touchscreen remote 1 Fill tank with tap water to MAX FI...

Page 16: ...t holding the water in the small tank tightly push down to make sure the dam is closed 5 Check the white round tube in the top left corner of the small reservoir There is a white piece that looks like a tower On the bottom of that tower there is a round tube like ring That ring floats when there is water in the small reservoir The ring may be stuck or jammed from particles which inhibits the ring ...

Page 17: ...rcuit may occur as a result Do not remove the plug when your hands are wet Do not use this unit near gas appliances or fireplaces When refilling the water tank cleaning the unit or when the unit is not in use be sure to unplug the unit Electrical shock and or fire from a short circuit may occur as a result Do not operate when using aerosol insecticides or in rooms where there is chemical fumes in ...

Page 18: ...ensors may malfunction as a result Frequency of maintenance required descaling will depend on the hardness or the impurities of the water that you use the harder the water the more often descaling will be necessary Keep the unit away from water INSTALLATION GUIDELINES Avoid use in locations where furniture fabrics or other items may come in contact with and restrict the air intake and or air outle...

Page 19: ... 200 Sq Ft Coverage 300 Pre Filter Washable Granular Active Charcoal Honeycomb Odor VOC Filter Non Washable Real HEPA Air Filter 99 6 dbA LOW 38 MED 40 HIGH 46 TURBO 55 HUMIDIFIER with ElectroSanitized Mist Cool Mist Ultrasonic Humidifier Water Tank Capacity 1 25 Gallons Water Tank Run Time 24 Hrs MED dbA 38 Rotating Mist Outlet 90 Degrees Finger Tip Control Water Sanitizing Method UV C Bulb 1 Wat...

Page 20: ... plug end 90 Degree Angle 12 Voltage Watts 120V 60hz 9W Internal Transformer 120V 60hz Power Outlet Adapter UL Certificate 3 120V 60hz Outlets 3 Outlet w 2 Prong Plug Unit Size Weight H 4 750 X W 7 750 X D 1 750 3 lbs Bluetooth V2 1 EDR Wifi Supports 802 11b g CDMA Telit CE910 PCB Accepts Telit CE910 Taoglas Antenna FXP14 HexaBand 2100 mhz Luminance Transducer Yes Certifications CETL UL FCC ROHS C...

Reviews: