ENGLISH
DEUTSCH
FRANÇAIS
IT
ALIANO
ESP
AÑOL
E
N
G
L
IS
H
F
R
A
N
Ç
A
IS
D
E
U
T
S
C
H
E
S
P
A
Ñ
O
L
IT
A
L
IA
N
O
GETTING STARTED
20
Memory Module Upgrade
To increase your notebook's memory capacity (up to 8 GB maximum), additional memory mod-
ules may be installed. The memory upgrade must be a dual-in-line (DIMM) SDRAM module.
Do not remove any screws from the memory upgrade module compartment except for the ones
specifically shown in the directions here.
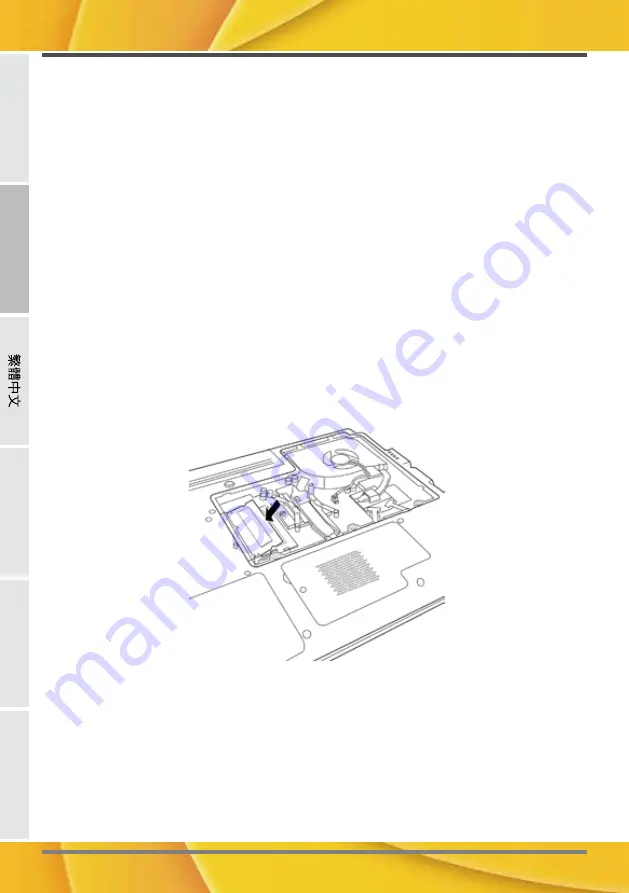
Installing a Memory Module
The following steps describe how to install a memory upgrade module. We do not recommend
that you do this yourself.
1. Turn off power to your notebook using the power switch, disconnect the power adapter, and/
or remove the battery pack.
2. Place your notebook upside-down on a clean work surface.
3. Open the top cover all the way, so that it is lying flat on the work surface.
4. Remove the five screws securing the compartment cover.
The memory upgrade module can be severely damaged by electrostatic discharge (ESD). Be
sure you are properly grounded when handling and installing the module.
5. Align the connector edge of the memory upgrade module, chip side up, with the connector slot
in the compartment.
6. Insert the memory upgrade module at a 45
o
angle and press it firmly onto the connector.
7. Press the memory upgrade module down into the compartment until it locks into the retaining
clips on either side. You will hear a click when it is properly in place.
8. Replace the cover and screws that were removed previously. Installation of the new memory
module is now complete.
The memory upgrade module is not something you routinely remove from your notebook PC.
Once it is installed, you should leave it in place unless you want to increase system memory
capacity.
Summary of Contents for PRAXIS N1103
Page 1: ...ORDENADOR PORTÁTIL PRAXIS N1103 N1107 Manual de usuario ...
Page 2: ......
Page 3: ...MANUAL DEL USUARIO Septiembre 2009 E S PA Ñ O L ...
Page 25: ...USER S MANUAL September 2009 E N G L I S H ...
Page 47: ...2009 9 ...
Page 49: ...3 ...
Page 51: ...5 CD DVD CD RW CD Dual DVD RW CD Super Multi DVD RW ...
Page 53: ...7 30 130 1 2 ...
Page 57: ...11 Kensington Kensington Kensington ...
Page 59: ...13 2 1 2 1 2 ...
Page 61: ...15 POST BIOS POST POST ...
Page 63: ...17 HDD ...
Page 65: ...19 2 2 ...
Page 67: ...21 1 2 3 PC PC 4 5 10 6 7 ...
Page 69: ...MANUEL DE L UTILISATEUR Septembre 2009 F R A N Ç A I S ...
Page 91: ...BENUTZERHANDBUCH September 2009 D E U T S C H ...
Page 113: ...MANUALE DELL UTENTE Settembre 2009 I TA L I A N O ...
Page 135: ......
Page 136: ......
Page 137: ......
Page 138: ......
Page 139: ... ...
Page 140: ......
Page 141: ......
Page 142: ... ...
Page 143: ......
Page 144: ......
Page 145: ......
Page 146: ......
Page 147: ......
Page 148: ......
Page 149: ......
Page 150: ... ...
Page 151: ......
Page 152: ... ...
Page 153: ......
Page 154: ......
Page 155: ... ...
Page 156: ......
Page 157: ......
Page 158: ......
Page 159: ......
Page 160: ......
Page 161: ... ...
Page 162: ...6 ...
Page 163: ...7 ...
Page 164: ...8 ...
Page 165: ...9 ...
Page 166: ...10 ...
Page 167: ...11 ...
Page 168: ...12 ...
Page 169: ......
Page 170: ...14 ...
Page 171: ...15 ...
Page 172: ...16 ...
Page 173: ...17 ...
Page 174: ...18 ...
Page 175: ...19 ...
Page 176: ...20 ...
Page 177: ... ...
Page 178: ......
Page 179: ......
Page 180: ...2 ...
Page 181: ...3 ...
Page 182: ...4 ...
Page 183: ...5 ...
Page 184: ...6 ...
Page 185: ...7 ...
Page 186: ...8 ...
Page 187: ...9 ...
Page 188: ...10 ...
Page 189: ...11 ...
Page 190: ...12 ...
Page 191: ...13 ...
Page 192: ...14 ...
Page 193: ...15 ...
Page 194: ...16 p ...
Page 195: ...17 p ...
Page 196: ...18 ...
Page 197: ...19 ...
Page 198: ...20 ...
Page 199: ...21 ...
Page 200: ...22 ...
Page 202: ...www airis es ...

