background image

Troubleshooting

3A1182G

19

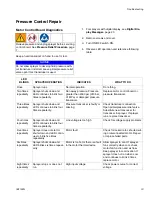
Pressure Control Repair

Motor Control Board Diagnostics

Keep a new transducer on hand to use for test.

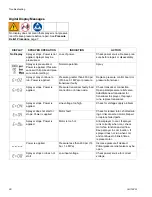
1. For sprayers with digital display, see 

Digital Dis-

play Messages

, page 20

2. Remove screws and cover.

3. Turn ON/OFF switch ON.

4. Observe LED operation and reference following 

table: 

Relieve pressure and unplug sprayer before servicing 
control board. See

 Pressure Relief Procedure

, page 

7.

NOTICE

Do not allow sprayer to develop fluid pressure with-
out transducer installed. Leave prime/pressure relief 
valve open if test transducer is used.

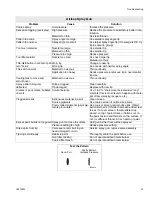
LED 

BLINKS

SPRAYER OPERATION

INDICATES

WHAT TO DO

Once

Sprayer runs

Normal operation

Do nothing

Two times 
repeatedly

Sprayer shuts down and 
LED continues to blink two 
times repeatedly

Run away pressure. Pressure 
greater than 4500 psi (310 bar, 
31 MPa) or damaged pressure 
transducer.

Replace motor control board or 
pressure transducer.

Three times 
repeatedly

Sprayer shuts down and 
LED continues to blink four 
times repeatedly.

Pressure transducer is faulty or 
missing

Check transducer connection. 
Open prime/pressure relief valve. 
Substitute new transducer for 
transducer in sprayer. If sprayer 
runs, replace transducer.

Four times 
repeatedly

Sprayer shuts down and 
LED continues to blink four 
times repeatedly.

Line voltage is too high

Check for voltage supply problems

Five times 
repeatedly

Sprayer does not start or 
shuts down and LED contin-
ues to blink five times 
repeatedly

Motor fault

Check for locked rotor, shorted wir-
ing or disconnected motor. Repair 
or replace failed parts.

Six times 
repeatedly

Sprayer shuts down and 
LED blinks six times repeat-
edly

Motor is too hot or there is a fault 
in the motor thermal device

Allow sprayer to cool. If sprayer 
funs correctly when cool, check 
motor fan function and air flow. 
Keep sprayer in cool location. If 
sprayer does not run when cool 
and continues to blink 6 times, 
replace motor.

Eight times 
repeatedly

Sprayer stops or does not 
run

High input voltage

Check power source for correct 
voltage

Summary of Contents for 16M526

Page 1: ... all warnings and instructions in this manual Be familiar with the controls and the proper usage of the equipment Save these instructions Model Part Number Volt age SERIES 24F585 120V B Airlessco EZ Rent 570 Hi Boy 16M528 110V A 16M526 240V A Airlessco EZ Rent 570 Lo Boy 24F586 120V C 24F588 120V B Airlessco EZ Rent 700 Hi Boy 16M529 110V A 16M527 240V A Airlessco EZ Rent 700 Lo Boy 24F587 120V C ...

Page 2: ...of electric shock When repair or replacement of the cord or plug is required do not connect the grounding wire to either flat blade terminal The wire with insulation having an outer surface that is green with or without yellow stripes is the grounding wire Check with a qualified electrician or serviceman when the grounding instructions are not completely understood or when in doubt as to whether t...

Page 3: ...c or conductive Connect to a grounded outlet and use grounded extension cords Do not use a 3 to 2 adapter Do not use a paint or a solvent containing halogenated hydrocarbons Do not spray combustible liquids in a confined area Keep spray area well ventilated Keep a good supply of fresh air moving through the area Spray generates sparks Keep pump assembly in a well ventilated area at least 20 feet 6...

Page 4: ...ate gloves eye protection and a respirator or mask when painting Do not operate or spray near children Keep children away from equipment at all times Do not overreach or stand on an unstable support Keep effective footing and balance at all times Stay alert and watch what you are doing Do not operate the unit when fatigued or under the influence of drugs or alcohol Do not kink or over bend the hos...

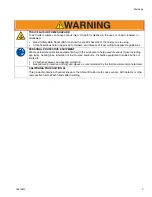
Page 5: ...E EQUIPMENT Wear appropriate protective equipment when in the work area to help prevent serious injury including eye injury hearing loss inhalation of toxic fumes and burns Protective equipment includes but is not limited to Protective eyewear and hearing protection Respirators protective clothing and gloves as recommended by the fluid and solvent manufacturer CALIFORNIA PROPOSITION 65 This produc...

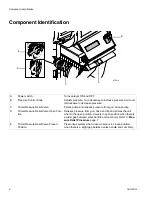
Page 6: ...s pump and relieves pressure from gun hose and tip D Prime Pressure Relief Valve Open Posi tion Relieves pressure from gun hose and tip and primes the unit when in the open position Valve is in open position when there is a wider gap between valve handle and cam body Refer to Pres sure Relief Procedure page 7 E Prime Pressure Relief Valve Closed Position Pressurizes system when closed Valve is in ...

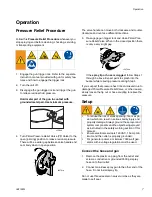
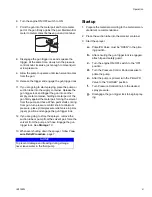
Page 7: ...ly a very slight gap If the spray tip or hose is clogged follow Steps 1 through 5 above Expect paint to splash into the bucket while relieving pressure during Step 4 If you suspect that pressure hasn t been relieved due to damaged Prime Pressure Relief Valve or other reason slowly loosen the tip nut or hose coupling to relieve the pressure Setup Connect the hose and gun 1 Remove the plastic cap pl...

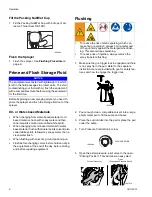
Page 8: ...sure the gun trigger lock in engaged and there is no spray tip in the gun Refer to the separate instruction manual provided with gun for safety fea tures and how to engage the trigger lock 2 Pour enough clean compatible solvent into a large empty metal pail to fill the pump and hoses 3 Place the suction tube into the pail or place the pail under the pump 4 Turn Pressure Control Knob to low 5 Open ...

Page 9: ...inimum pressure place prime pressure relief valve in prime open position and engage the gun trigger lock 12 If you are going to store the sprayer remove the suction tube or pump from the solvent pail force the solvent from the pump and hose Engage the gun trigger lock See Storage 10 13 Whenever shutting down the sprayer follow Pres sure Relief Procedure page 7 Startup 1 Prepare the material accord...

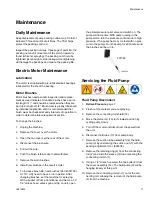
Page 10: ...p Armor For oil base paint flush with mineral spirits sol vent also called white spirit For water base paint flush with water then min eral spirits solvent also called white spirit and leave the pump hose and gun filled with min eral spirits solvent also called white spirit Long Term For longer storage use Graco or Airlessco Pump Armor Shut off sprayer Relieve Pressure page 7 and make sure prime p...

Page 11: ...he worn brushes 8 Install new brushes in the reverse order 9 To increase brush life new brushes Part 331780 for 110 volt need to have a run in period After changing brushes set the machine for spraying With a bucket of Pump Conditioner and water a 50 1 4 airless hose airless gun and tip on unit open the prime pressure relief valve and switch on The pump will now prime With pump running in the prim...

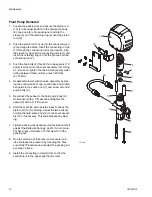
Page 12: ...ion valve assembly by plac ing the suction seat O ring suction ball and suction ball guide in the suction nut 7 and screw onto fluid pump body 9 5 Reconnect the sensor to the fluid pump body 9 Hold sensor with a 7 8 wrench and tighten the swivel 6 with a 11 16 wrench 6 Start the machine and operate slowly to check the piston rod 10 for binding Adjust the two bolts 8 holding the fluid pump body 9 t...

Page 13: ... piston 14 7 Take the spacer 15 and slide over the top of the piston 14 8 Take three spring washers 16 and slide over the top of the piston 14 in the following order First spring curve facing up Second spring curve facing down Third spring curve facing up 9 Take the upper male gland 17 and place it rounded side up 10 Take three upper polyethylene packings 18 and two leather packings 22 and assembl...

Page 14: ...unit on its back and disassemble gearbox 5 Inspect bearings 15 18 Crosshead Assembly 16 Gearcrank 17 and sleeve bearing 10 inside cover assembly 14 for wear damage Replace worn damaged parts 6 If gear grease needs replacing replace with gear grease Part No 114819 7 Clean mating surfaces of cover and box thoroughly use Part No 342899 Instant Gasket 8 Reassemble in reverse order 1 2 3 1 4 2 2 2 2 2 ...

Page 15: ...control assembly as described above 2 Disconnect potentiometer lead from pressure con trol assembly 3 Use a 1 16 allen wrench loosen set screw in the poteniometer knob and remove knob and spacer 4 Using a 1 2 wrench or deep socket remove the nut from the potentiometer shaft assembly 5 Pull entire potentiometer assembly out of the termi nal box 6 Replace in reverse order To avoid electric shock alw...

Page 16: ... If unable to loosen the two nuts hold them and unscrew the two screws Then remove the LCD Dis play Assembly 4 Reassemble in reverse order while making sure that the two spacers and the two washers are in place Tighten the two nuts handtight and seal with blue loctite Do not overtighten the nuts as this will damage the display NOTICE Unit will not operate if wires are disconnected or pinched Upon ...

Page 17: ...Packings and or piston worn Tighten packing nut repack unit Unit does not maintain good spraying pressure Blown spray tip Replace spray tip Packings and or pistons worn Repack unit Upper seat worn Replace upper seat Unit does not run Tripped Breaker Reset breaker Electrical failure See Machine Does Not Start Machine does not start Control Settings Make sure machine is plugged into the wall Verify ...

Page 18: ...o replacement sensor available use a multi meter to test the resistance across the red and black wires of the sensor be sure to test the plug You should read 1 5 3 5k ohms A faulty sensor usually reads no continuity open If the sensor passes all the tests see Pressure Control Knob Potentiometer Pressure Control Knob Potenti ometer Plug another potentiometer POT into the con trol board If the machi...

Page 19: ...ee times repeatedly Sprayer shuts down and LED continues to blink four times repeatedly Pressure transducer is faulty or missing Check transducer connection Open prime pressure relief valve Substitute new transducer for transducer in sprayer If sprayer runs replace transducer Four times repeatedly Sprayer shuts down and LED continues to blink four times repeatedly Line voltage is too high Check fo...

Page 20: ...sure transducer faulty bad connection or broken wire Check transducer connection Open prime pressure relief valve Substitute new transducer for transducer in sprayer If sprayer runs replace transducer Sprayer stops Power is applied Line voltage too high Check for voltage supply problem Sprayer does not start or stops Power is applied Motor fault Check for locked rotor shorted wir ing or disconnect...

Page 21: ... Clean carefully Tip damaged Replace with new tip Craters or pock marks bubbles on work Solvent balance Use 1 to 3 short solvents remainder long solvents this is most likely to happen with mate rial of low viscosity lacquers etc Clogged screens Extraneous material in paint Clean screen Course pigments Use coarse screen if orifice size allows Poorly milled pigments paint pig ments glocculate Use co...

Page 22: ... pump body 8 Servicing Gear Box Assembly 1 Remove fluid pump see page 11 2 Remove frame from the gearbox by loosening the four mounting screws 3 Separate cover assembly from box by removing bolts from front of cover and back of box 4 Lay unit on its back and disassemble gearbox 5 Inspect bearings Crosshead Assembly Gearcrank and sleeve bearing inside cover assembly for wear damage Replace worn dam...

Page 23: ...6480 1 2 3 4 5 9 6 7 10 7 Ref Part Description Qty 1 867145 COVER 1 2 301356 SPRING 1 3 867377 O RING 1 4 867214 FILTER 60 MESH 1 5 867647 SUPPORT 1 6 867077 BASE 1 7 867420 PLUG 2 9 867309 NIPPLE 3 8 M x 1 4 M 1 10 557391 PLUG 1 4 1 ti16052a ...

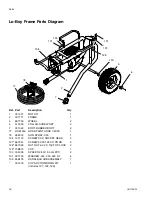
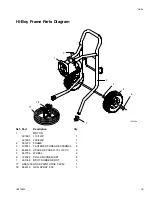
Page 24: ... SET 2 7 331048 BOOT RUBBER BOOT 2 77 HSE1450 HOSE PAINT HOSE 1 4X50 1 78 289316 GUN SPRAY 009 1 124 121112 SCREW CAP SOCKET HEAD 4 127 867551 SCREW 6 32X1 25 PH PN HD 2 128 867329 NUT NUT 6 32 X 109 TOP LOCK 2 129 15B870 CUP 1 130 305039 SPACER 3 4 ID 50 LG PVC 2 131 331103 WASHER 562 250 060 ST 4 136 866476 HANDLE LB SUBASSEMBLY 1 331476 CUP SUCTION DRAIN KIT includes 127 128 129 1 ...

Page 25: ... Description Qty 1 MOTOR 331491 110 120V 1 331493 230 240V 1 2 331273 FRAME 1 3 16F551 FASTENER THREAD EXTERNAL 4 4 866356 SPACER SPACER 75 LG PVC 2 5 867736 WHEEL 2 6 143029 COLLAR SCREW SET 2 7 331048 BOOT RUBBER BOOT 2 77 HSE1450 HOSE PAINT HOSE 1 4X50 1 78 289316 GUN SPRAY 009 1 ...

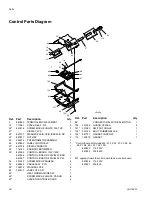
Page 26: ...ROL BOARD 110V 120V 1 867966 CONTROL BOARD 230V 240V BAR 1 867967 CONTROL BOARD 230V 240V PSI 1 34 331342 SCREW MACH PANHEAD 4 76 866049 CABLE ASSY 9 LG 1 92 100272 WASHER LOCK 6 94 342513 LABEL OFF ON 1 95 HEAT SINK MACHINED LP 1 96 SCREW MACH PHILLIPS PAN HD 6 97 SPACER CONTROL BOARD 6 98 CONNECTOR ELECTRICAL MOTOR 1 100 331296 GUARD SPLASH 2 101 301083 SWITCH TOGGLE 1 102 301150 BOOT RUBBER BLA...

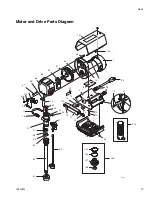
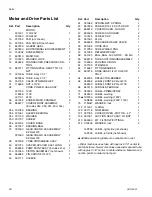
Page 27: ... Motor and Drive Parts Diagram 46 214 56 55 10 79 72 121 120 1 47 70 32 18 18 13 31 213 34 156 159 160 157 158 63 59 61 60 45 58 57 41 16 47 48 66 35 39 37 36 48 15 11 16 49 42 44 43 40 112 14 13 12 8 9 17 51 ti17840e ...

Page 28: ...EMBLY EZ Rent 570 1 331590 GEAR CRANK 32 ASSEMBLY EZ Rent 700 1 39 331038 YOKE CROSSHEAD ASSY 1 40 331074 SPACER SPACER 2 691 LONG 2 41 866482 PUMP PAINT ASSY includes 41a 1 41a 331093 PISTON ASSEMBLY not shown 1 42 866082 PIN CROSS PIN 375 1 43 331117 SLEEVE 1 44 331062 SPRING RET SPRING 1 45 867539 SCREW 5 16 18 X3 75 HX HD 2 46 868016 COVER COVER GUARD 1 47 866338 SCREW SHOULDER 2 48 107445 SCR...

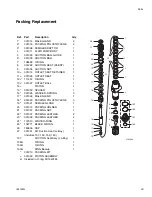
Page 29: ...ER 1 16 331025 WASHER SPRING 3 17 331022 MALE GLAND 1 18 331023 PACKING POLYETHYLENE 3 19 331021 FEMALE GLAND 1 20 331019 PACKING HOLDER 1 21 331037 PACKING NUT 1 22 331307 PACKING LEATHER 2 23 331306 PACKING LEATHER 4 24 107313 WHITE O RING 1 25 108771 BLACK O RING 1 26 180656 CAP 1 27 331051 KIT Suction Seat Lo Boy 1 includes 157 158 159 160 157 SUCTION Seat Assy Lo Boy 1 158 O RING 1 159 O RING...

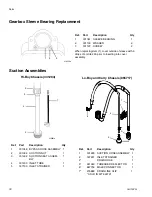
Page 30: ...ti16059a 1 2 3 ti16061a Hi Boy Chassis 331284 Ref Part Description Qty 1 301348 BYPASS HOSE ASSEMBLY 1 2 331034 SUCTION NUT 1 3 331292 SUCTION SEAT ASSEM BLY 1 4 331400 INLET TUBE 1 5 187190 INLET STRAINER 1 Lo Boy and Carry Chassis 865717 Ref Part Description Qty 1 331290 SUCTION HOSE ASSEMBLY 1 2 187651 INLET STRAINER 1 4 DRAIN HOSE 1 5 241920 THREADED DEFLECTOR 1 6 867759 MALE CONNECTOR 1 7 276...

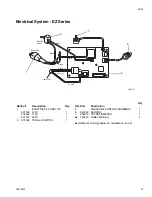
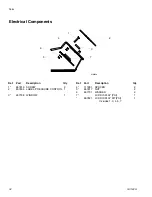
Page 31: ...ck Black Black ti2471b 1 3 5 6 7 Ref Part Description Qty Ref Part Description Qty 1 ELECTRICAL CORD110V 5 PRESSURE CONTROL ASSEMBLY 1 331163 120V 1 6 243222 SENSOR 1 118046 110V 1 7 256219 POTENTIOMETER 1 301101 240V 1 342423 LABEL Warning 1 3 301083 TOGGLE SWITCH 1 Additional warning labels are available at no cost ...

Page 32: ... 2 3 4 5 6 7 Ref Part Description Qty Ref Part Description Qty 1 867816 SCREW 2 4 117281 SPACER 2 2 867804 LABEL PRESSURE CONTROL 1 5 867817 NUT 2 6 867731 WASHER 2 3 867798 WINDOW 1 7 LCD DISPLAY PSI 1 867821 LCD DISPLAY KIT PSI Includes 1 3 4 5 7 1 ...

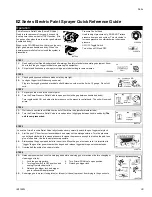
Page 33: ...oggle switch ON and adjust to low pressure on the pressure control knob The unit will now self prime STEP 4 4A Wait about one minute until fluid comes out of the return tube smaller diameter tube 4B Turn the Prime Pressure Relief Valve to closed position slight gap between handle and body The unit is now pressurized STEP 5 Leave the Prime Pressure Relief Valve fully closed and very carefully unloc...

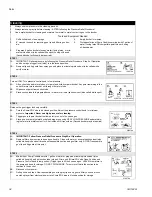
Page 34: ...ucket of water or mineral spirits solvent also called white spirit STEP 3 Release the gun trigger lock very carefully 3A Turn the Prime PR Valve to be closed position Adjust the pressure control knob for minimum pressure Important Never use high pressure for cleaning 3B Trigger gun into paint bucket to allow paint to run out of hose and gun 3C Place gun over empty metal bucket and trigger gun usin...

Page 35: ...livery EZ Rent 570 0 85 gpm 3 2 lpm EZ Rent 700 0 95 gpm 9 6 lpm Maximum tip size EZ Rent 570 0 025 EZ Rent 700 0 027 Fluid outlet npsm 1 4 in Noise Sound power 91 dBa Sound pressure 75 dBa Wetted parts zinc and nickel plated carbon steel nylon stainless steel PTFE acetal leather UHMWPE aluminum tungsten carbide Sound power measured per ISO 3744 Sound pressure measured at 3 3 feet 1 meter from equ...

Page 36: ...efective parts The equipment will be returned to the original purchaser transportation prepaid If inspection of the equipment does not disclose any defect in material or workmanship repairs will be made at a reasonable charge which charges may include the costs of parts labor and transportation THIS WARRANTY IS EXCLUSIVE AND IS IN LIEU OF ANY OTHER WARRANTIES EXPRESS OR IMPLIED INCLUDING BUT NOT L...

Reviews: