- 8 -
2.2 Connecting the Camera to LAN/WLAN
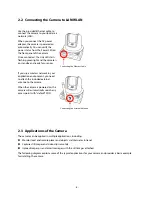
Use the provided Ethernet cable to
connect the camera to your local area
network (LAN).
When you connect the AC power
adapter, the camera is powered on
automatically. You can verify the
power status from the Power LED on
the front panel of the camera.
Once connected, the Link LED starts
flashing green light and the camera is
on standby and ready for use now.
If you use a wireless network in your
application environment, you need
to attach the included external
antenna to the camera.
When the camera is powered on, the
camera will automatically search any
access point with “default” SSID.
2.3 Applications of the Camera
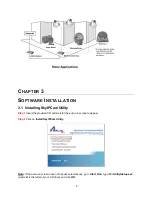
The camera can be applied in multiple applications, including:
Monitor local and remote places and objects via Internet or Intranet.
Capture still images and video clips remotely.
Upload images or send email messages with the still images attached.
The following diagram explains some of the typical applications for your camera and provides a basic example
for installing the camera.
Connecting the Ethernet Cable
Connecting the External Antenna


