RR-300-D&EL Kap.5
AIRTEC
Betriebsanleitung
Instructions
de service
Instruction Manual
Vorbereitung/Inbetriebnahme Préparation/Mise en service Preparation/starting
15/08/2006
30
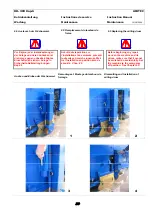
5.) Zum Objekt fahren mit dem Vor-
wärts- oder Rückwärtshebel. Ge-
schwindigkeit durch den Gashe-
bel bestimmend.
5. ) Utiliser le levier de marche avant ou
arrière pour atteindre la zone à trai-
ter. Ajuster la vitesse avec le levier
de régime.
5.) Drive towards the object with
the forwards or reverse lever.
Speed is determined by the
gas pedal.
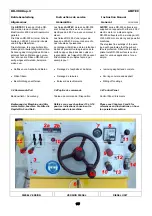
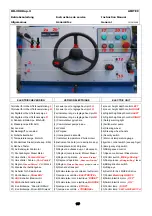
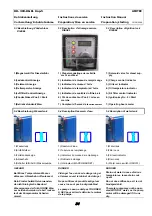
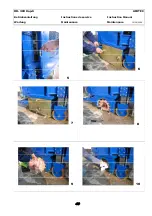
6.) Kippschalter „Fräsen“ Pos.12
Bild 3.4 einschalten.
6. ) Mettre l’interrupteur à bascule sur
«Fraiser» Pos.12 croquis 3.4
6.) Switch on toggle switch “Mill-
ing“ No.12 Fig 3.4.
7.) Kippschalter „Blinklicht“ Pos.3
Bild 3.4 einschalten
7. ) Allumer le gyrophare Pos.3 croquis
3.4
7.) Switch on toggle switch
“Blinking light“ No. 3 Fig 3.4
8.) Regler Pos.14 auf Stellung Fräsen,
bis er einrastet; dann Vollgas ge-
ben mit Hebel Pos. 11.
8. ) Positionner le régulateur (Pos.14)
sur „Fraiser“ jusqu’à ce qu’il
s’enclenche; puis atteindre le plein
régime grâce au levier Pos.11.
8.) Set regulator No. 14 to the
“Mill” position, until it locks
into place, then use full throt-
tle with lever No. 11.
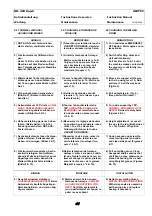
9.) Mit den Hebeln Pos.1a+1b absen-
ken bis die Trommel den Boden
berührt.
9. ) Abaisser le tambour au moyen des
leviers (Pos. 1a+1b) jusqu’à ce qu’il
touche le sol.
9.) Use levers Nos. 1a+b to lower
the machine until the drum
touches the ground.
10.)Schalter 2a+2b mit roter Taste
auf „0“ stellen. ( Eichen)
10.)Positionner les interrupteurs 2a+2b
(à touche rouge) sur «0». (étalonna-
ge)
10.)Set switch 2a+2b with the red
button to “0” (calibrate)
11.)Gewünschte Frästiefe mit Hebel
1a+1b einstellen. Ablesen auf
2a+2b, 1Ziffer entspricht 1mm.
11.)Ajuster la profondeur de fraisage
souhaitée avec le levier 1a+1b. Lire
sur 2a+2b, 1 chiffre correspond à
1mm.
11.)Set the required milling depth
using levers 1a+1b. Reading
off 2a and 2b, 1 digit will be 1
mm.
12.)Umschalter Pos.13 auf Stellung
„Vorwärts“ schalten.
12.)Positionner le commutateur Pos.13
sur „Avance“.
12.)Changeover switch, No.13 to
switch to “Forwards” position.
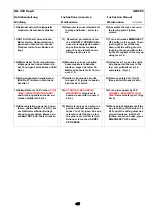
13.)Mit „Antriebs-Regler Fahrmotor“
Pos.10 Fahrgeschwindigkeit ein-
stellen.
Geschwindigkeit der Qualität des
Bodens anpassen, durchdrehen
der Antriebsräder verhindern!
Beim Fräsen von „Bahn 1 zu Bahn
2“,ändert sich die Anzeige 2b.
13.)Ajuster la vitesse du mouvement
avec le régulateur d’entraînement
du moteur Pos.10.
Adapter la vitesse en fonction des
propriétés du terrain, prévenir
l’emballement des roues de com-
mande!
Au passage de la fraise de la voie 1
sur la voie 2, l’affichage passe sur 2b.
13.)Set the driving speed using
the “drive regulator travel
motor” No. 10.
Adapt speed to quality of the
ground, prevent drive wheels
from spinning!
When milling from „Lane 1 to
Lane 2“, Display 2b also
changes.
14.)Fräsen gemäss Auftrag.
14.)Fraiser en fonction du terrain et
contracte.
14.)Perform milling in accor-
dance with the contract.
Inbetriebnahme der Fräsmaschine
ELEKTRISCH
Mise en service de la fraiseuse
ÉLECTRIQUE
Starting the Surfacer/Miller
ELECTRIC
3.)“EIN-TASTER“ drücken. Warten bis
Kontrolllampe Pos.19 leuchtet!
Umschaltung „STERN-DREIECK“
Dauer ca. 15 Sekunden!
3)Enclencher
l’interrupteur
MARCHE..
Attendre que la lampe de contrôle
Pos.19
s’allume. Alternance «ETOILE-
TRIANGLE»
Durée environ 15 secondes!
3.) Press the “ON BUTTON“. Wait
until the control lamp No 19 is
illuminated! “Star DELTA“
changeover time about 15
seconds
!
Alles andere wie bei „DIESEL“!
Pour les autres mesures, appliquer la
même marche à suivre que pour le
modèle diesel!
Everything else as for “DIE-
SEL“!
WICHTIG! NUR FRÄSEN, WENN DIE
MASCHINE
AM 63-AMPÈRE-
STECKER
ANGESCHLOSSEN IST!
IMPORTANT : FRAISER UNIQUEMENT
LORSQUE LA MACHINE EST RAC-
CORDÉE A UNE
PRISE SECTEUR
DE 63 AMPÈRES!
IMPORTANT! ONLY USE MILL-
ING MACHINE IF THE
63 AM-
PERE PLUG IS CONNECTED!

