AirVerter
®
Model 96 HVLP Paint Spray System
DO NOT OPERATE SPRAY GUNS WITHOUT PERSONAL SAFETY EQUIPMENT
3
EQUIPMENT REQUIREMENTS
Air Compressor
A. Air compressors used with AirVerter
®
Spray
Guns must be able to HOLD a minimum of 40
PSI while spraying.
Note
: Position a
pressure gauge in the air hose nearest the
spray gun to be assured of the PSI required to
satisfactorily spray your coating.
B. The AirVerter
®
Inductor (AV-005) requires a
minimum 5 HP compressor.
High Pressure Air Hose
A. Air hose lengths up to 50 feet
MUST
have an
I.D. of 3/8" including fittings.
B. Air hose lengths greater than 50 feet
MUST
have an I.D. of 1/2" including fittings.
Paint Cup, Pressure Pot or
Diaphragm Pump
Be certain to follow manufacturer’s instructions.
OPERATING INSTRUCTIONS
A. The Model AV-096 Spray Gun operates with a
constant flow of air through the gun. The
trigger controls the fluid flow only. The Model
96 Spray Gun requires an AirVerter
®
Inductor
Assembly between the gun and the
compressed air supply.
B.
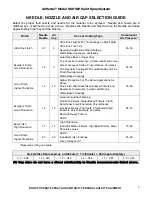
Consult the Needle, Nozzle and Air Cap
Selection Guide to select the proper
combination for the coating and finish
quality desired.
Too much pressure will
create unnecessary overspray!
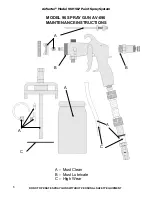
Using a One-Quart Paint Cup
A. Attach the 1-Quart Paint Cup (AV-188) to the
Fluid Tube Fitting (AV-9604) on the bottom of
the gun and tighten. Attach the Air Pressure
Tube on the cup lid to the Air Pressure Elbow
(AV-176) on the gun.
B. The 1-Quart Paint Cup must be airtight, clean
and free of obstructions.
•
The seal between the paint cup lid gasket
and the lip of the cup
MUST BE
airtight.
•
The Air Pressure Tube supplying air to the
paint cup
MUST BE
clean and free of
obstructions.
C.
Never fill a 1-Quart Paint Cup more than ¾
full
. This allows sufficient air space in the cup
for pressurization. Using a Cup Liner (AV-
020) will reduce clean-up time and solvent
usage.
D. Attach an Inductor Assembly (AV-005) to the
male quick-disconnect at the base of the gun
handle.
Using a Two-Quart or Larger
Remote Pressure Pot
or Diaphragm Pump
A. Remove the Air Pressure Elbow (AV-176) and
replace it with the Air Pressure Plug (AV-177)
found in your parts kit.
B. Attach the fluid hose from your pressure pot to
the Fluid Tube Fitting (AV-9604) on the gun
and tighten.
C. Attach an Inductor Assembly (AV-005) to the
Male Quick Disconnect (AV-172) at the base
of the gun handle.
Before Spraying
A.
Follow the
Air and Paint Management
Guidelines
listed on the following page.
B.
Before paint is poured into the cup or
diaphragm pump,
make certain paint is
properly mixed
. This is particularly true when
mixing multi-component paints. Use a paint
shaker, rotary mixer, or paint paddle to achieve
a homogeneous mixture. (
Hint:
Split your paint
into two parts; the top will be lighter and the
bottom will be heavier. Completely stir the
bottom half of the paint and slowly add small
amounts of the top half into the heavier
bottom.)
C.
Strain your paint to remove impurities
. Use
a cone strainer or a 100-mesh nylon bag or
equivalent strainer.
D.
Thin your paint
according to the
manufacturer’s specifications.
Summary of Contents for AV-096
Page 12: ......


