5
8.
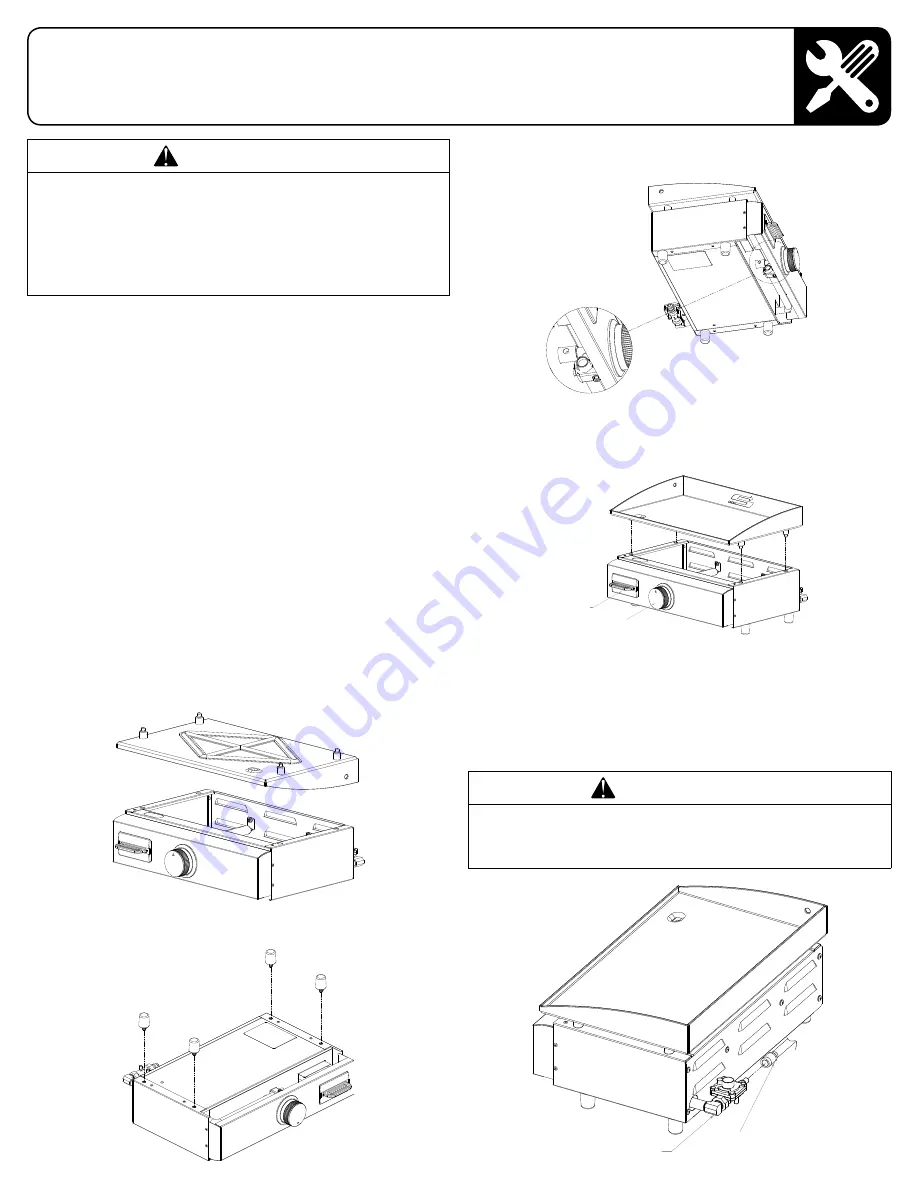
While your griddle is upside down, ensure that the fuel
nozzle is housed within the burner tube opening.
9.
Turn the griddle body over so it stands on its feet and
place the griddle plate in position on top of the griddle
body.
10.
To connect griddle to propane, use the RV low pressure
gas system hose to connect the quick-disconnect
female to the male quick-disconnect fitting on the back
of the griddle.
WARNING
Never check leaks with an open flame. Turn on the
gas and apply soapy water to all joints to see if
bubbles are formed.
CAUTION
BEFORE YOU BEGIN INSTALLATION
The recommended minimum clearances to combustible
constructions:
• 6.0” from sides
• 8.0” from back
• 19.5” from vertical
Please read all instructions thoroughly before proceeding.
1.
Remove packing material and all parts from the carton.
Packing material and carton can be retained for storage
if desired.
2.
Refer to the parts list on page 3. Ensure that all
components are contained in the package.
3.
Align the Control Valve Knob with the Control Valve
Shaft and press fully into place. See illustration on
Page 3.
4.
Install grease tray into front control panel as shown in
the illustration on page 3.
5.
Find a large, clean area in which to assemble your
Suburban Elite Series Griddle.
NOTE:
Make sure all
the plastic protection and packaging is removed before
assembling.
NOTE:
For permanently installing SOP-1003A, please
refer to INSTALLATION on Page 4.
6.
Remove the four rubber feet from the plastic bag
included with the Outdoor Griddle. Remove the griddle
top from the griddle body.
7.
Place the griddle upside down on a soft surface. Attach
the four rubber feet to the bottom of the griddle.
MODEL SOP-1003A - PORTABLE/TABLETOP SUBURBAN
ELITE SERIES GRIDDLE ASSEMBLY
and
INSTALLATION INSTRUCTIONS
CONTROL KNOB
GREASE TRAP
DRAWER
REGULATOR
W/QUICK CONNECT FITTING
RV GAS SUPPLY LINE
(QUICK CONNECT)


