17
EN
FR
ES
IT
PT
DE
-
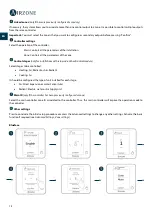
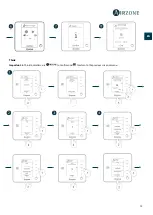
Press the LED
to confirm the association, otherwise use
to select another module.
-
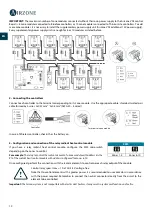
The number of the zone which associates with the controller is the lowest free available number.
-
If the association is correct, the LED
will flash green 5 times. If it flashes red twice, it means the controller is out of
range.
Main ID of the Lite controller
In case there are more than one master controller on the installation, It is required to set the Main ID parameter of the Lite
Controller for its proper functioning
(see section
Advanced settings – Blueface controller
). If no master is configured
for the Lite controller, the error "Lite without Main ID" will be displayed on the Blueface controller while all Lite LEDs
will show a steady white light.
Configure other functionalities of the LITE controller from the advanced configuration menu of a Blueface controller (see
section
) or Webserver Cloud (See Webserver Cloud installation manual).
IMPORTANT:
For changing the zone address, access the parameter Zone Address,
inside the advanced settings menu from a
Blueface controller
(see section
Lite controller reset
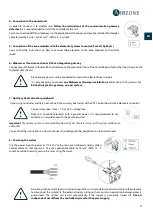
To reset to factory values on any Lite controller, remove the Lite controller from its base, turn up the microswitch 8 and place it
again on its base. Press on
, the LED will flash green twice when the reset process is completed.
To reassociate it, lower the microswitch 8, place the controller on its base and follow the steps displayed in the Initial setup
section, on Lite Controllers.
INITIAL CONFIGURATION EVALUATION
Check the following aspects:
-
AC unit-system communication: Choose any mode (except for STOP mode) and switch on the zone to generate
demand. Verify that the selected operation mode in the Main controller is shown in the indoor unit controller and the
set-point temperature changes.
-
Opening-closing of the dampers, ON/OFF of individual AC units and control outputs: Turn on the system and generate
demand in all the zones. Then, switch off and on each zone to verify the element to be controlled operates properly.
-
Verify that the static pressure of the duct system complies with the air distribution network conditions where is
installed (check the Manufacturer’s Manual of the equipment if you need to modify this parameter).
Important:
After the setup or in case of power outage, the system takes a few minutes to measure precisely the temperature
and the relative humidity.
FLOW REGULATION
If necessary, set the flow adjustment and minimum air of the system dampers:
FLOW ADJUSTMENT (REG)
1.
Turn on and generate demand in all zones to open all the dampers.
2.
Turn off the zone/damper to be adjusted.
3.
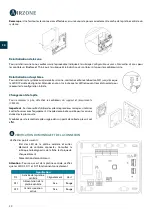
Adjust the maximum opening you want with the REG lever (I/II/III/IV).
4.
Turn on the zone and check the flow is correct.
MINIMUM AIR SETTING (A-M)
1.
Turn on and generate demand in all zones to open all the dampers.
2.
Adjust the minimum opening you want with the M-A lever (a/b/c/d).
3.
Turn on the zone and check the minimum air flow is correct.


