Setting Up
27
GB
Setting Up
Choosing the power sources
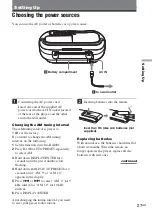
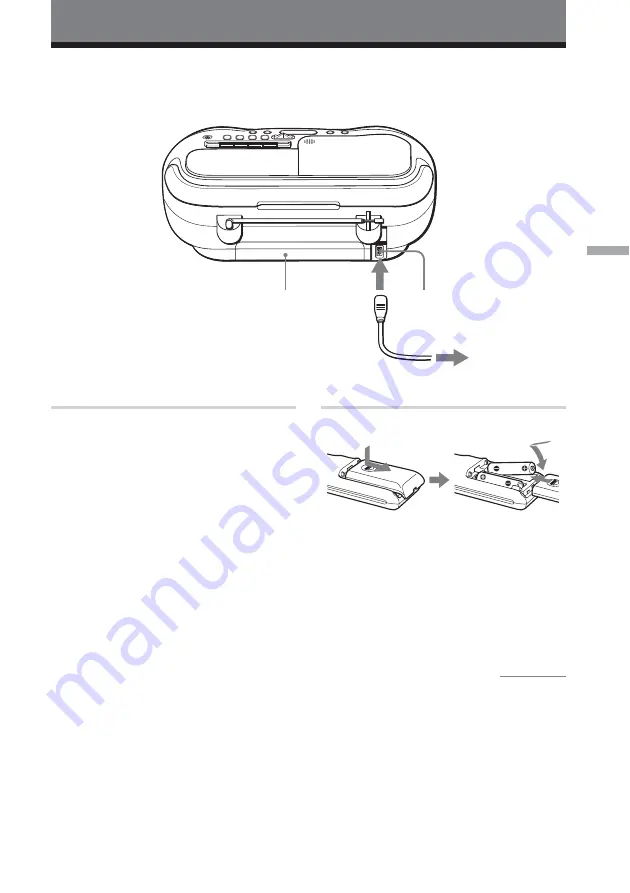
You can use the AC power or batteries as a power source.
AC IN
3
Battery compartment
1
to a wall outlet
1
Connecting the AC power cord
Insert one end of the supplied AC
power cord to the AC IN socket located
at the rear of the player, and the other
end to the wall outlet.
Changing the AM tuning interval
The AM tuning interval is preset to
9 kHz at the factory.
If you need to change the AM tuning
interval, do the following:
1
Set the function switch to RADIO.
2
Press BAND/AUTO PRESET repeatedly
to select AM.
3
Hold down DISPLAY/ENTER for 2
seconds until the preset number start
flashing.
4
Hold down BAND/AUTO PRESET for 2
seconds until “AM 9” or “AM 10”
appears in the display.
5
Press
.
or
>
to select “AM 9” for 9
kHz interval or “AM 10” for 10 kHz
interval.
6
Press DISPLAY/ENTER.
After changing the tuning interval, you need
to reset your preset radio stations.
2
Inserting batteries into the remote
Insert two R6 (size AA) batteries (not
supplied).
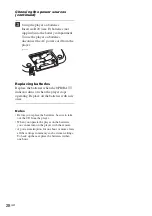
Replacing batteries
With normal use, the batteries should last for
about six months. When the remote no
longer operates the player, replace all the
batteries with new ones.
continued
Summary of Contents for CSD-AM700
Page 2: ...2KR AC AC Fraunhofer IIS Thomson MPEG Layer 3...
Page 3: ...3KR KR CD MP3 4 8 10 12 CD 14 15 16 17 18 20 21 S BASS 22 23 24 26 27 29 31 33 34 MP3 35 37...
Page 9: ...9KR POWER MODE VOLUME VOLUME VOL POWER VOLUME FM AM FM AM FM MODE Mono AM 27...
Page 10: ...10KR AC 27 1 POWER 2 TAPE 3 xZ TYPE I 4 N 1 2 4 3 POWER...
Page 11: ...11KR xZ m M X POWER VOLUME VOLUME VOL xZ m M X xZ POWER VOLUME N...
Page 12: ...12KR AC 27 1 POWER 2 xZ TYPE I 3 CD CD CD 4 RADIO 8 1 3 4 2 POWER...
Page 13: ...13KR xZ X MODE POWER z xZ X POWER 22 4 z AM MODE ISS 1 ISS 2 ISS 3 AC 1 2 TAPE 3 z 4 z N...
Page 17: ...CD 17KR u MODE 1 CD 2 SHUF MODE 3 u SHUF MODE MP3 CD TUNE FOLDER...
Page 19: ...CD 19KR MP3 1 PGM FOLDER MODE 2 TUNE FOLDER DISPLAY ENTER 3 2 CD z...
Page 21: ...21KR PRESET BAND AUTO PRESET 1 RADIO 2 BAND AUTO PRESET 3 1 BAND 2 10 10 12 10 1 2...
Page 22: ...22KR S BASS S BASS S BASS S BASS...
Page 23: ...23KR MODE DISPLAY ENTER CLOCK 27 1 CLOCK 2 DISPLAY ENTER 3 DISPLAY ENTER 00 12 24 3 MODE CLOCK...
Page 28: ...28KR 3 R20 D 6 AC OPR BATT CD 1 1...
Page 29: ...29KR CD AC AC R20 D 6 10mm CD CD...
Page 32: ...32KR REC z 33 TYPE II TYPE IV TYPE I 33 33 TYPE II TYPE IV TYPE I AC...
Page 33: ...33KR CD 10 20 30...
Page 36: ...36KR ID3 ID3 MP3 ID3 1 1 ID3 1 1 ID3 MP3...
Page 74: ......
Page 75: ......

