4
DISASSEMBLY INSTRUCTIONS
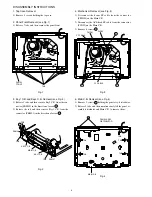
1. Top Case Removal
1) Remove 4 screws holding the top case.
2. Panel Front Removal (see Fig. 1)
1) Release 7 tabs, and then remove the panel front.
Fig. 1
3. Key1 C.B. and Key2 C.B. Removal (see Fig. 2)
1) Release 2 tabs, and then remove Key2 C.B. from the con-
nector (PKM02) in the direction of arrow 1 .
2) Release the tab, and then remove Key1 C.B. from the
connector (PKM01) in the direction of arrow 2 .
Fig. 2
4. Mechanism Removal (see Fig. 3)
1) Disconnect the drum FF cable from the connector
(PMD01) on the Main C.B.
2) Disconnect the ACE head FF cable from the connector
(P3D02) on the Main C.B.
3) Remove 6 screws A .
Fig. 3
5. Main C.B. Removal (see Fig. 4)
1) Remove 2 screws B holding the panel assy, distri-butor.
2) Release 5 tabs, and then simultaneously lift the panel as-
sembly, distributor and Main C.B. to remove them.
Fig. 4
PANEL
FRONT
TAB
TAB
TAB
TAB
KEY1 C.B
KEY2 C.B
MAIN C.B
PKM02
PKM01
1
2
FF CABLE
P3D02
FF CABLE
PMD01
A
A
A
PANEL ASSY,
DISTRIBUTOR
MAIN C.B
TAB
TAB
TAB
TAB
TAB
B


