background image

33

En

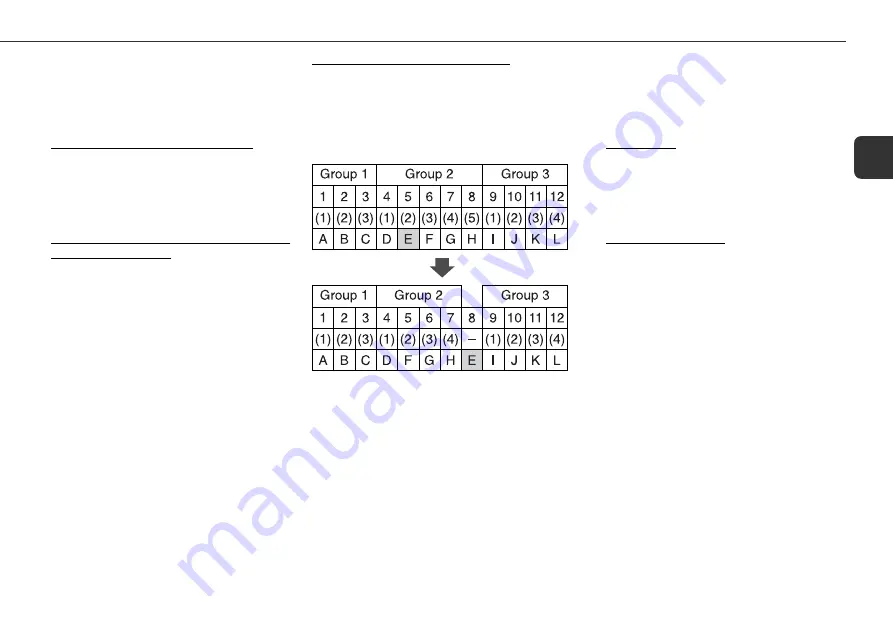
Removing a track from a group

You can remove a track from a group so that the track belongs
to no group. The track is moved to the next position to the
group the track belonged to.

Example

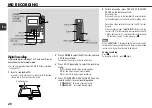
Removing track 5 from group 2

1, 2, 3,... : Track numbers
(1), (2), (3), ... : Track numbers within a group
A, B, C, ... : Track titles

1

Press MD 

E

  to select the MD function and

insert an MD.

2

Press 

f

 or 

g

 (numbered buttons on the

remote control) to select the track to move, or
play back the track.

3

In stop mode:

1

Press EDIT twice so that "

Track Edit

" is displayed,

then press MULTI JOG (ENTER on the remote control)
within 6 seconds.

2

Press EDIT repeatedly until "

Move Out?

" is

displayed, and press MULTI JOG within 6 seconds.

When playing the track:

Press EDIT repeatedly until "

Move Out?

" is displayed,

and press MULTI JOG within 6 seconds.

To cancel, press 

s

.

4

Within 1 minute, press MULTI JOG.

"

EDITING

" first, and then "

Complete

" is displayed.

• When the track is moved during play, press 

s

 to stop

play.

5

Remove the disc.

"

WRITING

" flashes and the data concerning the contents

of the editing are registered.

1

Press MD 

E

  to select the MD function and

insert an MD.

2

Press 

f

 or 

g

 (numbered buttons on the

remote control) to select the track to move, or
play back the track.

3

When selecting the track within a group:

1

Press EDIT twice so that "

Track Edit

" is displayed,

then press MULTI JOG (ENTER on the remote control)
within 6 seconds.

2

Press EDIT repeatedly until "

Move In?

" is displayed,

and press MULTI JOG within 6 seconds.

When playing the track or selecting the track not
belonging to any group:

Press EDIT repeatedly until "

Move In?

" is displayed,

and press MULTI JOG within 6 seconds.

4

Turn MULTI JOG or press 

f

,

g

  to select

the desired group number to move the track into.

You can select a blank group.
To cancel, press 

s

.

5

Within 1 minute, press MULTI JOG.

"

EDITING

" first, and then "

Complete

" is displayed.

• When the track is moved during play, press 

s

 to stop

play.

6

Remove the disc.

"

WRITING

" flashes and the data concerning the contents

of the editing are registered.
Summary of Contents for LCX-MT22

Page 1: ...OPERATING INSTRUCTIONS MD Stereo System HK LCX MT22 8C CJG 901 01 020801AMI H BF En English ...

Page 2: ...and uneven surfaces may cause the unit or cart to overturn or fall 7 Condensation Moisture may form on the CD pickup lens when The unit is moved from a cold spot to a warm spot The heating system has just been turned on The unit is used in a very humid room The unit is cooled by an air conditioner When this unit has condensation inside it may not function normally Should this occur leave the unit ...

Page 3: ...NTENTS PRECAUTIONS 2 PREPARATIONS 4 PARTS AND CONTROLS 5 ADJUSTMENTS BEFORE OPERATION 8 SOUND ADJUSTMENTS 9 CD OPERATIONS 10 RADIO OPERATIONS 12 TAPE PLAYBACK 14 TAPE RECORDING 15 BEFORE MD OPERATION 17 MD RECORDING 20 MD PLAYBACK 24 MD EDITING 26 TIMER OPERATIONS 36 CONNECTING A PERSONAL COMPUTER 38 REFERENCE 42 ...

Page 4: ... terminals 2 Connect the supplied antennas Connect the FM antenna to the FM 75 Ω terminals and the AM antenna to the AM LOOP jack Connect the FM antenna to the FM 75 Ω terminal with the mark as illustrated R6 AA 3 Connect the AC power cord to an AC outlet When the AC power cord is connected to an AC outlet for the first time the clock will flash on the display For setting the clock see page 8 Spea...

Page 5: ...ape TUNER BAND Selects radio function and radio band AUX USB Selects the function of external equipment connected to the AUX IN jacks or USB terminal sCLEAR CD MD and Tape stops playback Radio clears a station preset 7 r f g tDOWN TUNING UP CD and MD Skips to a previous or a succeeding track when pressed searches for a particular point in fast forward or reverse play when held down Tape Fast forwa...

Page 6: ...so 0 EQ SYMBOL Selects EQUALIZER kinds 10 CHARA SEL Selects the character type when entering MD disc track group names 3 CDE MDE sCLEAR TUNER BAND TAPEl AUX USB 4 MUTE Mutes the output from the speakers and PHONES jack 5 SP LP SPACE Selects MD recording mode normal stereo LP2 LP4 or monaural Used to insert a blank space in MD disc track group names also GROUP PRESET N M MD Selects a group on an MD...

Page 7: ... your computer 3 AUX IN jacks Accept analog sound signals from external equipment Connectexternalequipmentusinganoptionalconnecting cable with RCA phono plugs red plug to R jack white plug to L jack Refer also to the operating instructions for your equipment To switch function to external input press AUX USB to display AUX To change a source name in the display press AUX USB to display AUX and the...

Page 8: ...the remote control While the power is on hold down SHIFT and press CLOCK twice on the remote control press s and then press ENTER on the remote control In the 12 hour standard AM 12 00 indicates midnight and PM 12 00 noon If the clock display flashes when the unit is turned off There has been a power interruption Reset the clock ADJUSTMENTS BEFORE OPERATION Power Turning the unit on Press POWER 6S...

Page 9: ...16 the next time the unit is turned on Equalizer Sound equalization curves can be selected to match the music type 1 Press JOG MODE twice so that EQ is displayed 2 Within 6 seconds turn MULTI JOG to select a desired equalization curve To cancel the Equalizer select EQ OFF POP More presence in the vocals and mid range ROCK Powerful sound emphasizing treble and bass JAZZ Accented lower frequencies f...

Page 10: ...y and random at the same time Hold down SHIFT and press REPEAT RANDOM repeatedly on the remote control Each time it is pressed the function changes in the following order 1 1 Single track repeat 2 All tracks repeat 3 RANDOM Random play 4 and RANDOM Repeat Random play 5 Normal play On the main unit press JOG MODE repeatedly until PLAY MODE is displayed and then turn MULTI JOG within 6 seconds Direc...

Page 11: ...ogram exceeds 99 minutes and 59 seconds or if a track with a track number exceeding 30 is programmed the playing time is displayed as To check the program Press f or g repeatedly in stop mode The track number and program number are displayed in succession To clear the program Press s in stop mode To add tracks to the program Repeat step 2 before starting play The tracks are added to the end of the...

Page 12: ...ss MULTI JOG ENTER on the remote control The unit starts searching from low frequencies and allocates the preset numbers beginning from 1 to tuned in stations Complete is displayed when it finishes All the pre preset stations will be cleared Manual presetting 1 Press TUNER BAND to select a band then press f or g to tune in a desired station 2 Press MULTI JOG ENTER on the remote control The preset ...

Page 13: ...ll letters and symbols 0 numbers 5 Enter characters Turn MULTI JOG to select the desired character then press g On the remote control press the character buttons see page 27 several times to select a desired character then press g 6 Repeat steps 4 and 5 to enter all the required characters up to 10 characters To cancel press s 7 Within 1 minute press MULTI JOG ENTER on the remote control Complete ...

Page 14: ...apes is not recommended since they are extremely thin and easily deformed or damaged Wind up any slack in the tape with a pencil or similar tool before use Slack tape may jam in the mechanism 3 Press TAPE l to start play To stop playback Press s To rewind or fast forward Press f or g To reset the tape counter Press s in stop mode and the tape counter on the display is reset to 0000 Opening the cas...

Page 15: ...ape Insert with the exposed side facing down and the side to be recorded on facing out Press zPUSH EJECT to close the cassette holder 3 Prepare the source To record a radio broadcast press TUNER BAND to select the band and tune in a desired station To record CD or MD press CD Eor MD Eto select CD or MD function and then load a disc To record from external equipment connected to AUX IN jacks press ...

Page 16: ...r the unit enters recording pause mode Each time the button is pressed a 4 second blank space is added To erase a tape 1 Insert the tape Set the tape to the desired point if needed 2 Press AUX USB to select the AUX function If optional equipment is connected to the AUX IN jacks turn it off 3 Press REC SEL repeatedly until REC TAPE is displayed 4 Within 6 seconds press REC START REC REC PAUSE on th...

Page 17: ...be rearranged at random and for renumbering tracks enabling them to be played in any order THE LIMITATIONS OF MD Recording on the MD is performed differently from that of a cassette tape or a DAT Therefore the MD system is subject to the following restrictions Toc FULL is displayed even if the recording time does not reach the maximum recordable time of the disc Toc FULL is displayed when 254 trac...

Page 18: ...hat of material recorded in standard stereo or LP2 mode To prevent LP from being automatically recorded Press MD E to select the MD function Then hold down s and press SP LP MDLP OFF is displayed To record LP automatically repeat the above so that MDLP ON is displayed When recording Recording with the auto grouping mode set to ON When recording from CD to MD a group corresponding to therecordedCDi...

Page 19: ...egister function To set Auto index mark register function to ON OFF 1 Press EDIT repeatedly until Mark MODE is displayed 2 Within 6 seconds press MULTI JOG ENTER on the remote control 3 Turn MULTI JOG or press f g to display Mark ON To set Auto register function to OFF turn MULTI JOG to display Mark OFF 4 Press MULTI JOG The Initial setting is ON Mark ON Index mark modes In Auto index mark registe...

Page 20: ...CHRO REC SEL REC SEL on the remote control to select recording speed CDlMD X1 to record at normal speed CDlMD X2 to record at double speed 5 Within 6 seconds press REC START REC REC PAUSE on the remote control Recording starts When only a track is to be recorded CD playing returns to the beginning of the current track and recording starts Recording stops automatically when the CD finishes playing ...

Page 21: ...ur desired CD has already been recorded at double speed starting within the last 74 minutes Double speed recording of this CD is disabled by the copy protect feature see Copy protect features on page 23 until the disabled time has passed Notes During digital recording at normal or double speed you cannot pause recording If you start double speed recording while playing in repeat random repeat or p...

Page 22: ... BAND to select the band and tune in a desired station To record from a CD press CD E to select the CD function and load a CD To record from external equipment connected to AUX IN jacks press AUX USB to select the AUX function To record from the personal computer connected to USB terminal press AUX USB to select the USB function 3 Press SP LP repeatedly to select the recording mode SP standard len...

Page 23: ...stereo recording mode LP2 two times longer stereo recording LP4 four times longer stereo recording 4 Press CD SYNCHRO REC SEL REC SEL on the remote control to display CDlMD TAPE 5 Within 6 seconds press REC START REC REC PAUSE on the remote control Simultaneous recording starts It is impossible to pause recording The MD recording is made in digital You can set the CD to the random play mode or pro...

Page 24: ...p number total number of tracks within the group and total playing time of the group 2 Group title If no group title is registered No G Title is displayed MD PLAYBACK Switching between Disc mode and Group mode See page 19 about Disc mode and Group mode Press DISC GROUP on the remote control repeatedly so that GROUP is turned off on in the display GROUP is turned off Disc mode GROUP is turned on Gr...

Page 25: ...and random at the same time Hold down SHIFT and press REPEAT RANDOM repeatedly on the remote control Each time it is pressed the function changes in the following order 1 1 Single track repeat 2 All tracks repeat 3 RANDOM Random play 4 and RANDOM Repeat Random play 5 Normal play On the main unit press JOG MODE repeatedly until PLAY MODE is displayed and then turn MULTI JOG within 6 seconds Direct ...

Page 26: ...hile WRITING is displayed do not disconnect the AC cord or give a strong shock to the unit Otherwise the edited contents on a disc will not be able to be played A disc cannot be edited when a prerecorded disc is inserted PB Disc is displayed when the record protected tab on a loaded disc is moved to the protected position Protected is displayed during programmed play Note When tracks are edited mo...

Page 27: ...ce between the characters Press f or g repeatedly until the character just behind the inserting position flashes and then press SP LP SPACE on the remote control To insert a character between the characters Press f or g repeatedly until the character just behind the inserting position flashes and then enter a character with the remote control On the unit insert a blank space first and then enter a...

Page 28: ...within 6 seconds 4 Follow the steps 4 to 8 in Registering the disc title on page 26 When registering a title while playing the track press s to stop play after pressing MULTI JOG in step 7 Registering the track title during recording 1 Press EDIT so that T Title is displayed 2 Turn MULTI JOG or press f g to select the track and press MULTI JOG within 6 seconds 3 Follow steps 4 to 7 in Registering ...

Page 29: ... loaded disc already contains 254 tracks Dividing a group You can divide a group into two groups each containing a certain number of tracks Example Dividing group 2 at the point between tracks 4 and 5 1 2 3 Track numbers 1 2 3 Track numbers within a group A B C Track titles 1 Press MD E to select the MD function and insert an MD 2 Turn MULTI JOG press GROUP PRESET N M on the remote control to sele...

Page 30: ...the MD function and insert an MD 2 Turn MULTI JOG press GROUP PRESET N M on the remote control to select the latter group of the two groups to combine in stop mode For example to combine the 2nd and 3rd groups select the 3rd group 3 Press EDIT so that Group Edit is displayed and press MULTI JOG ENTER on the remote control within 6 seconds 4 Press EDIT repeatedly until G Combine is displayed and pr...

Page 31: ...ontrol to turn it off If GROUP is turned off go to step 3 3 In stop mode press EDIT repeatedly until G AllReset is displayed and press MULTI JOG ENTER on the remote control within 6 seconds G AllRst is displayed To cancel press s 4 Within 1 minute press MULTI JOG EDITING first and then Complete is displayed 5 Remove the disc WRITING flashesandthedataconcerningthecontents of the editing are registe...

Page 32: ...played and press MULTI JOG within 6 seconds 5 Turn MULTI JOG or press f g to select the desired track number to move the track to To cancel press s 6 Within 1 minute press MULTI JOG EDITING first and then Complete is displayed When the track is moved during play press s to stop play 7 Remove the disc WRITING flashesandthedataconcerningthecontents of the editing are registered Moving a track into a...

Page 33: ...yed When the track is moved during play press s to stop play 5 Remove the disc WRITING flashesandthedataconcerningthecontents of the editing are registered 1 Press MD E to select the MD function and insert an MD 2 Press f or g numbered buttons on the remote control to select the track to move or play back the track 3 When selecting the track within a group 1 Press EDIT twice so that Track Edit is ...

Page 34: ...rol to select the track to erase or play back the track 3 When selecting the track within a group 1 Press EDIT twice so that Track Edit is displayed then press MULTI JOG ENTER on the remote control within 6 seconds 2 Press EDIT repeatedly until T Erase is displayed and press MULTI JOG within 6 seconds When playing the track or selecting the track not belonging to any group Press EDIT repeatedly un...

Page 35: ... JOG or press f or g to select a blank group and then press MULTI JOG so that B Gr Er is displayed 5 Within 1 minute press MULTI JOG See Note on blank group on page 27 about blank group Erasing all tracks on a disc You can erase all tracks on the disc 1 Press MD E to select the MD function and insert an MD Confirm that the total number of tracks and total playing time are displayed 2 If GROUP is t...

Page 36: ... play will not begin unless the power is turned off External equipment connected to AUX IN jacks cannot be turned on and off by the built in timer of this unit Use an external timer USB source the personal computer connected to USB terminal cannot be selected for timer playback or timer recording 4 Press f or g to set the timer activated period and press ENTER The timer duration can be set between...

Page 37: ...al timer for the equipment so that its playback begins at the same time 8 Insert the recording tape or MD 9 Press POWER to turn the unit off When the timer on time is reached the unit turns on and begins recording with the selected source Timer recording will not begin unless the power is turned off External equipment connected to AUX IN jacks cannot be turned on and off by the built in timer of t...

Page 38: ...e guaranteed Controlling the unit by operating your computer or controlling your computer by operating the unit is impossible USB Connection Connect the two devices via USB terminal as illustrated below Be sure to see Installing USB drivers on page 39 before actually connecting your computer to the unit for the correct preparations NOTES IftheconnectionismadeviaaUSBhubandaUSBextension cable the pe...

Page 39: ...he unit with the USB cable as illustrated in USB Connection page 38 Your computer will automatically detect the unit and the installationforthenecessarydevices thedriversstandard appended to the OS will automatically begin Follow the on screen instructions Depending on your computer the OS installation CD ROM may be needed In that case insert it as instructed During detection do not disconnect or ...

Page 40: ...nstallation When the installation is complete verify the drivers devices are acknowledged 1 Select Settings from Start menu and click Control Panel 2 Double click System icon in Control Panel window 3 Select Hardware tab in System Properties window and click Device Manager 4 Click View in Device Manager window and then click Devices by type in View menu 5 Verify the devices are acknowledged Verify...

Page 41: ...tion software also If some problem occurs in your computer restart it USB Playback 1 Turn on your computer Wait until the OS is running normally 2 Turn on the unit 3 Press AUX USB on the unit press FUNCTION on the remote control repeatedly to display USB 4 Operate your computer to play back audio data stored in it 5 Adjust the volume level with VOLUME on the unit If sound is not generated check th...

Page 42: ...mit Combining all solo groups is attempted although there is only one solo group Can t COPY Recording is not possible due to the SCMS 23 page Protected The disc is record protected Slide the record protect tab on the disc see page 19 Disc Error The disc is damaged by scratches Replace the disc The unit received a strong shock during TOC reading Do not subject the unit to strong shock during TOC re...

Page 43: ...nit Everything stored in memory after purchase is cleared Syntax for group title Syntax 0 disc title track number1 track number2 group title1 track number3 track number4 group title2 track number5 track number6 group title3 Description A group consists of consecutive tracks Track numbers should be described in ascending order For example 1 4 and 5 7 are correct description while 4 1 or 7 5 are inc...

Page 44: ...n speed Approx 400 to 900 rpm CLV Sampling frequency 44 1 kHz No of channels Stereo 2 channels Monaural 1 channel A D D A converter 1 bit Frequency 20 to 20000 Hz 0 5 to 1 5 dB Wow and flatter Unmeasurable CASSETTE DECK Track format 4 tracks 2 channels stereo Frequency response Normal tape 50 Hz to 12500 Hz Recording system AC bias Heads Recording playback 1 erase 1 GENERAL Power requirements 220 ...

Page 45: ......

Reviews: