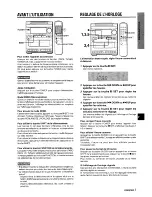
background image

Summary of Contents for NSX-V2100

Page 1: ......

Page 2: ...nit is moved from a cold spot to a warm spot The heating system has just been turned on The unit is used in a very humid room The unit is cooled by an air conditioner When this unit has condensation inside it may not function normally Should this occur leave the unit for a few hours then try to operate again 8 Wall or ceiling mounting The unitshould not be mounted on a wall or ceiling unless speci...

Page 3: ...er you will find them on the rear of your set in the space provided below Please refer to them when you contact your Aiwa deale r in case of difficulty E Model Nc Serial No Lot No CX NV2100 U BASIC RECORDING 9 Al EDIT RECORDING 10 PROGRAMMED EDIT RECORDING 11 TIMER SETTING THE SLEEP TIMER 12 SETTING THE TIMER 13 OTHER CONNECTIONS EM aoo CONNECTING OPTIONAL EQUIPMENT 14 LISTENING TO EXTERNAL SOURCE...

Page 4: ...o the C terminal and the black cord to the O terminal 2 Connect the supplied AM antenna to the AM LOOP terminal Q 3 Connect the AC cord to an AC outlet When the AC cord is connected the all characters may light up on the display In this case disconnect the AC cord Then connect it again To position the antennas FM antenna Extend fully and fix its end to the wall AM antenna Position to find the best...

Page 5: ...essed the next function is selected cyclically If the unii is not going to be used for an extended period of time remove the batteries from the remote control to prevent possible electrolyte leakage The remote control may not operate correctly when The line of sight between the remote control and the remote sensor inside the display window is exposed to intense light such as direct sunlight Other ...

Page 6: ...Accented lower frequencies for jazz type music Preee one of the GEQ buttons To cancel the selected mode Press the selected button again EQ oFF is displayed To select with the remote control Press the GEQ button repeatedly while pressing the SHIFT button The GEQ mode is displayed cyclically as follows ROCK POP JAZZ EQoFF cancel Low frequency sound may be distorted when the T BASS system is used for...

Page 7: ...utton To reset the interval repeat this procedure m When the AM tuning interval is changed all preset stations see PRESET1 ING STATIONS are cleared The preset stations have to be set again The unit can store a total of 32 preset stations When a station is stored a preset number is assigned to the station Use the preset number to tune in to a preset station directly 1 2 3 u Press the TUNER BAND but...

Page 8: ... To remove discs press the OPEN CLOSE button To start play when the power is off Direct Play Function Press the CD button or one of the DISC DIRECT PLAY buttons The power is turned on and play of the loaded disc s begins To replade discs before play press the OPEN CLOSE button to open the disc compartment To check the remaining time Press the EDIT CHECK button on the remote control during play The...

Page 9: ...en the tray stops rotating Press the numeric buttons and the 10 button to program a track Example To select the 25th track press the 10 10 and 5 buttons To select the 10th track press the 1Oand O buttons Total playing time of Program number the selected tracks Selected track number Total number of selected tracks 4 Repeat steps 2 and 3 to program other tracks 5 Press the button to start play To ch...

Page 10: ...into deck 2 and play it To record from a radio broadcast Press the TUNER BAND button and tune in to a station To record from the connected source Press the ViDEO AUX button and play it Press the button to start recording The F button is depressed simultaneously When recordina from a CD playing and recording start simultaneously from the first track To stop recording Press the WA button on deck 1 T...

Page 11: ... recording on the second side To stop recording in the middle Press the W button on deck 1 Deck operation and CD play stop simultaneously To clear the editing contents Press the CLEAR button for CD twice in the stop mode so that the red line surrounding Al EDIT in the display goes out or press the OPEN CLOSE button for CD To check the editing contents Before recording press the EDIT CHECK button o...

Page 12: ... the display repeat step 5 Press the EDIT CHECK button while pressing the SHIFT button to select side A and press the button on deck 1 to start recording CD play and recording of edited tracks for the first side start simultaneously When the end of the tape is reached deck 1 enters the recording stop mode After entering the recording stop mode go to step 9 Press the EDIT CHECK while pressing the S...

Page 13: ...tton on deck 1 to start erasure COPYRIGHT Please check the laws on copyright relating to recordings from discs ri dio or external tape for the country in which the machine is being used SETTING THE SLEEIP TIMER 1 2 The unit can be turned off automatically at a specified time Use the remote control 1 Press the SLEEP button while pressing the SHIFT button 2 Within 4 seconds press the or b button to ...

Page 14: ...t off after adjusting the volume and tone O remains on the display after the power is turned off timer standby mode Get ready for the TAPE function or the timer recording To listen to the tape press the button To record the source press the button on deck 1 When the timer on time is reached the unit turns on and begins play with the selected source While the timer is in operation the display indic...

Page 15: ...it can output CD digital sound signals through this jack Use an optical cable to connect digital audio equipment digital amplifier DAT deck MD recorder etc Remove the dust cap from the CD DIGITAL OUT OPTICAL jack Then connect an optical cable plug to the CD DIGITAL OUT OPTICAL jack LISTENING TO EXTERNAL SOURCES POWER 1 _ __ _ _ 1 To play equipment connected to the VIDEO AUX jacks proceed as follow...

Page 16: ...RE AND MAINTENANCE Occasional care and maintenance of the unit and the software are needed to optimize the performance of your unit To clean the cabinet Use a soft and dry cloth If the surfaces are extremely dirty use a soft cloth lightly moistened with mild detergent solution Do not use strong solvents such as alcohol benzine or thinner as these could damage the finish of the unit To clean the he...

Page 17: ...dirty page 15 Is a metal tape being used High frequency sound is not emitted is the recording piayback head dirty page 15 CD PLAYER SECTiON The CD Iplayer does not piay is the disc correctiy inserted A page 7 is the disc dirty page 15 Is the iens affected by condensation Wait approximateiy one hour and try again To reset if an unusual condition occurs in the display window or the cassette decks re...

Page 18: ...e encender La unidad se utilice en una habitation muy htimeda La unidad se enfr e mediante un acondicionador de sire Esta unidad tal vez funcione mal cuando tenga condensation en su interior En este case deje en reposo la unidad durante unas pocas horas y repita de nuevo la operacitm Montaje en pared o techo La unidad no se debera montar en una pared ni en el techo a menos que se especifique 10 co...

Page 19: ...DO m 5 RECEPCION DE LA RADIO SINTONIZACION MANUAL m m 6 PREAJUSTE DE EMISORAS 6 REPRODUCTION DE DISCOS COMPACTOS OPERAClONES BASICAS 1 7 REPRODUCTION PROGRAMAI A 8 REPRODUCTION DE CINTAS OPERAClONES BASICAS 9 GRABACION GRABACION BASICA 9 GRABACION CON EDICION Al 10 GRABACION CON EDICION PROGRAMADA 11 TEMPORIZADOR AJUSTE DEL TEMPORIZADOR PARA DORMIR 12 AJUSTE DEL TEMPORIZADOR 13 OTRAS CONEXIONES CO...

Page 20: ...t rse al terminal 0 y el cable negro al terminal 0 2 Conecte la antena de AM suministrada al terminal AM LOOP 3 Conecte el cable de alimentacion de CA a una toma de CA m Cuando se conecte el cable de CA puede que se enciendan todos Ios caracteres en el visualizador En este case desconecte el cable de CA Y Iuego vuelva a conectarlo Para posicionar Ias antenas Antena de FM Extiendala completamente y...

Page 21: ... se seleccionara ciclicamente m Si la unidad no va a ser utilizada durante mucho tiempo quite Ias pilas del control remoto para evitar Ias posibles fugas de electrolito El control remoto quiza no funcione correctamente cuando La Iinea de vision entre el control remoto y el sensor de seilales del interior del visualizador este expuesta a una Iuz intensa como por ejemplo la Iuz del sol Otros lcontro...

Page 22: ...RAFICO Esta unidad ofrece Ias tres curvas de ecualizacion diferentes siguientes ROCK Sonido potente que realza Ios agudos y Ios graves POP Mas presencia en Ias votes y en la gama de registro medio JAZZ Frecuencias bajas acentuadas para la mkica tipo jazz Pulse uno de Ios botones GEQ Para cancelar el modo seleccionado Pulse de nuevo el boton seleccionado Se visualizara EQ oFF Para seleccionar con e...

Page 23: ...lo de sintonizacion de AM todas Ias emisoras preajustadas consulte PREAJUSTE DE EMISORAS se borraran Las emisoras preajustadas tendran que ajustarse de nuevo PREAJUSTE DE EMISORAS Esta unidad puede almacenar un total de 32 emisoras Cuando almacene una emisora a esa emisora se Ie asignara un numero de preajuste Utilice el numero de preajuste para sintonizar directamente una emisora preajustada 0 9 ...

Page 24: ...uando la alimentaci6n eete desconectada funcion de reproduction directs Pulse el boton CD o uno de Ios botones DISC DIRECT PLAY La alimentaci6n se conectara y la reproducci6n del de IOS disco s introducido s empezara Para reemplazar discos antes de la reproducci6n pulse el boton OPEN CLOSE para abrir el compartimiento de Ios discos Para comprobar el tiempo restante Pulse el boton EDIT CHECK del co...

Page 25: ...a bandeja deje de girar Pulse IOS botones numericos y el boton 1 Opara programar una cancion Ejemplo Para seleccionar la cancion nurnero 25 pulse Ios botones lo loy5 Para seleccionar la canci6n numero 10 pulse Ios botones Ioyo Tiempo de reproduction total de Numero de programa Ias canciones seleccionadas Numero de la cancion Numero total de canciones seleccionada seleccionadas 4 Repita IOS pasos 2...

Page 26: ...a platina 2 y reproduzcala Para grabar un programa de radio Pulse el boton TUNER BAND y sintonice una emisora Para grabar de la fuente conectada Pulse el boton VIDEO AUX para ponerla en funcionamiento Pulse el boton para iniciar la grabacion El boton se oprime simultaneamente En la arabacion de un disco com acto la reproduction y la grabacion se inician al mismo tiempo desde la primers cancion Par...

Page 27: ...edio Pulse el boton W 4 de la r31atina1 La operation de la plat na y la del reproductor de discos compactos se detienen simultaneamente Para borrar el contenido de edition Pulse dos veces el boton CLEAR del reproductor de discos compactos en el modo de parada de manera que se apague la indication AI ED17 rodeada por una Iinea roja o pulse el boton OPEN CLOSE del reproductor de discos compactos Par...

Page 28: ...ra B Despues de confirmar que B aparezca en el visualizador repita el pase 5 Pulse el boton EDIT CHECK mientras pulsa el boton SHIFT para seleccionar la cara A y pulse el boton de la platina 1 para comenzar a grabar La reproduction dei disco compacto y la grabacion de Ios temas editados para la primers cara comienzan simutanemente Una vez que la cinta Ilega al final la platina 1 entra en el modo d...

Page 29: ...rado Pulse el boton de la platina 1 para iniciar la borradura DERECHOS DE AUTOR Sirvase comprobar Ias Ieyes de derechos de autor relacionadas con la grabacion de discos de la radio o de cintas clel pais en et que se utilice el aparato AJUSTE DEL TEMPORIZADOR PARA DORMIR 1 2 La unidad se podra apagar automaticamente despues de transcurrido un tiempo especificado Utilice el control remoto 1 Pulse el...

Page 30: ...spues de haber ajustado el volumen y ei tono permanecera en el visualizador despues de que se desconecte la alimentacion modo de espera del temporizador Fije la funcion TAPE o haga Ios preparatives para la grabacion por temporizador Para escuchar una cinta grabada pulse el boton E Para grabar la fuente pulse el boton de la platina 1 Cuando Ilegue la hors de encendido del temporizador la unidad se ...

Page 31: ...alida a sefiales de sonido digital de discos compactos a traves de esta toma Utilice un cable optico para conectar el equipo de audio digital amplificador digital platina de cinta audiodigital grabadora de minidiscos etc Quite la tapa contra el POIVO de la toma CD DIGITAL OUT OPTICAL Luego conecte la clavija del cable optico a la toma CD DIGITAL OUT OPTICAL Para hater la reproduction en el equipo ...

Page 32: ...imizar Ias prestaciones de su unidad Para Iimpiar la caja Utilice un pafio blando y seco Si Ias superficies estan muy sucias utilice un paiio suave humedecido un poco en una solution de detergence suave No utilice disolventes fuerles tales como alcohol bencina o diluyente porque estos podrian estropear el acabado de la unidad Para Iimpiar Ias cabezas y Ios puntos por donde pasa la cinta Despues de...

Page 33: ...zando una cinta de metal Noes emite sonido de alta frecuencia LESt Suciala cabeza de grabacion reproduction pagina 15 SECCKIIN DEL REPRODUCTOR DE DISCOS COMPACTOS El repraductor de discos compactos no puede reproducer LEsta bien insertado el disco P59ina 7 EstA ucio el disco pagina 15 Afecta la condensaci n a la lente7 Espere una hors aproximadamente y pruebe otra vez Para re ijustar la unidad Si ...

Page 34: ...adequate de la chaleur Laisser un espace de 10 cm derriere et dessus I appareil et un espace de 5 cm de chaque c6te Ne pas mettre I appareil sur un lit un tapis ou sur une surface similaire qui pourrait obstruer Ies orifices de ventilation Ne pas mettre I appareil clans une bibliotheque un coffret ou un meuble completement ferme oh I aeration serait insuffisante Entree d objets et de Iiquide Faire...

Page 35: ...RADIO ACCORD MANUEL m 6 MEMORISATION DE STATIONS 6 LECTURE DE DISQUES COMPACTS OPERATIONS DE BASE 7 LECTURE PROGRAMMED 8 LECTURE DE CASSETTES OPERATIONS DE BASE s 9 ENREGISTREMENT ENREGISTREMENT DE BASE 9 ENREGISTREMENTAVEC MONTAGE ET CALCUL DU TEMPS 10 ENREGISTREMENTAVEC MONTAGE PROGRAMME 11 MINUTERIE REGLAGE DE LA MINUTERIE D ARRET 12 REGLAGE DE LA MINUTERIE 13 AUTRES CONNEXIONS CONNEXION D UN A...

Page 36: ...enne AM fournie a la borne AM LOOP 3 Brancher Ie cordon secteur a une prise de courant Lorsque Ie cordon d alimentation est branche il est possible que tous Ies caracteres s affichent a I ecran Dans ce cas debranchez Ie cordon d alimentation Ensuite rebranchez le Pour positioner Ies antennes Antenne FM Deployer cette antenne completement et fixer son extremite a un mur Antenne AM Orienter cette an...

Page 37: ...nctionsuivante est seleciionnee de maniere cyclique mm Si la te14commandene doitpas 6tre utiliseependant Iongtemps enlever Ies piles pour eviter tout risque de fuite d electrolyte La telecommande risque de ne pas fonctionner correctement quand I espace entre la telecommande et Ie capteur situe sur la fen6tre d affichage est expose a une Iumiere intense comme Ie soleil d autres telecommandes televi...

Page 38: ...t appareil possede Ies trois courbes d egalisation differences suivantes ROCK Son puissant accentuant Ies aigus et Ies graves POP Presence accrue des parties vocales et de la gamme moyenne JAZZ Frequencies basses accentuees pour la musique de type jazz Appuyer sur une des touches GEQ Pour annuler Ie mode selectionne Appuyer de nouveau sur la touche selectionnee EQ oFF est affiche Pour selectionner...

Page 39: ... rnemorisees voir MEMORISATION DE STATIONS sent effacees II faut memoriser de nouveau ces stations MEMORISATION DE STATIONS L appareil peut memoriser un total de 32 stations Quand une station est memorisee un numero de prereglage Iui est affecte Pour accorder I appareil directement sur une station memorisee utiliser Ie numero de prereglage correspondent 1 9 1o 3AND SHIFT CLE 1 2 C QC L QG C2QC C2c...

Page 40: ...CLOSE Pour demarrer la lecture quand I alimentation est toupee fonction de lecture directe Appuyer sur la touche CD ou sur une des touches DISC DIRECT PLAY L appareil est mis sous tension et la lecture du ales disque s en place demarre Pour changer des disques avant la lecture appuyer sur la touche OpEN CLOSE pour ouvrir Ie compartment a disques Pour verifier Ie temps restant Appuyer sur la touche...

Page 41: ...e de tourner A I aide des touches numeriques et de la touche 1 O programmer une plage Exemple Pour selectionner la vingt cinquieme plage appuyer sur Ies touches 10 10 et 5 Pour selectionner la dixieme plage appuyer sur Ies touches lOet O Numero de Temps de lecture total des programme plages selectionnees 4 5 Numero de la plage Nombre total de plages selectionnee selectionnees Repeter Ies etapes 2 ...

Page 42: ...nregistrer a partir d une emission de radio Appuyer sur la touche TUNER BAND et accorder sur une station Pour enregistrer a partir de la source connectee Appuyer sur la touche VIDEO AUX et mettre la source en marche 3 Appuyer sur la touche pour demarrer I enregistrement La touche est mise en service simultanement Lors de I enreaistrement a artir d un disaue compact la lecture et I enregistrement d...

Page 43: ...rri ter I enregistrement en tours Appuyer sur la touche 4 de la platine 1 La platine et Ie lecteur de disques compacts s arrbtent simultanement Pour effacer Ie contenu du montage Appuyer deux fois sur la touche CLEAR du Iecteur de disques compacts clans Ie mode arret de maniere que Ie trait rouge entourant AI EDIT disparaisse de I affichage ou appuyer sur la touche OPEN CLOSE du Iecteur de disques...

Page 44: ...e Apres s tre assure que B est affiche repeter I etape 5 Appuyer sur la touche EDIT CHECK tout en appuyant sur la touche SHIFT pour selectionner la face A et appuyer sur la touche de la platine 1 pour demarrer I enregistrement La lecture du disque compact et I enregistrement des plages programmers pour la premiere face demarrent simultanement Quand la fin de la face est atteinte la platine 1 passe...

Page 45: ...sur la touche de la platine 1 pour demarrer I effacement REGLAGE DE LA MINUTERIE D ARRET 1 2 La minuterie d arr6t permet de mettre I appareil hors tension automatiquement au bout d un temps specifie Utiliser la telecommande 1 2 Appuyer sur la touche SLEEP tout en appuyant sur la touche SHIFT Dans Ies auatre secondes aui suivent appuyer sur la touche ou pour specifier Ie temps jusqu a la mise hors ...

Page 46: ... est toupee mode attente de minuterie Effectuer Ies preparations pour la fonction TAPE ou pour I enregistrement commande par la minuterie Pour ecouter une cassette appuyer sur la touche Pour enregistrer la source appuyer sur la touche de la platine 1 Ckrand I heure de la mise sous tension par la minuterie est atteinte I appareil est mis sous tension et la lecture commence sur la source selectionne...

Page 47: ...ortir Ies signaux sonores numeriques de disque ccmpact par cette prise Utiliser un cable optique pour connecter un appareil audio numerique amplificateur numerique platine DAT enregistreur de minidisques etc Enlever k capuchon antipoussiere de la prise CD DIGITAL OUT OPTICAL Ensuite connecter la fiche d un cable optique a cette prise POWER 1 Pour utiliser I appareil connecte aux prises VIDEO AUX p...

Page 48: ...es sent necessaires pour assurer un fonctionnement optimal Nettoyage du coffret Utiliser un chiffon doux Iegerement imbibe d une solution detergence deuce Afin de ne pas aiterer Ie fini de I appareil ne pas utiliser de solvants forts tels que de I alcool de la benzine ou du diluant Nettoyage des tiStes et des chemins de bande Toutes Ies dix heures d utilisation nettoyer Ies t es et Ies chemins de ...

Page 49: ...e pas sale page 15 Une cassette au metal n est elle pas utilisee II n y a pas de sons aigus La t te d enregistremen t de lecture n est elle pas sale page 15 PARTIE LECTEUR DE DISQUES COMPACTS La lecture ne fonctionne pas Le disq e est il correctement mis en place page 7 Le disque n est il pas sale page 15 N y a t ii pas de la condensation sur la Ientille Attendre environ une heure puis essayer de ...

Page 50: ......

Page 51: ......

Page 52: ...p ment does cause harmful interference to radio or television reception which can be determined by turning the equipment off and on the user is encouraged to try to correct the interference by one or more of the following measures Reorient or relocate the receiving antenna Increase the separation between the equipment and receiver Connect the equipment into an outlet on circuit different from that...

Reviews: