–
6
–
In such a case, check also if the POWER AMPLIFIER circuit or power supply circuit has any abnormalities or not.
2-2. Regarding reset
There are cases that the machine does not work correctly because the MICROCOMPUTER is not reset even though the AC power
cord is re-inserted, or the software reset (pressing the STOP key + POWER key) is performed.
When the above described phenomenon occurs, it can lead to wrong judgement as if the MICROCOMPUTER is defective and to
exchange the MICROCOMPUTER. In such a case, perform the forced-reset by the following procedure and check good or no
good of the MICROCOMPUTER.
1
1
1
1
1
Remove the AC power cord.
2
2
2
2
2
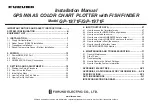
Short both ends of the electrolytic capacitor C113 that is connected to VDD of the MICROCOMPUTER with tweezers.
3
3
3
3
3
Connect the AC power cord again. If the MICROCOMPUTER returns to the normal operation, the MICROCOMPUTER is
good.
Note:
The reference number or MICROCOMPUTER pin number of transistor (Q110) and electrolytic capacitor (C113) can change depending
on the models. Be sure to check the reference numbers on schematic diagram before starting the discharging work.
2-3. Confirmation of soldering state of MICROCOMPUTER
Check the soldering state of the MICROCOMPUTER in addition to the above described procedures. Be sure to exchange the
MICROCOMPUTER after surely confirming that the trouble is not caused by poor soldering but the MICROCOMPUTER itself.
Fig-2-2
MICRO-
COMPUTER
MICR
OCOMPUTER
FRONT C.B
FRONT C.B
VSS
VDD
C113
*
%
C113
18
15
Short with tweezers.
Summary of Contents for XH-N5
Page 15: ... 15 FL BJ741GK GRID ASSIGNMENT ANODE CONNECTION GRID ASSIGNMENT ...
Page 16: ... 16 ANODE CONNECTION ...
Page 18: ... 18 SCHEMATIC DIAGRAM 1 MAIN 1 2 FUNCTION BBE DSP ECHO CONNECT1 3 ...
Page 19: ... 19 SCHEMATIC DIAGRAM 2 MAIN 2 2 DECK ...
Page 21: ... 21 SCHEMATIC DIAGRAM 3 FRONT DECK DECK MOTOR CONNECT2 3 ...
Page 23: ... 23 SCHEMATIC DIAGRAM 4 OPERATE KEY MIC LED A LED B LED C LED D ...
Page 25: ... 25 SCHEMATIC DIAGRAM 5 AMP AMP C B ...
Page 27: ... 27 SCHEMATIC DIAGRAM 6 VIDEO I O VIDEO JACK VIDEO 3 CONNECT 3 3 ...
Page 28: ... 29 SCHEMATIC DIAGRAM 7 TUNER ...
Page 30: ... 31 SCHEMATIC DIAGRAM 8 PT VOLTAGE SEL SW ...
Page 32: ... 33 IC BLOCK DIAGRAM IC BU4052BCF IC BA7625 ...
Page 33: ... 34 IC BU4094BCF IC BA7762AFS ...
Page 34: ... 35 IC M62445AFP IC SPS 442 1 F ...
Page 35: ... 36 IC BA3880FS IC LC72131D ...
Page 36: ... 37 IC BA3835F IC LA1837NL ...
Page 37: ... 38 IC BU2099FV IC BU9262AFS ...