background image

4

Installation

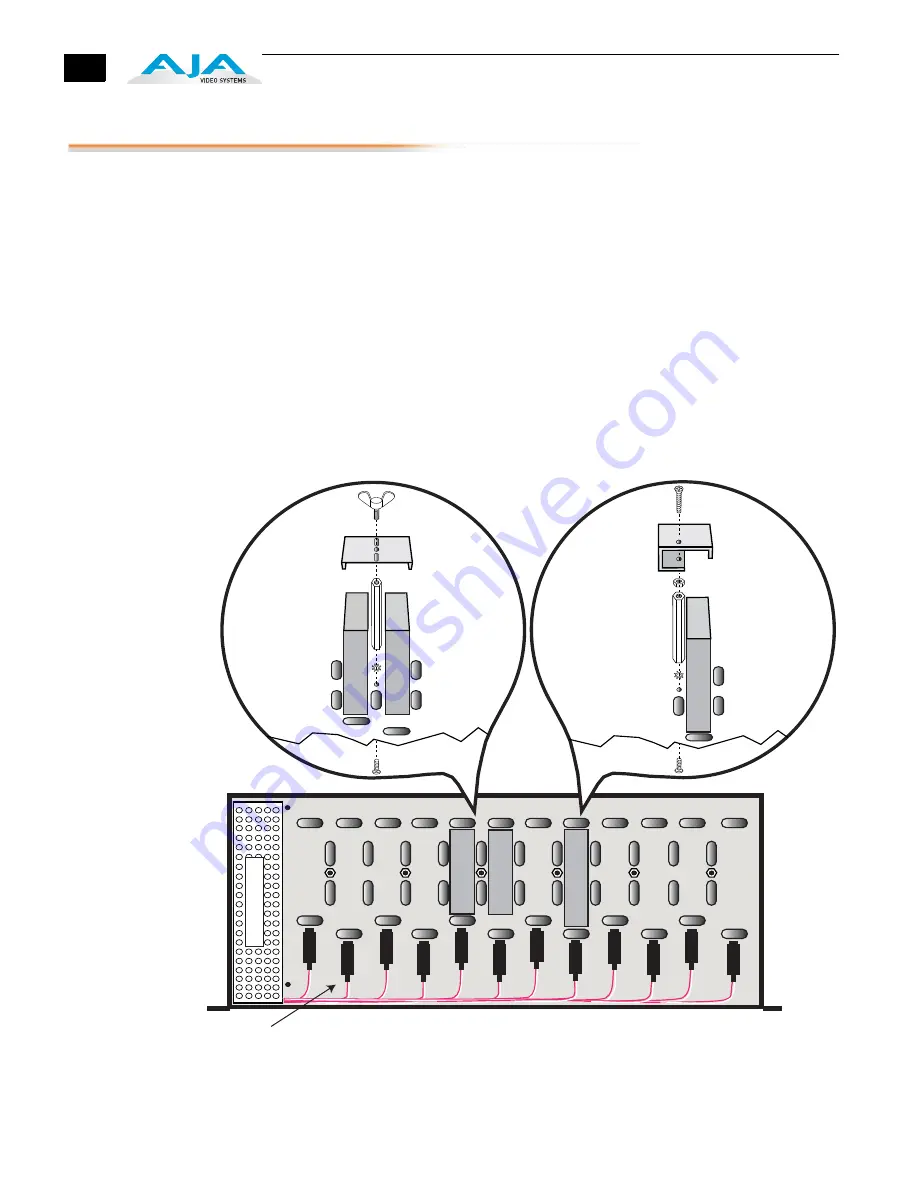
Install the converters in the DRM frame as shown and explained below:

1.

Position a star washer and standoff over a hole in the bottom of the frame where you 
want to mount a converter or converters. 

2.

Insert a screw from the underside of the frame through the hole, washer, and standoff, 
and tighten the screw to anchor the washer and standoff in place.

3.

Position converter(s) within the chosen slot(s) next to the standoff.  

4.

Place a clamp over the converter(s) and align the clamp hole(s) with the standoff.

5.

Cinch the clamp down tightly to the converter and standoff. Small converters require a 
wingnut inserted through a flat clamp. Large converters require a screw inserted 
through a spacer clamp on top of a nut. Adjust the nut for best clamping.

6.

Repeat the process for as many converters as you want to install.

7.

Place the front cover on the front of the frame and place the frame in a rack. 

8.

Insert rack screws and washers through the four holes in the frame’s cover and rack 
ears to secure the frame and cover to the rack. The screws through the top two holes 
hold the cover in place. The screws through the bottom two holes, which are larger, 
hold the frame in place while allowing the cover to be removed. 

9.

Connect signal cables and the power connector to each mini-converter. 

Mounting Small and Large Converters in the DRM Frame

Small Slot

Lar

ge Slot

Small Slot

Lar

ge Slot

Small Slot

Lar

ge Slot

Small Slot

Lar

ge Slot

Small Slot

Lar

ge Slot

Small Slot

Lar

ge Slot

The 6 large slots take small or large converters
The 6 small slots take only small converters

DRM FRAME TOP VIEW

Wingnut

Position star washer
and standoff over 
hole between 
converters. Tighten 
standoff to frame
by inserting screw
from underneath.

Frame underside

Frame inside

Place clamp 
over converters
and screw wingnut
into standoff 
through hole in
clamp.

Small

Converters

Front

View

Front

View

Large

Converter

Frame underside

Frame inside

Place nut over
standoff, place
clamp over 
converter, insert
screw through clamp
and nut, and tighten. 
Adjust position of nut
for best fit.

Position star washer
and standoff over 
hole between 
converters. Tighten 
standoff to frame
by inserting screw
from underneath.

Po

w

er Supply

Power 
Connectors

Summary of Contents for DRM

Page 1: ...www aja com Installation and Operation Guide B e c a u s e i t m a t t e r s DRM Mini Converter Rack Mount Frame Note Converters shown in photo not included Published 12 18 12 ...

Page 2: ... of the warranty period and make suitable arrangements for the performance of service The Customer shall be responsible for packaging and shipping the defective product to a designated service center nominated by AJA Video with shipping charges prepaid AJA Video shall pay for the return of the product to the Customer if the shipment is to a location within the country in which the AJA Video servic...

Page 3: ...es Note Because of heat related issues the 3GM converter cannot be used with the DRM frame The DRM includes a mini power supply with connections for up to 12 converters to eliminate the many individual converter wall wart power supplies What s In The Box When you unpack your AJA DRM you ll find the following components AJA DRM frame Power cord Bag of clamps and hardware for mounting converters The...

Page 4: ...re the frame and cover to the rack The screws through the top two holes hold the cover in place The screws through the bottom two holes which are larger hold the frame in place while allowing the cover to be removed 9 Connect signal cables and the power connector to each mini converter Mounting Small and Large Converters in the DRM Frame Small Slot Large Slot Small Slot Large Slot Small Slot Large...

Page 5: ... measures Reorient or relocate the receiving antenna Increase the separation between the equipment and receiver Connect the equipment into an outlet on a circuit different from that to which the receiver is connected Consult the dealer or an experienced radio TV technician for help FCC Caution This device complies with Part 15 of the FCC Rules Operation is subject to the following two conditions 1...

Page 6: ... R11 06 CSA C22 2 NO 60065 2003 A1 06 GS EN 60065 2002 A1 Additional licenses issued for specific countries available on request Emissions EN 55103 1 1996 EN61000 3 2 2006 EN61000 3 3 1995 A1 2001 A2 2005 Immunity EN 55103 2 1996 EN61000 4 2 1995 A1 1999 A2 2001 EN61000 4 3 2006 EN61000 4 4 2004 EN 61000 4 5 2005 EN 610004 6 2007 EN61000 4 11 2004 The product is also licensed for additional countr...

Page 7: ...VCCI Council VCCI V 3 2008 04 If this equipment is used in a domestic environment radio interference may occur in which case the user may be required to take corrective actions Translated caution statements warning conventions and warning messages The following caution statements warning conventions and warning messages apply to this product and manual 1 Class A ITE この装置は クラスA 情報技術装置です この装置を家庭環境で使...

Page 8: ...reil près de l eau et nettoyez le seulement avec un tissu sec Warnung Das Gerät nicht in der Nähe von Wasser verwenden und nur mit einem trockenen Tuch säubern Advertencia No utilice este dispositivo cerca del agua y límpielo solamente con un paño seco Aviso Não utilize este dispositivo perto da água e limpe o somente com um pano seco Avviso Non utilizzare questo dispositivo vicino all acqua e pul...

Page 9: ...entation ou la prise sont endommagés que du liquide a été versé ou des objets sont tombés dans l appareil que l appareil a été exposé à la pluie ou à l humidité ne fonctionne pas normalement ou est tombé Warnung Das Gerät sollte nur von qualifizierten Fachkräften gewartet werden Eine Wartung ist fällig wenn das Gerät in irgendeiner Weise beschädigt wurde wie bei beschädigtem Netzkabel oder Netzste...

Page 10: ...denziali potrebbe causare interferenze dannose nel cui caso agli utenti verrà richiesto di adottare tutte le misure necessarie per porre rimedio alle interferenze a proprie spese Warning Disconnect the external AC power supply line cord s from the mains power before moving the unit Avertissementþ Retirez le ou les cordons d alimentation en CA de la source d alimentation principale lorsque vous dép...

Page 11: ...ssione La presa deve essere installata vicino all apparecchio e deve essere facilmente accessibile Warning FR2 Dual Power Cord Notice please read this To reduce the risk of electrical shock disconnect both power cords before servicing equipment Avertissementþ Notice relative aux doubles cordons d alimentation de FR2 veuillez lire Pour réduire le risque de choc électrique débranchez les deux cordon...

Page 12: ...12 ...

Reviews: