background image

After Sales Support

 (AU) 1300 886 649  (NZ) 0800 836 761  |       info@tempo.org

10

First use

•  First cooling down: 

When you first switch on the appliance, the compressor will 

run continuously until the wine fridge reaches a cool enough temperature. During 
this period of time, try not to open the door frequently or place bottles inside the 
appliance. After about 3–4 hours, you can start loading the wine fridge.

•  Odour: 

You may notice an odour when you first switch on the appliance. This is due 

to the parts being new and is no cause for concern. The odour will subside as the 
appliance starts to cool.

IMPORTANT!

•  When you use the wine fridge for the first time, or restart the appliance after it has 

been turned off for a long time, there could be a few degrees variance between 
the temperature you select and the one indicated on the LED display. This is 
normal and it is due to the length of activation time. Once the wine fridge has 
been running for a few hours, everything will be back to normal. 

•  When loading several bottles of wine at once, it will take longer for the appliance 

to cool the individual bottles than when adding a bottle at a time.

•  If the unit is switched off or unplugged, you must allow at least 5 minutes before 

restarting the appliance or reconnecting it to your mains supply.

Getting Started

Unpacking

•  Packaging materials: 

This product has been packaged to protect it against 

transportation damage. Remove all packaging materials from around and inside the 
appliance, including the protective foam on the door panels. 
Keep the original packaging box and materials in a safe place. It will help prevent 
any damage if the product needs to be transported in the future, and you can use 
it to store the appliance when it is not in use. In the event that the box is to be 
disposed of, please recycle all packaging materials where possible. 
Plastic wrapping can be a suffocation hazard for babies and young children, so 
ensure all packaging materials are out of their reach and disposed of safely.

•  Parts: 

Check to ensure you have all the parts listed/pictured on page 8.

• 

Power cord: 

Unwind the power cord to its full length and inspect it for damage. 

Do not use the appliance if the appliance or its cord have been damaged or are 
not working properly. 

In case of damage, contact our after sales support centre for 

advice on examination, repair or return of the damaged product.

•  Read the manual: 

Read this manual to familiarise yourself with the appliance. Pay 

particular attention to the safety instructions on the previous pages.

•  Clean: 

To remove any dust from transit and storage, clean the interior surfaces of 

the wine fridge with lukewarm water and a soft cloth, following the instructions in 
the "Cleaning and Maintenance" section. Dry thoroughly.

•  Door opening: 

Your wine fridge has the capability of the door opening from the right 

or left side. If your set-up requires reversal of the door swing, follow the instructions 
in the "Door Reversal" section. Your new wine fridge is now ready for installation. 

Summary of Contents for 46WF-AK

Page 1: ...AFTER SALES SUPPORT AU 1300 886 649 NZ 0800 836 761 46 Bottle Wine Fridge INSTRUCTION MANUAL MODEL 46WF AK E209...

Page 2: ...6 761 info tempo org 2 Contents Page 03 General Safety Instructions 07 Installation 08 Product Overview 10 Getting Started 11 Instructions 15 Cleaning and Maintenance 16 Door Reversal 18 FAQs and Trou...

Page 3: ...ric shock and injury when correctly adhered to Keep the manual in a safe place for future reference along with the completed warranty card purchase receipt and carton If applicable pass these instruct...

Page 4: ...rd can negatively affect the performance of the unit Damaged cord Do not use a cord that shows cracks or abrasion damage along its length or at either end Any damage to the cord may cause a short circ...

Page 5: ...sult in electric shock injury or death Do not connect or disconnect the plug when your hands are wet Flames Do not let open flames or ignition sources enter the appliance Flammable explosive substance...

Page 6: ...bient temperature Choose a well ventilated area for the wine fridge with temperatures ideally between 22 C and 25 C In ambient temperatures above or below this range the unit s interior temperature ma...

Page 7: ...properly To level the unit adjust the levelling legs at the front of the wine fridge Settling Before connecting the wine fridge to the power source let it stand upright for approximately 2 hours This...

Page 8: ...ng legs 2x 4 Bottom wine rack basket C 5 Wine bottle shelf B 1x 6 Wine bottle shelves A 5x B Documentation not shown Instruction manual Warranty certificate and 2 spacers for optional use NOTE Due to...

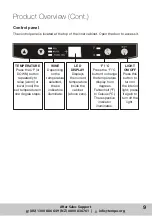
Page 9: ...or light press it again to turn off the light TEMPERATURE Press the UP or DOWN button repeatedly to raise warm or lower cool the set temperature in one degree steps WINE Depending on the temperature s...

Page 10: ...damage Remove all packaging materials from around and inside the appliance including the protective foam on the door panels Keep the original packaging box and materials in a safe place It will help...

Page 11: ...e temperature press the UP or DOWN button repeatedly With every press the temperature will increase or decrease by one degree The set temperature is shown on the LED display Depending on the temperatu...

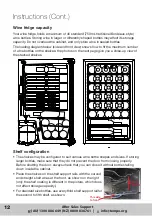
Page 12: ...on the right only the shelf coating is different in the picture which does not affect storage capacity For standard size bottles use every third shelf support rail for the second to fifth shelf as sho...

Page 13: ...to 5th shelf 7 bottles per shelf At the back 4 bottles with necks towards the front At the front 3 bottles with necks towards the back 6th shelf 5 bottles At the front 5 bottles with necks towards th...

Page 14: ...ing away Leave the wine fridge operating during vacations of less than three weeks If you are not going to use the appliance for longer periods remove all items and unplug the power cord Clean and dry...

Page 15: ...xcess water out of the cloth when cleaning around the controls or electrical parts Make sure to keep the door gasket seal clean to keep the unit running efficiently Wash the shelves and the outside of...

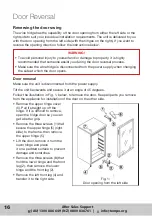
Page 16: ...ion of the door on the other side Remove the upper hinge cover 6 Pull it straight up off the hinge If it is difficult to remove open the fridge door so you can get a better grip Remove the three screw...

Page 17: ...9 and reverse the direction of the lower hinge 2 Install the lower hinge and the front leg 2 onto the left side of the lower frame with the three screws 8 Insert the bolt pin 9 to the lower hinge 2 S...

Page 18: ...losed completely The temperature control is not set correctly The door gasket does not seal properly The wine fridge does not have the correct clearances There are vibrations Check to ensure that the...

Page 19: ...el Our after sales support centre stocks the following spare parts for the appliance Control PCB Display PCB Door gasket Door hinge assembly upper and lower Electrical box Short adjustable foot Temper...

Page 20: ...6 Customer Helpline AU 1300 886 649 NZ 0800 836 761 Email info tempo org V1 0 July 2018 Warranty returns Should you for any reason need to return this product for a warranty claim make sure to include...

Reviews: