background image

English

   - 60 -

Subtitle Position

:


Sets subtitle position as up or 

down.

Subtitle Font Size

: Sets subtitle font size (max. 

54pt).

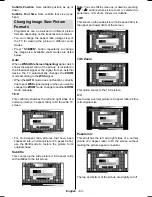
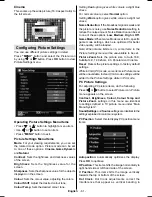
Changing Image Size: Picture 
Formats

Programmes can be watched in different picture 

• 

formats, depending on the transmission received.
You can change the aspect ratio (image size) of 

• 

the TV for viewing the picture in different zoom 
modes.
Press 

• 

“SCREEN”

 button repeatedly to change 

the image size. Available zoom modes are listed 
below.

Auto

When a 

WSS (Wide Screen Signalling)

 signal, which 

shows the aspect ratio of the picture, is included in 
the broadcast signal or the signal from an external 
device, the TV automatically changes the 

ZOOM


mode according to the 

WSS

 signal.

When the 

• 

AUTO

 mode does not function correctly 

due to poor 

WSS

 signal quality or when you want to 

change the 

ZOOM

 mode, change to another 

ZOOM


mode manually.

16:9

This uniformly stretches the left and right sides of a 
normal picture (4:3 aspect ratio) to 

fi

 ll the wide TV 

screen.

For 16:9 aspect ratio pictures that have been 

• 

squeezed into a normal picture (4:3 aspect ratio), 
use the 

16:9

 mode to restore the picture to its 

original shape.

Subtitle

This zooms up the wide picture (16:9 aspect ratio) 
with subtitles to the full screen.

Note

: You can shift to screen up or down by pressing 

“ ” / “ ” buttons while picture zoom is selected as 
panaromic, 14:9 Zoom, Cinema or Subtitle.

14:9

This zooms up the wide picture (14:9 aspect ratio) to 
the upper and lower limits of the screen.

14:9 Zoom

This option zooms to the 14:9 picture.

4:3

Use to view a normal picture (4:3 aspect ratio) as this 
is its original size.

Panoramic

This stretches the left and right sides of a normal 
picture (4:3 aspect ratio) to 

fi

 ll the screen, without 

making the picture appear unnatural.

The top and bottom of the picture are slightly cut off.

A02_MB60_[GB]_(01-TV)_woypbpr_1900UK_IDTV_BRONZE17_MOB L_22912WLED_10071657_50182412.indd   60

A02_MB60_[GB]_(01-TV)_woypbpr_1900UK_IDTV_BRONZE17_MOB L_22912WLED_10071657_50182412.indd   60

26.01.2011   19:40:21

26.01.2011   19:40:21

Summary of Contents for ALED2205T

Page 1: ...43 ALED2205T 1 82...

Page 2: ...vice List 56 Managing Stations Channel List 56 Operating the Channel List 56 Moving a Channel 56 Deleting a Channel 57 Renaming a Channel 57 Locking a Channel 57 Managing Stations Favourites 57 Button...

Page 3: ...keep the handbook as future reference When selling the device or giving it away absolutely give these direction for use Thank you for choosing this product This manual will guide you for the proper o...

Page 4: ...s on the TV set are intended for ventilation and to ensure reliable operation To prevent overheating these openings must not be blocked or covered in anyway Heat and Flames The set should not be place...

Page 5: ...esn t separate this device completely from mains Moreover the device consumes power in the standby operation In order to separate the device completely from mains the mains plug has to be pulled from...

Page 6: ...et will be decreased to optimum level Note that some picture settings will be unavailable to be changed when the TV is in Power Save Mode When the TV is not in use please switch off or disconnect the...

Page 7: ...Red button Zooms videos in Media Browser 16 video mode Green button 17 Yellow button 18 Menu on off 19 Blue button 20 OK Edit Channel list Hold in TXT mode 21 Cursor right Subpage in TXT mode 22 Curso...

Page 8: ...s can accept either 720p or 1080p Optional signals No sound connection is needed for an HDMI to HDMI connection RF Input 2 connects to an aerial antenna system Note that if you use a decoder or a medi...

Page 9: ...the connected jacks should match To enable audio connection you must use RED and WHITE inputs of the side AV connection cable Afterwards insert your device s audio cable s connectors into the RED and...

Page 10: ...Set the resolution that suits your viewing requirements Resolution information can be found in the appendix parts PC Input back Side AV Input PC VGA Cable Not supplied PC Audio Cable Not supplied Side...

Page 11: ...o standby mode To power down the TV completely unplug the power cord from the mains socket Note When the TV is switched to standby mode standby LED can blink to indicate that features such as Standby...

Page 12: ...cordance with the menu system of your TV Volume Setting Press V button to increase the volume Press V button to decrease the volume Avolume level scale slider will be displayed on the screen Programme...

Page 13: ...on to view Select Genre menu Using this feature you can search the programme guide database in accordance with the genre Info available in the programme guide will be searched and results matching you...

Page 14: ...l Analogue tuning using and OK buttons Automatic Channel Scan Retune Menu Operation Digital Searches and stores aerial DVB stations Analogue Searches and stores analogue stations Full Searches and sto...

Page 15: ...sible only when the Country option is set to Denmark Sweden Norway or Finland Use this setting to clear channels stored Press or button to select Clear Service List and then press OK The following OSD...

Page 16: ...el that you want to lock and select Lock option Press OK button to continue You will be asked to enter parental control PIN Default PIN is set as 0000 Enter the PIN number Press OK button when the des...

Page 17: ...y Media Browser window press either MENU button on the remote control and then select Media Browser by pressing or button Press OK button to continue Media Browser menu options will be displayed Also...

Page 18: ...le Press once more to enable only Shuffle Press again to enable all You can follow the disabled functions with the change of the icons RETURN Back to file list INFO Displays help screen Viewing Music...

Page 19: ...the ZOOM mode change to another ZOOM mode manually 16 9 This uniformly stretches the left and right sides of a normal picture 4 3 aspect ratio to fill the wide TV screen For 16 9 aspect ratio picture...

Page 20: ...ise Reduction can be set to one of these options Low Medium High or Off Game Mode When Game Mode is set to On specific game mode settings which are optimized for better video quality will be loaded No...

Page 21: ...nged manually only when the Equalizer Mode is in User Balance This setting is used for emphasizing left or right speaker balance Headphone Sets headphone volume AVL Automatic Volume Limiting AVL funct...

Page 22: ...ange depending on the service provider Press MENU button and select the icon by using or button Press OK button to view Settings menu Use or button to highlight Conditional Access and press OK to view...

Page 23: ...ck Menu lock setting enables or disables the menu access You can disable access to the installation menu or the whole menu system Maturity Lock optional When set this option gets the maturity informat...

Page 24: ...played When finished with editing press GREEN button to save You can press MENU button to cancel Deleting a Timer Select the timer you want to delete by pressing or button Press RED button Select YES...

Page 25: ...hat your TV always has the most update information you can use this setting In order for the proper operation please ensure that the TV is set to standby mode You can enable or disable automatic upgra...

Page 26: ...to use when TOP text transmission is present Pressing or commands will request the next or previous page respectively Tips Screen Care Clean the screen with a slightly damp soft cloth Do not use abras...

Page 27: ...12 1360x768 60 Hz Appendix B AV and HDMI Signal Compatibility Input Signal Types Source Supported Signals Available EXT SCART PAL 50 60 O NTSC 60 O RGB 50 O RGB 60 O Side AV PAL 50 60 O NTSC 60 O YPbP...

Page 28: ...ion information 24Hz 25Hz 30Hz 50Hz 60Hz 480i 480p 576i 576p 720p 1080i 1080p Appendix D Supported File Formats for USB Mode Supported Players Player Stream Video Decoder MSVD Audio Decoder MSAD Audio...

Page 29: ...is found and downloaded successfully with next power up TV opens with new software version Note on reboot operation Reboot is the last step in software upgrade operation if download of new software is...

Page 30: ...TION W 47 W max 1 W Standby PANEL 22 Screen Size DIMENSIONS mm DxLxH With foot 134 x 532 x 375 Weight Kg 5 05 DxLxH Without foot 53 x 532 x 347 Weight Kg 4 80 Digital Reception MHEG 5 ENGINE compliant...

Page 31: ...C 12 socket at the back of the TV Then the standby LED lights 2 up Press the 3 button P P or a numeric button on the remote control or press the button or button on the TV The TV will then switch on A...

Page 32: ...CD CD R CD RW MP3 JPEG MPEG DivX playback NTSC PAL playback according to disc content LPCM audio via coaxial digital audio output optional Multi Audio up to 8 support According to disc content Multi...

Page 33: ...the disc to direct sunlight or heat sources such as hot air ducts or leave it in a car parked in direct sunlight as the temperature can rise quickly and damage the disc After playing store the disc i...

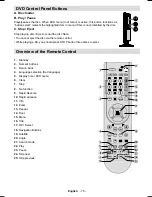
Page 34: ...a the remote control While playing a file you should press STOP button three times to eject Overview of the Remote Control Standby 1 Numeric buttons 2 Return back 3 Language selection Set language 4 D...

Page 35: ...Time counter mode selection during playback Press repeatedly to switch between modes LANG Audio language X X MENU Displays TV menu OK SELECT Enter View Play REPEAT Displays repeat options RETURN Retur...

Page 36: ...cted not supported by the 7 disc the subtitle language will automatically be set to the disc s priority language Usually a circulation will happen while switching 8 to another language that is you can...

Page 37: ...technical service SPDIF OUTPUT You can set Spdif Output as PCM or RAW If you select PCM from SPDIF Output in DVD menu and play DVD with Dolby audio you can get audio output with two channels via the s...

Page 38: ...Incorporating a new video compression technology MPEG II and high density recording technology DVD enables aesthetically pleasing full motion video to be recorded over long periods of time for instanc...

Page 39: ...o rd in g Ty p es D is c S ize M a x P layin g Tim e 74 m in 20 m in S ing le sid ed 240 m in D o u b le sid ed 480 m in S ing le side d 80 m in D o u b le sid ed 160 m in C h aracteristic s D V D co...

Page 40: ...a pixel Support format 444 440 422 420 Grayscale External Subtitles optional srt Support Text File Format but do not support Picture File Format smi sub ssa ass Note It is not guaranteed that all DivX...

Reviews: