background image

Couleur du fil

Canal et polarité

Blanc (L+)

Gauche, borne positive

Bleu (L–)

Gauche, borne négative

Rouge (R+)

Droite, borne positive

Vert (R–)

Droite, borne négative

Fixer la nouvelle cartouche avec les vis et les écrous. Les vis doivent être alignées perpendiculairement au cache de 
protection (7).
Ajuster la distance entre la pointe de lecture et le moyeu central. La distance pour une lecture optimale est de 16mm.
Serrer les vis et les écrous.

Remplacement de la pointe de lecture

Il est possible de remplacer la pointe de lecture plutôt que toute la cartouche.

Eteindre le tourne-disque.
Bloquer le bras (9) sur son support au moyen de l’attache (10).
Tourner le collier de serrage dans le sens des aiguilles d’une montre puis détacher le cache de 
protection (7).
Placer le protège pointe de lecture sur la cartouche.
Appuyer vers le bas et retirer la pointe de lecture.
Installer une nouvelle pointe de lecture compatible avec la cartouche.
Remettre la cartouche sur le bras de lecture (9).
Régler la force d’appui de la pointe de lecture.

1.
2.
3.
4.
5.

6.

7.
8.

1.
2.
3.

4.
5.
6.
7.
8.

D) Replacing the cartridge

Replace the cartridge after roughly 400 hours of use. The cartridge included in the product is Audio-

Technica

®

 AT3600L.

Switch off the turntable.
Secure the tone arm (9) to the tone arm rest with the clamp (10).
Turn the fastening collar clockwise and then detach the headshell (7).
Unscrew the two screws on headshell (7) and then separate the cartridge from the headshell (7).
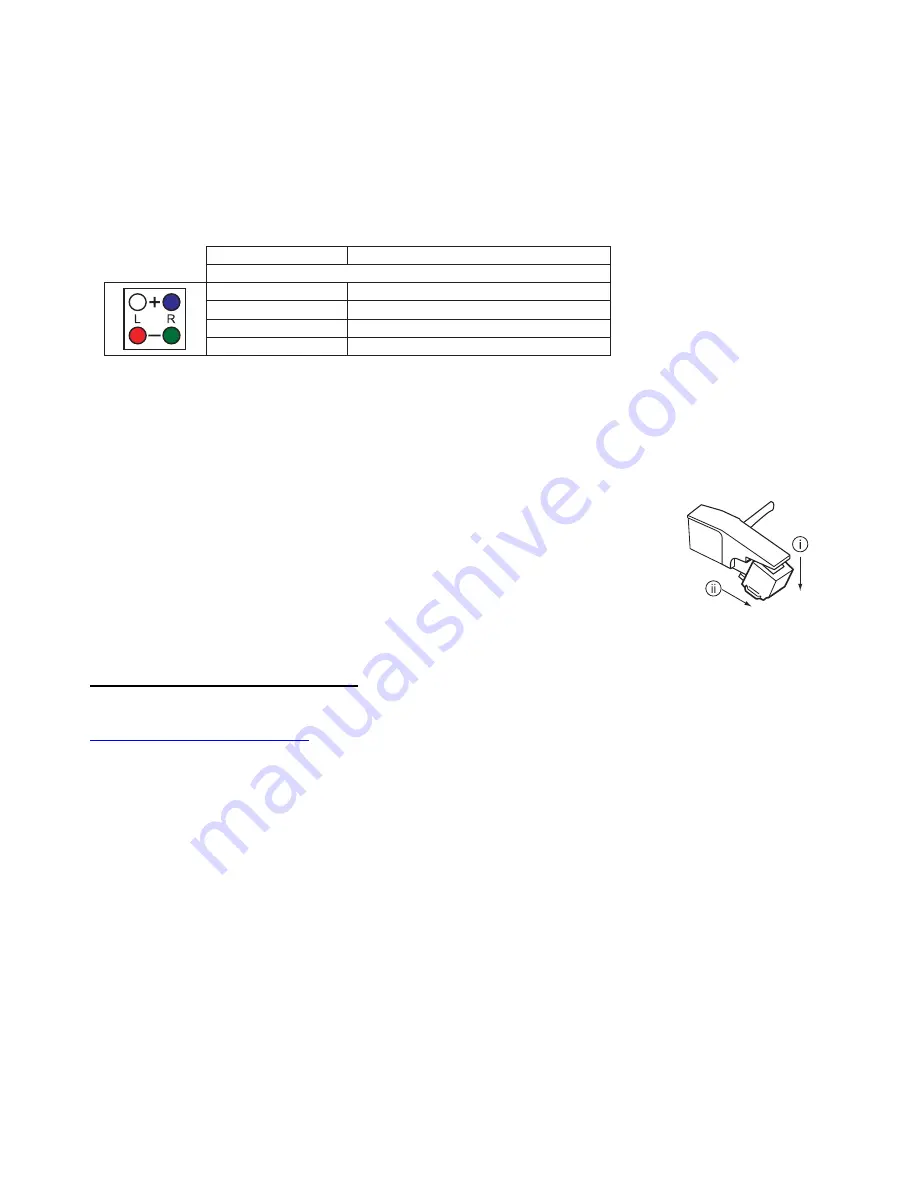
Connect a new cartridge to the headshell (7) while observing the pin assignment, which is shown

as below.

Wire Colour

Channel and polarity

White (L+)

Left, plus terminal

Blue (L–)

Left, negative terminal

Red (R+)

Right, plus terminal

Green (R–)

Right, negative terminal

Affix the new cartridge to with the screws and nuts. The screws should be aligned perpendicular to the

headshell (7).
Set the distance between the stylus and the centre spindle. The distance should be set to 16mm for

optimal playback.
Tighten the screws and nuts.

Replacing the stylus

Instead of replacing the whole cartridge, you can replace the stylus only.

Switch off the turntable.
Secure the tone arm (9) to the tone arm rest with the clamp (10).
Turn the fastening collar clockwise and then detach the headshell (7).
Put the stylus guard on the cartridge.
Press down and remove the stylus.
Insert a new stylus that is compatible with the cartridge.
Attach the cartridge to the tone arm (9).

1.
2.
3.
4.
5.

6.

7.

8.

1.
2.
3.
4.
5.
6.
7.

AUDACITY SOFTWARE OVERVIEW 

Audacity is free software, licensed under the GNU General Public License(GPL).  

More information as well as open source code can be found on the web at  

http://audacity.sourceforge.net/


*

 Please ensure you have installed the software before starting. 


SET UP PROCEDURE 

1.  Connect an input source to the unit. 

2.  Connect the USB lead to your computer. 

3.  Install the Audacity recording software. 

4.  Open the Audacity program. 

5.  Go to EDIT then PREFERENCES. 

6.  Click AUDIO I/O tab. 

7.  Choose recording device USB AUDIO CODEC from the drop down menu. 

8.  Choose CHANNELS (2 STEREO) 

9.  Tick SOFTWARE PLAY THROUTH BOX 

10. Click OK. 


RECORDING & SAVING TRACKS 

1.  Play the track to be recorded. 

2.  Click the RED record button on the computer. 

3.  When you have finished the recording, click the YELLOW stop button. 

4.  You can now click


FILE and choose to save your recording. 


5.


Click the GREEN play button to playback your finished recording

.

54

Summary of Contents for ATT10U

Page 1: ...PROFESSIONAL USB TURNTABLE ATT10U OperatorÕsmanual Bedienungsanleitung 4 14 D 48 58 GB ...

Page 2: ...n be found in the Table of contents with the corresponding page number on page 49 Dear customer Thank you for purchasing this product We kindly request the user to follow the operating instructions to preserve this condition and to ensure safe operation Please read the operating instructions completely and observe the safety and operating instructions before using the product All company names and...

Page 3: ...ents 52 A Topside 52 B Rearpanel 52 6 Setupandconnection 52 A Setup 52 B Connection 53 C Connectingtomains 53 D Replacingthecartridge 54 7 Operation 55 A Balancingthecounterweight 55 B Settinganti skatecompenstaion 55 C Playingrecords 55 D Revolutionspeedfunetuning 55 8 Maintenance 56 9 Troubleshooting 57 10 Disposal 58 11 Technicaldata 58 49 ...

Page 4: ...tem The turntable includes a S shaped tone arm reinforced with anti skating mechanism It must be powered by 230V 50Hz or 115V 60Hz and is only authorised to used in dry indoor environments Any usage other than described above is not permitted and can damage the product and lead to associated risks such as short circuit fre electirc shock etc No part of the product may be modifed or rebuilt Please ...

Page 5: ...ed since the power adapter is predominantly cooled by convection ventilation The housing of the turntable must not be opened Capacitors in the device may still be charged even if the device has been disconnected from voltage source There is risk of mortal electric shock when touching electric components inside Before cleaning or connecting the turntable to other devices the turntable must be disco...

Page 6: ...en experiencing feedback direct the radiation field of your loudspeakers away from the turntable A Setup Place the platter 2 on the centre spindle Make sure that the platter 2 can rotate uniformly and does not wobble excessively Rotate the platter 2 until the drive hub 3 is visible through either one of the rectangular openings on the platter Reach into the hole and pull the rubber drive belt over...

Page 7: ...Bport 18 oftheturntabletoavacantUSBportofacomputerviaUSBcable AsoftwareCDisincluded withanopensourcesoftware Audacity Licensed under the GNU General Public License GPL whichcanrecordandeditaudiosignalfromUSBsignaltocomputer Forinstallationandoperationinstructionsanddetailspleasevisithttp audacity sourceforge net B Connection Connecting to other audio devices Connect the phono outputs 16 of the tur...

Page 8: ...rm 9 to the tone arm rest with the clamp 10 Turn the fastening collar clockwise and then detach the headshell 7 Put the stylus guard on the cartridge Press down and remove the stylus Insert a new stylus that is compatible with the cartridge Attach the cartridge to the tone arm 9 1 2 3 4 5 6 7 8 1 2 3 4 5 6 7 AUDACITY SOFTWARE OVERVIEW Audacity is free software licensed under the GNU General Public...

Page 9: ...according to the record playing speed Press 33 button to play 33 1 3 rpm records Press 45 button to play 45 rpm records Press both buttons simultaneously to play 78 rpm records Press REVERSE button 6 to play the record in reverse To deactivate the function press REVERSE button 6 again Press button 1 to play the record The turntable will start to rotate Release the clamp of the tone arm rest 10 and...

Page 10: ...connect or disconnect power plugs with wet hands Never disconnect power plugs from the mains socket by pulling at the cable Always pull out the power plug holding it at the contact surfaces provided for this purpose Always pull the power plug out of the mains socket if the appliance is not going to be used for longer periods of time To ensure an adequate ventilation there must be an open area of 5...

Page 11: ...annel Is one of the cinch fittings incorrectly inserted Is the balance control on the amplifier mixing desk incorrectly set The tone of the playback sound is too low or high Has the speed been correctly set The playback is distorted Has the stylus force been set correctly Is the stylus defective or worn down Has the anti skating compensation been set correctly Is the record or stylus dirty Is the ...

Page 12: ...ling of this product The recycling of materials will help conserve natural resources Please do nottherefore dispose of your old electrical and electronic equipment with your household waste For moredetailed information about recycling of this product please contact your local city office your householdwaste disposal service or the shop where you purchased the product Operating voltage 230 V 50 Hz ...

Reviews: