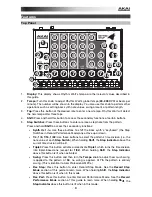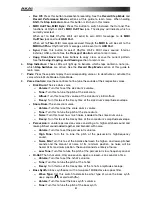
background image


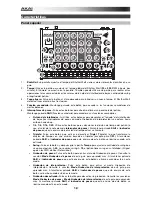
Rear Panel 


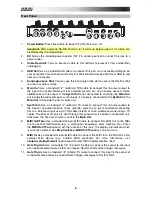
1

2

3

4

5

6 7 8 9

10 11


1.


Power Button:

 Press this button to power Rhythm Wolf on or off.


Important:

 After powering Rhythm Wolf on, let it warm up before using it. Its tuning can 

be affected by the temperature. 

2.


DC In:

 Use the included power adapter (12V, 2A, center-positive) to connect this jack to a 

power outlet.


3.


Cable Restraint: 

You can secure a cable to this restraint to prevent it from accidentally 

unplugging.


4.


USB Port:

 Use a standard USB cable to connect this port to an available USB port on 

your computer. This connection lets Rhythm Wolf send and receive MIDI over USB to and 
from your computer.


5.


Kensington Lock Slot:

 You may use this Kensington lock slot to secure the Rhythm Wolf 

to a table or other surface.


6.


Main Out:

 Use a standard 1/4" (6.35mm) TRS cable to connect this line-level output to 

the input of an audio interface, mixer, amplifier system, etc. You can also connect stereo 
headphones to this output. If the 

Synth Out

 is not connected to anything, the 

Main Out


will include the drum and bass synth voices. If a cable is connected to the 

Synth Out

, the 

Main Out

 will include the drum voices only.


7.


Synth Out:

 Use a standard 1/4" (6.35mm) TS cable to connect this line-level output to 

the input of an audio interface, mixer, amplifier system, etc. (we recommend connecting 
this to a balanced input using a TRS cable instead of to an unbalanced one using a TS 
cable). The bass synth voice is sent through this output only if a cable is connected to it. 
Otherwise, the bass synth voice is sent to the 

Main Out

8.


MIDI Out/Thru: 

Use a standard five-pin MIDI cable to connect this MIDI Out to the MIDI 

In of an external MIDI device (e.g., a synthesizer, sequencer, drum machine, etc.). Press 
the 

MIDI Out/Thru

 button to set the function of this jack. The display will indicate which 

is currently selected. See 

Step Switches: MIDI Out/Thru

 above to learn more. 

9.


MIDI In: 

Use a standard five-pin MIDI cable to connect this MIDI In to the MIDI Out of an 

external MIDI device (e.g., another MIDI controller). For more information, visit 

akaipro.com/rhythmwolf

 to download the latest MIDI implementation chart. 

10.


Gate Trig Out:

 Use a standard 1/8" (3.5mm) TS cable to connect this output to the input 

of an optional external device that can receive Rhythm Wolf's Gate (trigger) messages.


11.


Gate Trig In:

 Use a standard 1/8" (3.5mm) TS cable to connect this input to the output of 

an optional external device to send Gate (trigger) messages to Rhythm Wolf.


Summary of Contents for Rhytm Wolf

Page 1: ...User Guide English 2 10 Gu a del usuario Espa ol 11 19 Guide d utilisation Fran ais 20 28 Guida per l uso Italiano 29 37 Benutzerhandbuch Deutsch 38 46 Appendix English 47...

Page 2: ...wolf For additional product support visit akaipro com support Quick Start Connection Diagram Important After powering Rhythm Wolf on let it warm up before using it Its tuning can be affected by the te...

Page 3: ...e Step Switches in Record Performance Mode one octave up or down 1 4 1 8 1 16 1 32 Use these buttons to select the pattern s time division i e the note value of each Step Switch When holding Shift the...

Page 4: ...drum s volume o Tune Turn this to tune the pitch of the kick drum o Attack Turn this to set the volume of the kick drum s initial attack o Decay Turn this to set the Decay time of the kick drum s amp...

Page 5: ...equence A B or A and B See the About Patterns section to learn more 13 Seq Variation Press this button to select whether you are playing editing Sequence A Sequence B or Sequence A and B See the About...

Page 6: ...only 7 Synth Out Use a standard 1 4 6 35mm TS cable to connect this line level output to the input of an audio interface mixer amplifier system etc we recommend connecting this to a balanced input usi...

Page 7: ...Clock and SongPosPtr 0 depending on its transport state Rhythm Wolf s Gate Trig Out will pulse each time it advances one step When set to External or USB Rhythm Wolf s playback will respond to incomi...

Page 8: ...Fill button during playback The fill that plays will be determined by 1 the state of the Seq Variation button and 2 which sequence is currently playing When Seq Variation is set to Sequence A only or...

Page 9: ...both drum and bass synth voices has a velocity which determines how loud the note is played To edit a step s velocity press and hold the Velocity button and then press the desired Step Switch to cycl...

Page 10: ...and then press Step Switch 14 Copy The Step Indicator for the current pattern will flash green The Step Indicators for non empty patterns will flash amber The Step Indicators for empty patterns will...

Page 11: ...ener soporte adicional del producto visite akaipro com support Diagrama de inicio y conexi n r pida Importante Tras encender el Rhythm Wolf d jelo calentar antes de usarlo La temperatura puede afectar...

Page 12: ...nota de cada interruptor de pasos Al mantener pulsado Shift el indicador de pasos que est encima de la divisi n de tiempo actual se iluminar Triplete Pulse este bot n para activar o desactivar Triplet...

Page 13: ...tar el tiempo de decaimiento de la envolvente de amplitud del bombo Redoblante La voz del redoblante o Volumen Gire esta perilla para ajustar el volumen del redoblante o Afinaci n Gire esta perilla pa...

Page 14: ...ulse este bot n para reproducir el relleno de la secuencia actual A B o A y B Consulte la secci n Acerca de los patrones para aprender m s 13 Variaci n de secuencia Pulse este bot n para seleccionar s...

Page 15: ...nectar esta salida de nivel de l nea a la entrada de una interfaz de audio mezclador sistema de amplificaci n etc recomendamos conectar esta salida a una entrada balanceada utilizando un cable TRS en...

Page 16: ...l puntero de la canci n en 0 MIDI dependiendo de su estado de transporte La salida Gate Trig Out del Rhythm Wolf pulsar cada vez que avanza un paso Cuando se ajusta a externo o USB La reproducci n del...

Page 17: ...lse el bot n Fill Relleno durante la reproducci n El relleno a reproducirse ser determinado por 1 el estado del bot n Seq Variation y 2 la secuencia actualmente en reproducci n Cuando Seq Variation se...

Page 18: ...de la bater a como del sintetizador de bajos tiene una velocidad la cual determina qu tan fuerte se reproduce la nota Para editar la velocidad del paso mantenga pulsado el bot n Velocity y despu s pu...

Page 19: ...r de paso 14 Copy El indicador de paso para el patr n actual parpadear en verde Los indicadores de pasos para los patrones que no est n vac os parpadear n en verde Los indicadores de pasos para los pa...

Page 20: ...ppl mentaire veuillez visiter akaipro com support D marrage rapide Sch ma de connexion Important Apr s avoir mis le Rhythm Wolf sous tension laissez lui le temps de se r chauffer avant de l utiliser S...

Page 21: ...ivision temporelle de l encha nement c est dire la valeur de note de chaque touche de pas Lorsque la touche Shift est enfonc e l indicateur de pas au dessus de la division temporelle actuelle s allume...

Page 22: ...temps de d croissance de l enveloppe d amplitude de la grosse caisse Snare Drum La voix d une caisse claire o Volume Ce bouton permet de r gler le volume de la caisse claire o Tune Ce bouton permet d...

Page 23: ...utes les notes All Notes Off 12 Fill Cette touche permet de faire jouer le son de fond de la s quence en cours A B ou A et B Reportez vous la section Encha nements pour en savoir plus 13 Seq Variation...

Page 24: ...ain Out ne transmet que les voix de batterie 7 Synth Out Utilisez un c ble 6 35 mm 1 4 po standard pour raccorder la sortie ligne l entr e d une interface audio d une console de mixage d un syst me de...

Page 25: ...mode La sortie Gate Trig Out du Rhythm Wolf met une impulsion chaque fois qu il avance d un pas Lorsque r gl sur External ou USB La lecture du Rhythm Wolf est modifi e en fonction des messages MIDI r...

Page 26: ...d termin par 1 le mode de fonctionnement de la touche Seq Variation et 2 la s quence est en cours de lecture Lorsque la touche Seq Variation est r gl e sur la S quence A seulement ou la S quence B se...

Page 27: ...taves Chaque pas pour les voix de batterie et de synth tiseur de basse poss de une dynamique qui d termine comment fort la note est jou e Pour modifier la dynamique du pas maintenez la touche Velocity...

Page 28: ...14 Copy L indicateur de pas pour l encha nement en cours devient vert et clignote Les indicateurs de pas pour les encha nements utilis s deviennent ambre et clignotent Les indicateurs de pas pour les...

Page 29: ...nza sul prodotto recarsi alla pagina akaipro com support Guida rapida Schema dei collegamenti Importante dopo aver acceso il Rhythm Wolf lasciare che si scaldi prima di utilizzarlo La sintonia pu esse...

Page 30: ...tiene premuto Shift l indicatore di passo al di sopra della divisione di tempo corrente sar acceso Triplet premere questo tasto per attivare o disattivare la funzione Triplet terzina che trasforma la...

Page 31: ...decadenza della definizione di ampiezza della grancassa Rullante la voce del rullante o Volume girare questo comando per impostare il volume del rullante o Tune girare questo comando per regolare il...

Page 32: ...ll premere questo tasto per riprodurre il fill per la sequenza corrente A B oppure A e B Per saperne di pi si veda il paragrafo Informazioni sui pattern 13 Seq Variation variazione di sequenza premere...

Page 33: ...irsi di un cavo TS standard da 1 4 6 35 mm per collegare questa uscita a livello di linea all ingresso di un interfaccia audio di un mixer di un impianto di amplificazione ecc si consiglia di collegar...

Page 34: ...a del suo stato di trasporto L uscita Gate Trig del Rhythm Wolf pulsa ogni volta che avanza di un passo Quando impostato su External esterno o USB La riproduzione del Rhythm Wolf risponder ai messaggi...

Page 35: ...roduzione Il fill che viene riprodotto viene determinato 1 dallo stato del tasto Seq Variation e 2 da quale sequenza viene attualmente riprodotta Quando Seq Variation variazione di sequenza impostato...

Page 36: ...ha una velocit che determina la quantit di forza con la quale la nota viene suonata Per modificare la velocit di un passo tenere premuto il tasto Velocity velocit quindi premere l interruttore di pass...

Page 37: ...icatore di passo per il pattern corrente lampeggia di verde Gli indicatori di passo di pattern non vuoti lampeggiano di giallo Gli indicatori di passo di pattern vuoti saranno spenti 2 Lasciare l inte...

Page 38: ...odukt Support besuchen Sie akaipro com support Schnellstart Anschlussdiagramm Wichtig Lassen Sie den Rhythm Wolf nach dem Einschalten etwas warmlaufen bevor Sie ihn verwenden Sein Tuning kann von der...

Page 39: ...ne Oktave nach oben oder unten zu verschieben 1 4 1 8 1 16 1 32 Verwenden Sie diese Tasten um die Zeiteinteilung des Patterns auszuw hlen d h den Notenwert f r jeden einzelnen Step Taster Beim Halten...

Page 40: ...k nnen Sie die Klangfarbe der jeweiligen Sounds feinabstimmen Kick Drum Der Kick Drum Sound o Lautst rke Drehen Sie hier um die Lautst rke der Kick Drum einzustellen o Tuning Drehen Sie hier um die T...

Page 41: ...ten Halten Sie die Umschalttaste gedr ckt und dr cken Sie dann diese Taste um eine Alle Noten Aus Meldung zu senden 12 Fill Dr cken Sie diese Taste um einen Fill f r die aktuelle Sequenz zu spielen A...

Page 42: ...ang Verwenden Sie ein handels bliches 1 4 6 35 mm TS Kabel um diesen Line Level Ausgang mit dem Eingang einer Audio Schnittstelle einem Mixer einem Verst rker System etc zu verbinden Wir empfehlen die...

Page 43: ...enden Rhythm Wolf s Gate Trig Out sendet jedes Mal einen Impuls wenn es einen Step vorw rts geht Bei der Einstellung Extern oder USB Die Wiedergabe des Rhythm Wolf reagiert auf die eingehenden MIDI Na...

Page 44: ...Das abgespielte Fill wird von zwei Faktoren bestimmt 1 dem Zustand der Seq Variation Taste und 2 welche Sequenz gerade abgespielt wird Ist die Seq Variation auf eine einzige Sequenz A oder eine einzig...

Page 45: ...sowohl f r Drum als auch f r Bass Synthesizer Sounds hat eine Velocity die bestimmt wie laut der Ton gespielt wird Um die Velocity eines Steps zu bearbeiten halten Sie die Velocitys Taste gedr ckt und...

Page 46: ...ttaste gedr ckt und dr cken Sie dann Step Taster 14 Kopieren Der Step Indikator f r das aktuelle Pattern blinkt gr n Die Step Indikatoren f r freie Patterns blinken gelb Die Step Indikatoren f r leere...

Page 47: ...mm TRS main output 1 1 4 6 35mm TS synthesizer output 1 1 8 3 5mm TS gate trigger input 0 5 V max 1 1 8 3 5mm TS gate trigger output 5 V pulse 1 5 pin MIDI input 1 5 pin MIDI output through 1 USB port...

Page 48: ...akaipro com Manual Version 1 3...

Reviews: