background image


BOX CONTENTS 


y


SynthStation 25 

y


4 AAA batteries 

y


Quickstart Guide 

y


Safety Instructions & Warranty Information Booklet 


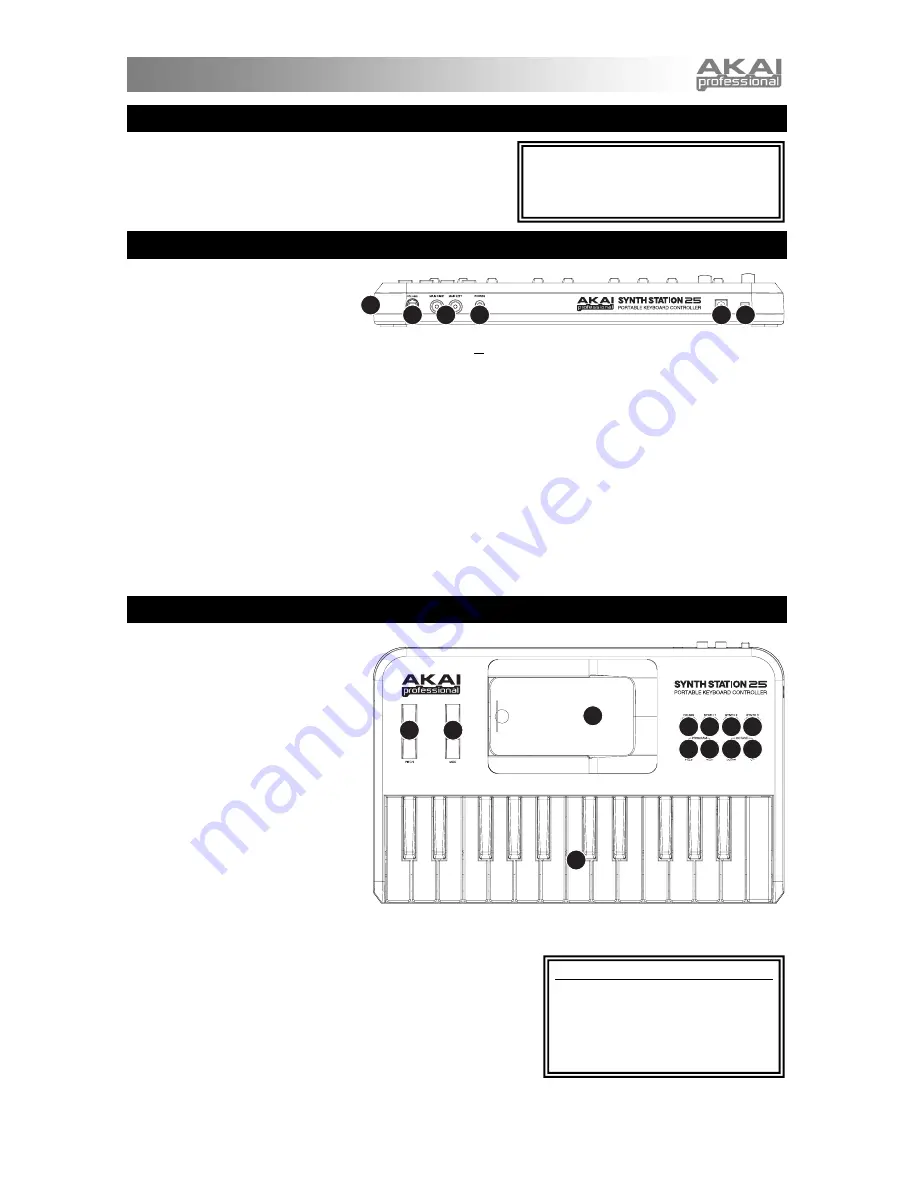
REAR PANEL OVERVIEW 

 
1.


POWER INPUT


 Connect a 6V 

DC – 1A power adapter (center 
pin positive, 2.1mm pin diameter, 
5.5mm barrel diameter, not 
included) to this jack then into an electrical outlet.  Alternatively, you can power SynthStation 25 with 4 AAA batteries 
(inserted into the battery compartment underneath the unit) 

or

 via the USB PORT on the side of the unit with a standard 

mini-USB cable (not included) connected to your computer.  However, using a power adapter will let you charge your 
iPhone

®

 or iPod touch

®

 * while using SynthStation 25. 

2.


MINI-USB PORT –

 Plug a standard mini-USB cable (not included) into this port and into the USB port of your computer.  

The computer's USB port will provide power to SynthStation 25.  When connected to your Mac or PC, SynthStation 25 
can be used as a USB-MIDI controller.  SynthStation 25 is class-compliant, so it is "plug-and-play" – no separate driver 
installation is necessary. 

3.


POWER SWITCH –

 Turns SynthStation 25 on or off. 

4.


MASTER VOLUME –

 Adjusts the volume of the MAIN OUTPUTS and HEADPHONE OUTPUT.  This master output 

includes iPhone or iPod touch playback. 

5.


HEADPHONE OUTPUT –

 Connect 1/8" stereo headphones to this output.  You can adjust level of this output with the 

MASTER VOLUME knob. 

6.


MAIN OUTPUTS –

 Connect a speaker system or other output device to these outputs using the included stereo RCA 

cable.  Adjust the level of these outputs with the MASTER VOLUME knob. 


* iPhone and iPod touch are trademarks of Apple Inc., registered in the U.S. and other countries. 


TOP PANEL OVERVIEW 

 
1.


DOCK – 

Connect your iPhone or 

iPod touch here. Gently rock the 
device back and forth over the 
connector when attaching or 
removing it. 

2.


KEYBOARD –

 This 25-note 

keyboard is velocity-sensitive and, in 
conjunction with the OCTAVE –/+ 
buttons, can control an eight-octave 
range. 

Note:

 Your performance on the 

KEYBOARD is independent from the 
keyboard shown on the Perform 
Page in SynthStation Studio, 
allowing you perform in three 
octaves at a time – one in 
SynthStation Studio and the two-
octave KEYBOARD on SynthStation 
25. 

3.


PITCH BEND WHEEL –

 Transmits MIDI Pitch Bend information to raise or lower the pitch of the KEYBOARD 

temporarily.  

4.


MOD WHEEL – 

Transmits continuous controller data (CC #1 or 

Modulation Depth). 

5.


OCTAVE –/+ – 

These buttons can be used to shift the KEYBOARD's 

range up or down three octaves in either direction allowing for an 
eight-octave range.  When you are higher or lower than the center 
octaves, the corresponding OCTAVE button will light.  To return the 
KEYBOARD to the center octaves, press both OCTAVE buttons 
simultaneously.   

6.


PROGRAM –/+ –

 These buttons can be used to change the Program 

(the set of Sounds in SynthStation Studio).   

7.


DRUM / SYNTH –

 These buttons select one of three Synth parts or the Drum part for performance in SynthStation 

Studio.  The KEYBOARD will play the sounds of the selected part.    

1

2

3

4

5 5

6 6

7 7

7 7

The app, 

Akai SynthStation Studio

, is not 

included.  To purchase it, go to the iTunes 
App Store and search for "SynthStation 
Studio."  

1 3

2

4

6

5

Note for Gen 1 (original) iPhone users:


When using SynthStation 25, use the 
following steps to connect your iPhone: 
put your iPhone in Airplane Mode, turn on 
SynthStation 25, then lastly, connect your 
iPhone to the dock. You are now ready to 
use SynthStation 25. 

Summary of Contents for Synth Station 25

Page 1: ...WWW AKAIPRO COM QUICKSTART GUIDE ENGLISH 1 2 GUÍA DE INICIO RÁPIDO ESPAÑOL 3 4 GUIDE D UTILISATION RAPIDE FRANÇAIS 5 6 GUIDA RAPIDA ITALIANO 7 8 KURZANLEITUNG DEUTSCH 9 10 ...

Page 2: ......

Page 3: ...red in the U S and other countries TOP PANEL OVERVIEW 1 DOCK Connect your iPhone or iPod touch here Gently rock the device back and forth over the connector when attaching or removing it 2 KEYBOARD This 25 note keyboard is velocity sensitive and in conjunction with the OCTAVE buttons can control an eight octave range Note Your performance on the KEYBOARD is independent from the keyboard shown on t...

Page 4: ...thStation Studio app Turn SynthStation 25 off then on again If you are powering it via its mini USB connection disconnect then reconnect it to your computer Also try connecting SynthStation 25 to a USB port on your computer rather than a USB hub Delete the SynthStation Studio app from your iPhone or iPod touch then re download it Be sure you have backed up the app on your computer before deleting ...

Page 5: ...CA estéreo incluido Ajuste el nivel de estas salidas con la perilla de VOLUMEN MAESTRO iTunes e iPod Touch son marcas registradas de Apple Inc registradas en EE UU y otros países VISTA DEL PANEL SUPERIOR 1 ESTACIÓN DE ACOPLAMIENTO Conecte aquí su iPhone o iPod touch Balancee delicadamente el dispositivo en uno y otro sentido sobre el conector cuando lo conecte o lo retire 2 TECLADO Este teclado de...

Page 6: ...tado correctamente al SynthStation 25 Para hacerlo vaya a Settings General About en su iPhone o iPod touch y desplácese hasta el pie de la página Debe aparecer SynthStation 25 Apague el iPhone o iPod touch y luego enciéndalo nuevamente y vuelva a abrir la aplicación SynthStation Studio Apague y encienda nuevamente el SynthStation 25 Si lo alimenta por la conexión mini USB desconéctelo y vuelva a c...

Page 7: ... câble RCA inclus Le niveau du signal de ces sorties est commandé par le bouton VOLUME iPhone et iPod sont des marques de commerce déposées de Apple inc enregistrées aux États Unis et dans d autres pays CARACTÉRISTIQUES DU PANNEAU SUPÉRIEUR 1 SOCLE Branchez un iPhone ou un iPod ici Insérez le bas du iPhone ou du iPod sur le connecteur en effectuant doucement un mouvement d avant arrière procédez d...

Page 8: ...e iPod touch est correctement branché au SynthStation 25 Pour ce faire cliquez sur Réglages Général Informations sur le iPhone ou le iPod touch puis parcourrez jusqu au bas de la page SynthStation 25 devrait être affiché Fermez et rouvrez le iPhone ou le iPod touch puis lancez l application SynthStation Studio Fermez et rouvrez le SynthStation 25 Si vous utilisez l alimentation via la connexion mi...

Page 9: ...dosi del cavo stereo RCA in dotazione Regolare il livello di queste uscite servendosi della manopola VOLUME MASTER iPhone e iPod sono marchi di fabbrica di Apple Inc registrati negli Stati Uniti e in altri Paesi PANORAMICA PANNELLO SUPERIORE 1 DOCK Collegare l iPhone o l iPod touch a questo livello Far ondeggiare delicatamente il dispositivo in avanti e indietro sul connettore al momento di colleg...

Page 10: ...rarsi che l iPhone o l iPod sia adeguatamente collegato al SynthStation 25 Per fare ciò recarsi su Settings General About nell iPhone o iPod touch quindi scorrere fino in fondo alla pagina Deve comparire SynthStation 25 Spegnere e riaccendere l iPhone o l iPod touch e riaprire l app SynthStation Studio Spegnere e riaccendere il SynthStation 25 Se lo si alimenta tramite il suo collegamento mini USB...

Page 11: ...mithilfe des mitgelieferten Stereo Cinch Kabels an diese Ausgänge an Sie können die Lautstärke dieser Ausgänge mit dem MASTER LAUTSTÄRKEREGLER einstellen iPhone und iPod Touch sind Marken der Apple Inc und in den USA und anderen Ländern eingetragen ÜBERSICHT OBERSEITE 1 DOCK Hier verbinden Sie Ihr iPhone oder Ihren iPod Touch Bewegen Sie das Gerät beim Anbringen oder Entfernen einige Male vorsicht...

Page 12: ...äß mit der SynthStation 25 verbunden ist Um dies zu tun wählen Sie Einstellungen Allgemein Info auf Ihrem iPhone oder iPod Touch und scrollen anschließend zum unteren Rand der Seite SynthStation 25 sollte nun aufscheinen Schalten Sie Ihr iPhone oder Ihren iPod Touch zuerst aus und anschließend wieder an und öffnen dann die SynthStation Studio App Schalten Sie die SynthStation 25 zuerst aus und dan...

Page 13: ...n Information Yes No Turn GM1 System On Yes No Turn GM2 System On Yes No Turn GM System Off Yes No DLS 1 Yes No File Reference Yes No Controller Destination Yes No Key based Instrument Ctrl Yes No Master Fine Coarse Tune Yes No Other Universal System Exclusive No No Manufacturer or Non Commercial System Exclusive Yes Yes NRPNs Yes No No No RPN 00 Pitch Bend Sensitivity Yes No RPN 01 Channel Fine T...

Page 14: ......

Page 15: ......

Page 16: ...WWW AKAIPRO COM 7 51 0314 B ...

Reviews: