background image

ULISESevo

29

:


www.akces-med.com


'

+48 17 864 04 77 


*

export@akces-med.com


6.11.                           

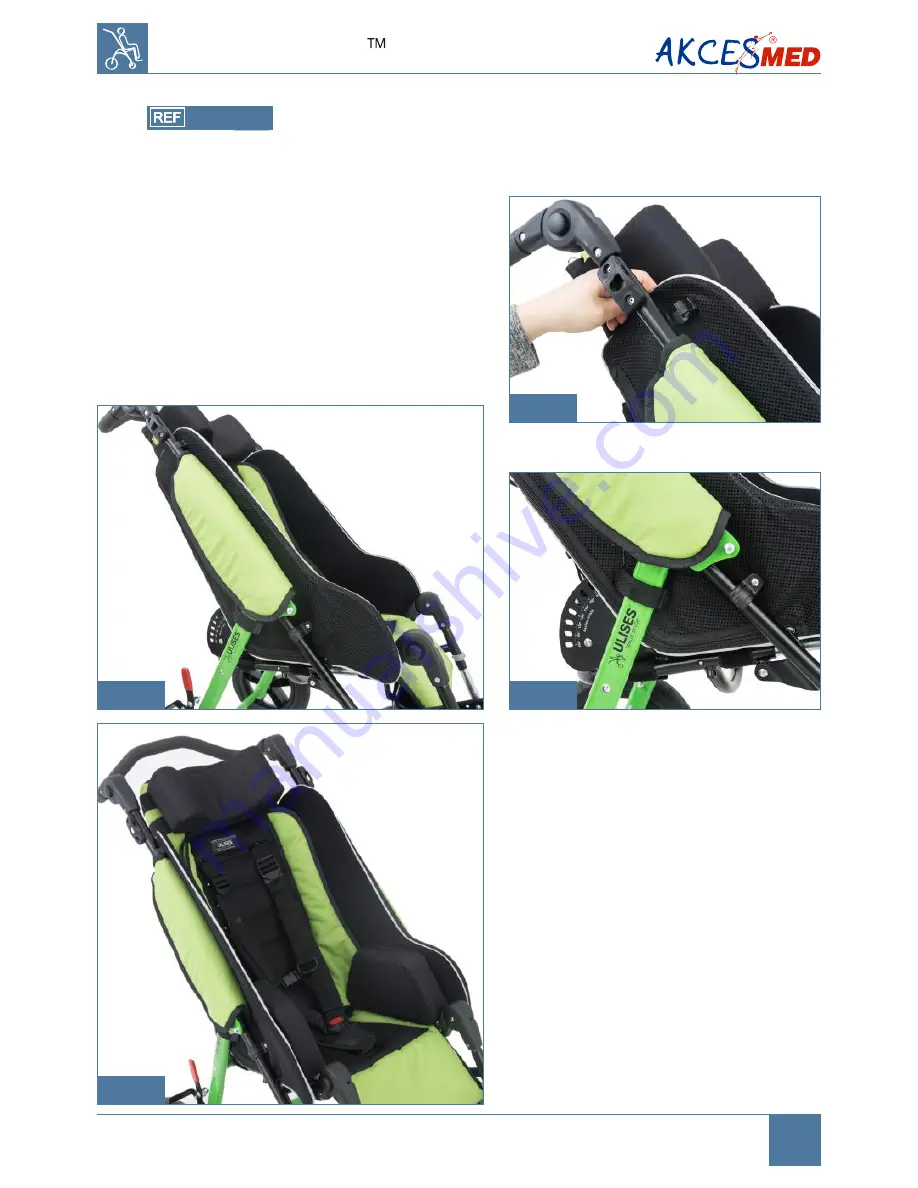
High rigid trunk support

ULE_148

In  order  to  mount  the  supports,  you 
should:

STEP  1. 

Slide  the  support  between  the 

frame and the seat. Then, press the upper 
hook of the support down (pic. 76).

STEP  2. 

Press  the  other  hook  in  the 

designated  place  and  secure  with  Velcro 
strap (pic. 77, 78).

The supports are covered 

with one-sided Velcro 

material which means that 

you can attach to it any 

patient-stabilizing elements 

that are equipped with Velcro 

e.g. seat narrowing cushions.

fig.78

fig.77

fig.76

fig.79

Summary of Contents for ULISESEVO

Page 1: ...ULISESevo SPECIAL NEEDS STROLLER USER MANUAL ...

Page 2: ...duce technical and trading changes in the content of the instruction without warning Medical product first class according to the Regulation 93 42 EWG of European Parliament and Council regarding medical products For this product the producer issued relevant declaration of conformity Akces Med Sp z o o Company introduced quality management system ISO 13485 regarding production sales and service Th...

Page 3: ...g the stroller 13 5 2 Unfloding the stroller 14 5 3 Footrest 15 5 4 Wheels 16 5 5 The push handle 17 5 6 Backrest 17 5 7 Przedłużenie oparcia 18 5 8 Seat 18 5 9 5 points belts 19 6 Additional equipment 21 6 1 Safety rail 21 6 2 Thigh abduction belt 21 6 3 Trunk stabilizing belt 23 6 4 Calf belt 25 6 5 Head neck support 25 6 6 Loins support 26 6 7 Trunk belt 26 6 8 Abduction block 27 6 9 Thigh belt...

Page 4: ... 30 6 13 H vest 4 points safet vest 31 6 14 6 points safety vest 33 6 15 Umbrella 35 6 16 Stolik 35 6 17 Canopy 36 6 18 Cup holder 37 6 19 Elastico cushion seat Seat cushion thighs shape Seat cushion pommel shape 38 6 20 Tilt angle adjustment of the footrest 38 6 21 Bags 39 6 22 Under seat basket 40 7 The use of stroller 41 7 1 Preparation of the patient 41 7 2 How to use stroller 42 8 Safety rule...

Page 5: ...greatly facilitates its functionality With simple and light construction it can be easily folded for transporting purposes Furthermore relatively small size allows you to fit ULISES EVO into an undersized car trunk Stable structure of the stroller belts and supports system make the user feel safe The backrest can be easily bend back and adjustable push handle increases the stroller maneuverability...

Page 6: ...l cord injuries and spine trauma with paralysis and paresis ULISESevo 6 SE INDICATIONS FOR U www akces med com 48 17 864 04 77 export akces med com for proper usage preparation maintenance cleaning and guarantee conditions regarding ULISES EVO stroller User manual should be kept in easily accessible place It is designed for people who look after disabled children and for both doctors as well as ph...

Page 7: ...ckrest upholstery 7 Seat with depth adjustment 8 Footrest with height and tilt angle adjustments 2 point belts fastening the feet 9 Foldable stroller frame 10 Rear air pumped wheels equipped with two independent brakes 11 Front swivel castors 12 Backrest extension ULISESevo GENERAL CHARACTERISTICS OF STROLLER 7 www akces med com 48 17 864 04 77 export akces med com 11 2 4 1 8 3 10 5 7 9 6 12 ...

Page 8: ...t Trunk stabilizing belt H vest Calf belt Head neck support Loins support Abduction block Aid for moving patients AM P Soft cover for tray Trunk belt Safety rail ULE_001 ULE_002 ULE_003 ULE_013 ULE_101 ULE_107 ULE_113 ULE_114 ULE_115 ULE_121 ULE_124 ULE_125 ULE_126 ULE_128 ULE_129 6 points safety vest Abduction adduction thight belts ...

Page 9: ...irm headrest made of foam 5 point belts stabilizing the feet 4 points safety vest Low latteral support Sun umbrella Tray Folding canopy Rain cover ULE_134 ULE_137 ULE_130 ULE_131 ULE_132 ULE_136 ULE_153 ULE_148 ULE_147 ULE_402 ULE_403 ULE_405 ULE_408 Low latteral support with seat narrowing cushion 6cm ULE_149 Low latteral support with seat narrowing cushion 10 cm ULE_150 ...

Page 10: ...tico cushion seat Seat cushion pommel shape Front wheel locks Lifting bar DeLux Bag Lady s bag Men s bag Roomy storage basket Travel Bag for stroller ULE_411 ULE_412 ULE_503 ULE_504 Seat cushion thighs shape ULE_413 ULE_415 ULE_419 ULE_421 ULE_433 ULE_435 ULE_502 Mosquito net Headrest cotton cover ULE_409 ULE_410 ULE_505 ULE_506 ...

Page 11: ...flatable wheel Front inflatable wheel Rear PU wheel Front PU wheel Rear PU wheel silver metallized Front PU wheel silver metallized Rear inflatable wheel silver metallized Oxygen tank holder Organizer bag ULE_507 ULE_509 ULE_701 ULE_707 ULE_704 ULE_711 ULE_705 ULE_712 ULE_706 ...

Page 12: ...t and dimensions of the device Width cm 57 63 69 After folding width cm 57 63 69 Length cm 94 110 127 After folding length cm 104 107 114 Height cm 102 102 102 After folding height cm 40 45 50 Weight kg 18 5 20 22 Note Dimensional tolerance in the table is 1 1 cm Size 1a 31 29 37 54 28 24 32 19 102 90 150 13 90 180 75 57 57 110 107 102 45 19 5 Backrest height without backrest extension D cm 40 70 ...

Page 13: ...seat fig 3 Footrest angle adjustment see page 16 point 5 3 2 5 fig 2 ULISESevo 5 fig 1 fig 3 STEP 3 Pull the strap located in the back of the backrest fig 4 and simultaneously push the backrest forward until it stops fig 5 Backrest tilt angle adjustment see page 17 point 5 6 1 fig 4 fig 5 DETAILED DESCRIPTION HOW TO USE STROLLER 13 www akces med com 48 17 864 04 77 export akces med com ...

Page 14: ...der to make stroller folding easier it is recommended to take off the side covers ULISESevo fig 8 fig 6 fig 7 fig 9 fig 10 14 www akces med com 48 17 864 04 77 export akces med com STEP 1 Pull the stroller s handle backwards until the folding mechanism snaps 5 2 Unfolding the stroller To unfold the stroller you should ...

Page 15: ...e footrest fig 14 STEP 3 Put the quick connectors into holes CAUTION Make sure whether the stroller has been properly unfolded and the folding mechanism is totally locked ULISESevo fig 11 fig 12 STEP 2 Afterwards set the desired angle of backrest and footrest unfold the footrest put the side covers 15 www akces med com 48 17 864 04 77 export akces med com fig 13 fig 14 ...

Page 16: ... equipped with front swivel castors fig 17 5 4 2 Air pumped rear wheels 5 4 3 The stroller has an independent lock for each rear wheel To activate brake pull the red lever located at the wheel backwards until it stops fig 18 This action should be repeated with the other rear wheel 5 4 4 The brakes have adjustable breaking force In order to adjust it you should tighten or loosen the hex nut located...

Page 17: ...e backrest tilt angle you should STEP 1 Pull the belt located at the back of the backrest fig 20 and then set the desired angle of the backrest fig 21 STEP 2 Release the belt and make sure that the backrest is totally locked fig 20 fig 21 17 www akces med com 48 17 864 04 77 export akces med com Adjustment of the backrest tilt angle is gradually Before the use of the stroller make sure that the re...

Page 18: ...P 3 Set the desired seat depth STEP 4 Using Allen wrench tighten the holder and fasten the Velcro straps 18 www akces med com 48 17 864 04 77 export akces med com fot 25 fot 21 fot 26 5 7 Backrest extension 5 7 1 In order to adjust the backrest extension height you should STEP 1 Using the Allen wrench loosen the screws located at the back of the backrest fig 23 STEP 2 Set the desired height of the...

Page 19: ...nsert their ends into strap buckle fig 28 fig 27 fig 28 STEP 2 In order to attach the belts to the higher part of the backrest insert ends of the belts into holes placed on the backrest Afterwards secure them using knob placed on the other side STEP 3 Connect the belts fig 29 and insert them into buckle located at the seat fig 30 www akces med com 48 17 864 04 77 export akces med com Maximum depth...

Page 20: ...0 Properly attached belts were shown in the picture fig 31 fig 31 ASSEMBLY DIAGRAM OF THE BELTS BELT HOLDER CAUTION The belt should be interlaced through the plastic holder three times Assembly diagram below STEP 4 In order to attach the 5 point belts to the seat interlace the belt through the plastic holder located at the cushion www akces med com 48 17 864 04 77 export akces med com ...

Page 21: ...ed in the picture 32 STEP 2 Set the safety rail at the desired position To do that you need to release the latch so that the pin jumped into the frame hole fig 38 fig 38 fig 39 fig 32 fig 33 fig 34 6 2 Thigh abduction belt ULE_101 In order to mount the Thigh abduction belt you should STEP 1 Detach the two plastic strap adjusters pic 35 STEP 2 Put the belts on the seat breathable fabric should be f...

Page 22: ... next to the backrest pic 37 STEP 4 Slide the end of the belt into the plastic strap adjuster pic 38 39 STEP 5 Then attach the plastic strap adjuster the one that you previously detached in STEP 1 to the belt pic 40 STEP 6 Slide the end of the belt into the snap buckle pic 41 42 fig 42 fig 41 fig 39 fig 38 fig 40 fig 37 ...

Page 23: ...straps into the holes placed in the backrest upholstery pic 45 46 You can adjust the position of the belt by putting the straps into the different holes higher or lower ones Fasten the straps behind the backrest by use of Velcro pic 47 48 fig 45 fig 46 ULE_113 STEP 7 Finally slide again the end of the belt into the plastic strap adjusters fig 43 fig 44 fig 47 fig 48 ...

Page 24: ...emaining strap with buckle 1 as indicated in the pictures below pic 52 54 1 1 1 1 1 STEP 2 Pass the side straps through the stroller frame pic 49 and then slide them into the plastic strap adjuster pic 50 51 Repeat on the other side of the stroller fig 53 fig 54 fig 50 fig 51 fig 49 fig 52 ...

Page 25: ...o mount the headrest put the headrest straps into the holes placed in the backrest upholstery Fasten the strap behind the backrest using Velcro 2 3 1 1 ULE_121 6 5 Head neck support STEP 4 To fasten the trunk stabilizing belt slide the strap 1 into the other strap buckle 2 and then fasten it by use of Velcro pic 55 56 Depending of the width of the trunk you can use shorter 2 or longer strap 3 with...

Page 26: ...he Loins support on the backrest and interlace the straps through the holes in the upholstery pic 60 61 ULE_124 STEP 2 Fasten the belts behind the backrest pic 62 63 6 7 Trunk belt The trunk belt can be easily cut to any length In order to do that you should STEP 1 Unfasten the belt from the back pic 64 ULE_126 fig 60 fig 61 fig 62 fig 63 fig 64 ...

Page 27: ...7 The belt should be mounted to the stroller around the backrest pic 68 ULE_128 fig 69 fig 65 fig 66 fig 67 fig 68 6 8 Abduction block In order to mount the abduction block you should STEP 1 Remove the 5 point belts attached to the standard stroller equipment STEP 2 Slide the abduction block bar into the handle placed in the seat upholstery pic 69 STEP 3 Tighten the abduction block to the seat by ...

Page 28: ...uld STEP 1 Put the belt on the stroller and fasten it under the seat using Velcro 6 10 Narrowing pads set 6 cm ULE_134 Narrowing pads set 10 cm ULE_137 Cushions can only be attached to the seat along with the rigid side supports low or high that are trimmed with one sided Velcro material see page 30 31 fig 72 fig 73 fig 74 fig 75 ULE_136 ...

Page 29: ...n the frame and the seat Then press the upper hook of the support down pic 76 STEP 2 Press the other hook in the designated place and secure with Velcro strap pic 77 78 The supports are covered with one sided Velcro material which means that you can attach to it any patient stabilizing elements that are equipped with Velcro e g seat narrowing cushions fig 78 fig 77 fig 76 fig 79 ...

Page 30: ... using Velcro strap and hooks that need to be pressed to the frame pic 81 82 The supports are covered with one sided Velcro material which means that you can attach to it any patient stabilizing elements that are equipped with Velcro e g seat narrowing cushions fig 35 fig 80 fig 35 fig 81 fig 35 fig 82 fig 35 fig 83 Low latteral support with seat narrowing cushion 6cm ULE_149 Low latteral support ...

Page 31: ...ap adjusters pic 84 Then interlace the remaining strap through the black holder placed next to the backrest pic 85 ULISESevo STEP 2 Slide the end of the strap into the plastic strap adjuster located on the other side pic 86 88 fig 35 fig 84 fig 35 fig 85 fig 35 fig 87 fig 35 fig 88 fig 35 fig 86 31 www akces med com 48 17 864 04 70 produkcja akces med com ...

Page 32: ...om part of the vest pic 84 85 Afterwards slide again the end of the strap into the strap adjusters pic 86 87 STEP 5 Attach the upper part of the vest at the desired height and secure it with the knob from the back pic 88 89 fig 35 fig 84 fig 35 fig 85 fig 35 fig 89 fig 35 fig 86 fig 35 fig 87 fig 35 fig 88 fig 35 fig 89 32 www akces med com 48 17 864 04 70 produkcja akces med com ...

Page 33: ...uction see page 32 33 STEP 1 5 STEP 2 The 6 point safety vest has additional security in the form of a long strap with snap buckle that should be passed around the backrest and fastened from the other side of the vest pic 92 95 fig 35 fig 90 fig 35 fig 91 fig 35 fig 92 fig 35 fig 93 fig 35 fig 94 fig 35 fig 95 33 www akces med com 48 17 864 04 70 produkcja akces med com ...

Page 34: ... has a wide range of adjustments that allows you to easily fit it to the patient pic 97 102 ULISESevo fig 35 fig 97 fig 35 fig 98 fig 35 fig 99 fig 35 fig 100 fig 35 fig 101 fig 35 fig 102 fig 35 fig 96 34 www akces med com 48 17 864 04 70 produkcja akces med com ...

Page 35: ... pic 103 STEP 2 Tighten the knob pic 104 STEP 3 Set the desired position of the umbrella using the button pic 105 fig 106 fig 105 6 16 Tray In order to mount the tray you should STEP 1 Place the tray hooks onto the selected frame elements pic 107 108 ULE_403 fig 104 fig 103 fig 108 fig 107 35 www akces med com 48 17 864 04 70 produkcja akces med com ...

Page 36: ...o adjust the tray depth loose the knob and set the desired depth Then tighten firmly the knob In order to mount the canopy you should STEP 1 Insert the canopy into the handles pic 112 114 6 17 Canopy ULE_405 fig 112 fig 31 fig 113 fig 114 fig 110 fig 109 fig 35 fig 44 fig 111 36 www akces med com 48 17 864 04 70 produkcja akces med com ...

Page 37: ...rder to attach the cup holder to the stroller you should STEP 1 Loosen the clamp and put it on the stroller frame pic 117 STEP 2 Tighten the knob pic 118 STEP 3 Set the desired position using the button pic 119 ULE_411 fig 69 fig 70 fig 31 fig 115 fig 116 fig 31 fig 117 fig 118 fig 31 fig 119 fig 120 37 www akces med com 48 17 864 04 70 produkcja akces med com ...

Page 38: ...1 122 Seat cushion thighs shape ULE_419 Seat cushion pommel shape ULE_421 6 20 Tilt angle adjustment of the footrest ULE_432 In order to mount the conversion kit which allows tilt angle adjustment you should STEP 1 Prepare necessary tools and components Conversion kit Allen wrench 3 mm Allen wrench 6 mm fig 31 fig 121 fig 122 fig 123 38 www akces med com 48 17 864 04 70 produkcja akces med com ...

Page 39: ...stall the conversion kit in the footplate holes pic 124 125 STEP 3 Set the tilt angle of the footrest while tightening M8 bolt pic 126 127 6 21 DeLux Bag ULE_502 Women s bag ULE_503 Men s bag ULE_504 fig 31 fig 124 fig 125 fig 31 fig 126 fig 127 fig 128 fig 31 fig 131 fig 31 fig 130 fig 31 fig 129 39 www akces med com 48 17 864 04 70 produkcja akces med com ...

Page 40: ...Under seat basket Under seat basket can be mounted to the chassis frame by use of latches pic 132 135 ULE_505 fig 31 fig 134 fig 135 fig 31 fig 132 fig 133 40 www akces med com 48 17 864 04 70 produkcja akces med com ...

Page 41: ...ic reason and to avoid abrasion it is advisable for the patient to always wear clothes when using the device skin must not be naked especially in places of regular contact with upholstery drains bags catheters etc if applied have to be secured to function properly and not to disturb during using the product if it is necessary for a patient to wear orthopedic supply collar corset orthesis shoes if ...

Page 42: ...ler can roll 4 Remember to place stroller forwards 5 In case of any obstacles such as step or curb it is necessary to raise front wheels by pressing the handle down Next place front wheels on step and then raise back part of stroller with the aid of handle Equipment works correctly only when the device is adjusted according to patient s height as well as weight Remember to take all these measureme...

Page 43: ...ly mounted and moreover check if they are not broken check if all screws knobs and all glued sewed or tapped parts are tightened check if brakes are operating correctly check if buckles are operating correctly always use safety belts Velcro tapes should overlap min 8cm adjust the device according to patient s measurements and needs e g the adjustment of pelottes footplate etc make sure that all mo...

Page 44: ... the stairs it doesn t matter if the patient is placed in the device or not 8 It is important to engage brake during getting into and getting out the stroller 9 Make sure that all limbs are not close to spokes or other adjustable elements 10 Although the device and the upholstery are made of fire resistant materials please pay your attention when approaching to sources of fire or sources of high t...

Page 45: ...o manufacturer so as to service it Next manufacturer determines again how long the product can be used and moreover the date of the next service will be determined 5 If product is damaged please contact our dealer or AKCES MED customer service ph 17 864 04 70 ULISESevo 45 www akces med com 48 17 864 04 77 export akces med com CAUTION It is forbidden to place the patient in the device while being i...

Page 46: ...bigger upholstery may be destroyed It is necessary to remember that the excess of dampness should be removed from fabric before next cleaning Please rinse upholstery with warm water and clean white cloth once stain is removed 2 It is forbidden to soak upholstery 3 It is forbidden to clean upholstery with the aid of hard brushes 4 It is forbidden to clean upholstery with strong chemical agents such...

Page 47: ...nd all screws nuts knobs etc are correctly tightened check if belts vests trunk belts feet stabilizing belts etc are not frayed check if buckles and clamps work correctly CAUTION Remember that upholstery has to be always dry before using CAUTION Manufacturer takes responsibility only for hidden faults or damages which appeared despite the fact that user complied with the guidelines CAUTION In case...

Page 48: ...EDIC DEVICES MANUFACTURER Date of issue The last update 02 02 2015 20 02 2017 Authorised Dealer Akces MED Sp z o o Jasionka 955B 36 002 Jasionka tel 17 864 04 77 www akces med com e mail export akces med com R ...

Reviews: