background image

电池组件暴露在阳光下能产生电流。单个组件的电压小于50  VDC,但当组件串联起来时整个电压极高。

为了防 止电弧作用,着火及触电的危险,以下内容应被充分理解、遵守。

PV modules can generate electricity upon exposure to light. The voltage of a single module is less than 50 

VDC, but the total voltage can be dangerously high when modules are connected together in series. The following 

must be fully understood and obeyed when  handling the PV modules to avoid risk of arcing, fire and electric 

shock.

在安装、使用和保养光伏系统之前请仔细阅读安装使用手册,并且遵守本手册中的安全防范措施,否则有可能引起
人身财产损失。

Carefully read  through these  installation instructions  before installing,  operating or maintaining PV system. Failure to 

follow these instructions may result in bodily injury or damage to property. 

光伏系统产生的高电压和强电流可能会造成严重的伤害和生命危险。

PV systems can produce high voltage and current which could cause serious injury or even death.

安装组件系统需要有专业技能和知识,并且只能由具有资格认证或被授权的人来进行操作。

The installation of PV modules should only be performed by qualified personnel.

安装时不能穿戴金属首饰。不要赤手接触带电接线端子。选择绝缘的工具进行电气连接。

Do not wear metallic jewelry when installing. Do not touch live terminals with bare hands. Use insulated tools for electri-

cal connections。

不要在潮湿的条件下安装组件。

Do not install PV modules at wet conditions.

破损的组件应放弃使用。损坏的组件应被覆盖遮光以免暴露在阳光下,产生导电的危险。

Do  not  use  damaged  nor  defective  modules.  Even  damage  or  defective  modules  can  produce  electricity.  Keep 

damaged or defective modules covered to avoid exposure to light. 

无论组件有没有连接,接触组件接线端等导电部分都可能引起电火花或者电击。

Contact with electrically active parts of a PV module such as terminals, can result in burns sparks and lethal shock 

whenever the PV modules are connected or not.

接线时使用正确的安全劳保用品和工具设备。

Use appropriate safety equipments when working on any wiring.

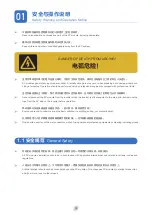
安全与操作说明 

Safety Warning and Operation Notice

DANGER OF DEATH FROM ELECTRICAL SHOCK!

小心触电!

01

01

Summary of Contents for SK6608M Series

Page 1: ...sion Number AK INST EN 002 01 Revision Date 2019 11 05 ADD Jintang Road Economic Development Zone URL www akoptronics com TEL 86 400 101 7000 INSTALLATION MANUAL INSTALLATION MANUAL For AKCOME PV Modu...

Page 2: ...t which could cause serious injury or even death The installation of PV modules should only be performed by qualified personnel Do not wear metallic jewelry when installing Do not touch live terminals...

Page 3: ...he main grid but remove the fuse from the AC side on the inverter before operation Ensure cable and connectors are at perfect condition no splitting soiling nor contamination One should never touch th...

Page 4: ...stem Follow the unpacking instruction Carry the module by at least two persons Do not lay nor pile the PV module casually Avoid any objects stacking or falling on the PV modules Do not stand nor step...

Page 5: ...regardless of whether the PV module is connected to the system or not Do not unplug connectors if the system circuit has been connected to an operating load When installing PV modules on roofs or othe...

Page 6: ...cessive salt fog hail sand and dust smoke active chemical atmosphere acid rain etc 200m 200m 1000m 1000 The PV module should be installed at least 200m away from the sea side Corresponding measure sho...

Page 7: ...fety For PV installation on the ground the modules are expected to be at least one meter high from the ground to avoid soil grass and snow covering the bottom part of the modules 20 For PV installatio...

Page 8: ...teel washer 3 M8 Stainless steel M8 bolt 2000 1 5 The modules mentioned in this installation manual are only allowed to be installed below 2000 m above sea level The load capacity of the module is des...

Page 9: ...or snow pressure is not much four installation holes may be used Module can withstand wind pressure of 1600Pa on both sides When wind speed is higher than 130km h or snow pressure is higher than 2400...

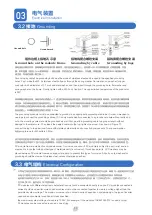
Page 10: ...fault 4mm2 40 85 Use field wiring with suitable cross sectional areas that are approved for use at the maximum short circuit current of the PV module Installer use only sunlight resistant cables quali...

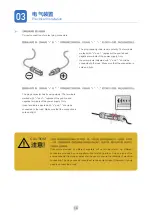
Page 11: ...Installation 03 The plug connector has its own polarity The terminals marked with and represent the positive and negative terminals of the power supply Only those terminals indicated with and should b...

Page 12: ...the aluminum frame with stainless steel bolts and connection components The recommended tightening torque for M3 bolts is 2 3N m PVC PV module frame is made of anodized aluminum Corrosion can occur if...

Page 13: ...eaning implement a sponge Dirt must never be scraped or rubbed away when dry as this will cause micro scratched Do not use high pressure water spray nor chemicals to clean the PV modules Routinely che...

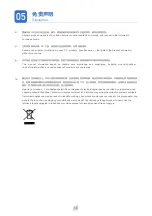
Page 14: ...not constitute any guarantee Meaning of crossed out wheeled dustbin Do not dispose of electrical appliances as unsorted municipal waste use separate collection facilities Contact your local government...

Page 15: ...diance of 1000 W m 2 AM 1 5 spectrum and a cell temperature of 25oC The electrical characteristics are within 10 percent of the indicated values of Isc Voc and Pmax under STC Refer to module datasheet...

Page 16: ...ening torque using stainless steel M8 bolts stainless steel washer stainless steel M8 nut and EPDM rubber should be around 15 20Nm Do not use clamp to block the surface of solar cells Appendix Double...

Page 17: ...ity to secure the modules to supporting structure M8 60 16 20 Nm Secure the module in each mounting location with an M8 bolt for 60 pcs and a flat washer spring washer and nut and tighten to a torque...

Page 18: ...stem in compliance with all local electrical codes and regulations Please refer to the racking system user instructions 1 6 For the contents not mentioned in this appendix please refer to clause 1 6 A...

Page 19: ...2008 1002 40 SK6611MC XXX 156 9BB 355 380 1856 1002 35 SK6610MC XXX 156 9BB 310 325 1675 992 35 45 SK6610MC XXX 158 9BB 320 345 1684 1002 35 SK6610MC XXX 156 5BB 310 320 1675 992 35 40 45 SK6610MC XX...

Page 20: ...wer Voltage Vmp V Max Power Current Imp A Open Circuit Voltage Voc V Short Circuit Current Isc A 320 37 1 8 63 45 8 9 26 325 37 5 8 67 46 0 9 31 330 37 5 8 80 46 2 9 49 335 37 7 8 89 46 4 9 55 340 38...

Page 21: ...4 0 9 97 340 35 8 9 51 44 2 10 04 345 36 0 9 58 44 4 10 11 350 36 3 9 65 44 6 10 18 355 36 5 9 72 44 8 10 25 Power Range Pm W Max Power Voltage Vmp V Max Power Current Imp A Open Circuit Voltage Voc V...

Page 22: ...275 29 0 9 48 36 0 9 97 280 29 1 9 63 36 2 10 10 285 29 3 9 72 36 4 10 22 290 29 5 9 83 36 6 10 34 Power Range Pm W Max Power Voltage Vmp V Max Power Current Imp A Open Circuit Voltage Voc V Short Cir...

Page 23: ...er Voltage Vmp V Max Power Current Imp A Open Circuit Voltage Voc V Short Circuit Current Isc A 390 40 5 9 63 48 2 10 20 395 40 7 9 71 48 5 10 26 400 40 9 9 78 48 8 10 32 405 41 1 9 85 49 1 10 39 410...

Page 24: ...8 10 32 Power Range Pm W Max Power Voltage Vmp V Max Power Current Imp A Open Circuit Voltage Voc V Short Circuit Current Isc A 355 37 02 9 59 45 05 10 04 360 37 27 9 66 45 27 10 11 365 37 52 9 73 45...

Page 25: ...8 Power Range Pm W Max Power Voltage Vmp V Max Power Current Imp A Open Circuit Voltage Voc V Short Circuit Current Isc A 310 32 3 9 60 40 1 10 09 315 32 4 9 72 40 3 10 20 320 32 6 9 82 40 5 10 31 Pow...

Page 26: ...365 40 4 9 04 50 0 9 52 370 40 6 9 13 50 2 9 57 375 40 7 9 21 50 4 9 63 380 40 9 9 29 50 6 9 68 385 41 1 9 375 50 8 9 74 Power Range Pm W Max Power Voltage Vmp V Max Power Current Imp A Open Circuit V...

Page 27: ...42 3 9 40 310 34 3 9 08 42 5 9 45 315 34 6 9 13 42 7 9 51 320 34 9 9 18 42 9 9 56 325 35 2 9 24 43 2 9 62 Power Range Pm W Max Power Voltage Vmp V Max Power Current Imp A Open Circuit Voltage Voc V S...

Page 28: ...0 37 1 8 89 45 7 9 38 335 37 3 8 98 46 2 9 47 340 37 7 9 02 46 4 9 51 345 38 0 9 08 46 6 9 57 350 38 3 9 14 46 9 9 62 Power Range Pm W Max Power Voltage Vmp V Max Power Current Imp A Open Circuit Volt...

Page 29: ...48 0 9 64 365 39 7 9 23 48 2 9 72 370 40 0 9 28 48 4 9 80 375 40 2 9 34 48 7 9 88 380 40 5 9 39 48 9 9 96 385 40 8 9 44 49 1 10 04 390 41 1 9 49 49 3 10 12 395 41 4 9 55 49 5 10 20 Power Range Pm W Ma...

Page 30: ...65 39 7 9 23 48 2 9 72 370 40 0 9 28 48 4 9 80 375 40 2 9 34 48 7 9 88 380 40 5 9 39 48 9 9 96 385 40 8 9 44 49 1 10 04 Power Range Pm W Max Power Voltage Vmp V Max Power Current Imp A Open Circuit Vo...

Reviews: