
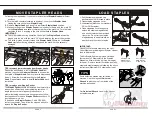
Following the steps below if you wish to remove/install
Stapler Heads
at different
positions.
A. Turn the latch counter-clockwise to position 1. to unlock the
Stapler Head
.
Unplug the cord socket from
Stapler Head
.
B. Remove
Stapler Head
and insert it in a different
Stapler Head
position.
C. Make sure the hole on
Staples Pusher
is hinged onto the pin, and the mark “26”
on the
Staple Pusher
is shown towards the rear of the machine. Turn the latch
clockwise to lock it, and plug in the cord socket back to
Stapler Head
.
IMPORTANT:
aa. To avoid problems during operation, the hole of the
Staples Pusher
must be
hinged onto the pin, with the mark “26” shown towards the rear of the machine.
bb. The latch must be securely locked onto
Stapler Head
. Otherwise, the
Stapler
Head
may fall out during operation and cause the machine to be seriously
damaged
A
B
C.
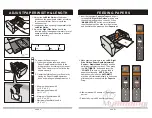
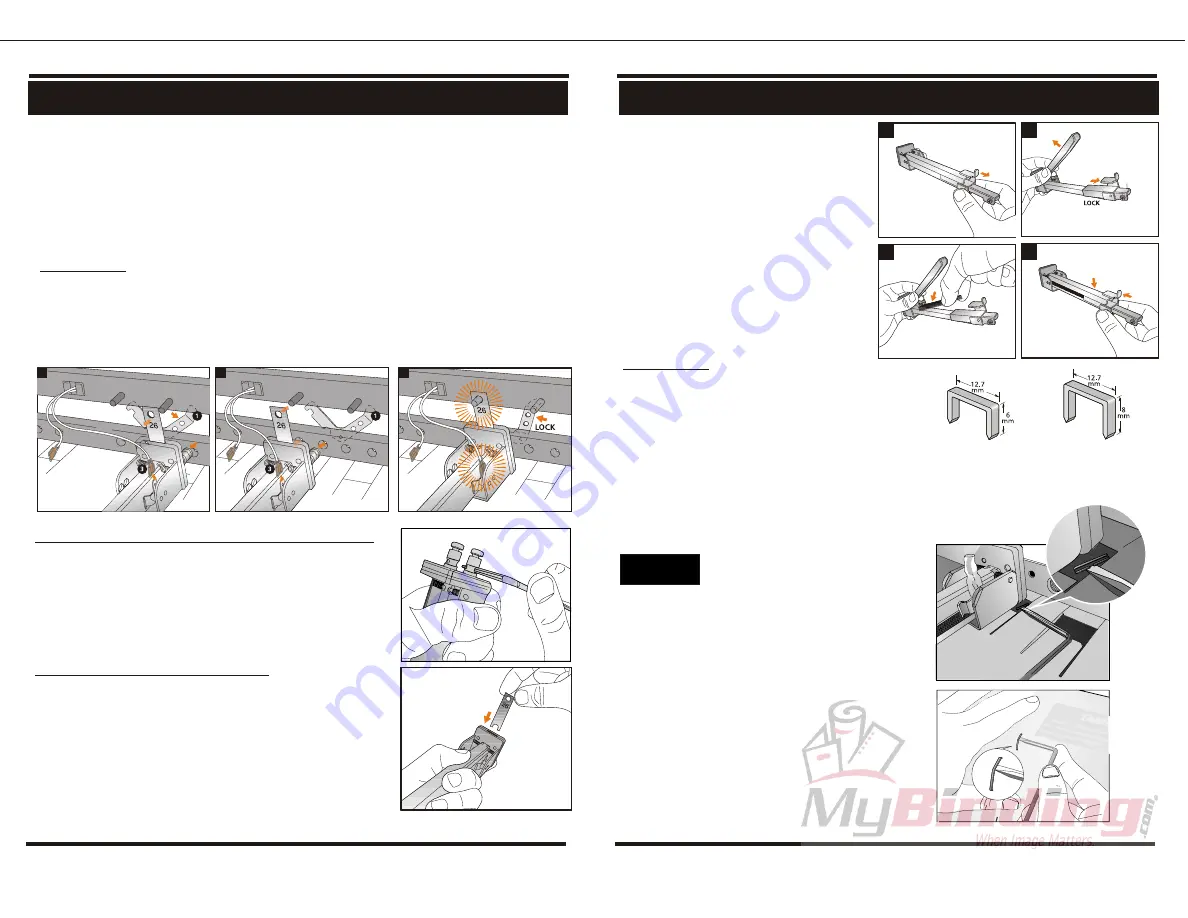
L O A D S TA P L E S
1. Pull the staples magazine cap
backwards until it is locked in place.
2. Open staples magazine cover.
3. Load staples (Must use our standard
26/6 or 26/8 staples).
4. Close magazine cover and gently
unlock the staples magazine cap
and push it towards the machine's
front side. Do not let the staples
magazine cap to snap forward, as it
would smash the stick of staples.
M O V E S TA P L E R H E A D S
TIPS to remove jammed staples from Stapler Heads
.
Repeat the above steps to remove
Stapler Head
from
machine, then use the
Universal Wrench
to unscrew the
front plate of
Stapler Head
. Remove jammed staples and
clean it. Screw the front plate back onto the
Stapler
Head
. Repeat above steps to install
Stapler Head
back
to machine.
TIPS to replace new Staples Pusher
The
Staples Pusher
should be replaced from time to time
to ensure an efficient and smooth stapling operation. If
staple jams occur more frequently than usual, or a
abnormal stapling sound occurs during operation, follow
the steps above to remove
Staples Pusher
and check if it
is scratched or worn out.
To purchase new
Stapler Pusher
( Part # CS2-80-3),
contact your dealer. Then, follow the steps as above to
replace the
Staples Pusher.
PAGE 4
PAGE 5
1.
2.
3.
4.
IMPORTANT:
Use only our standard staples on the right.
Other Staples may damage our Stapler Head or
lead to bad results.
The No-Staple light will be turned ON when
there are only 5 staples left in the Staples
Magazine. Also, machine will stop working at
this point. Remove last left 5 staples and refill
staples to stapler magazine following the above
instructions (Maximum 210 staples per load).
Part # SC 266,
26/6
Staples
5,000 pcs/box
Part # SC 268,
26/8
Staples
5,000 pcs/box
TIPS
Some defective staples may fall inside of
machine. Use the magnetic
Universal
Wrench
to pick them up from inside of the
machine as needed.
Our
Universal
Wrench
can also be used as
a staples remover.


