en
gl
is
h
PART NAMES AND FUNCTIONS
INFORMACIÓN PRELIMINAR
4
7
cdj-mp100
cdj-mp100
cdj-mp100
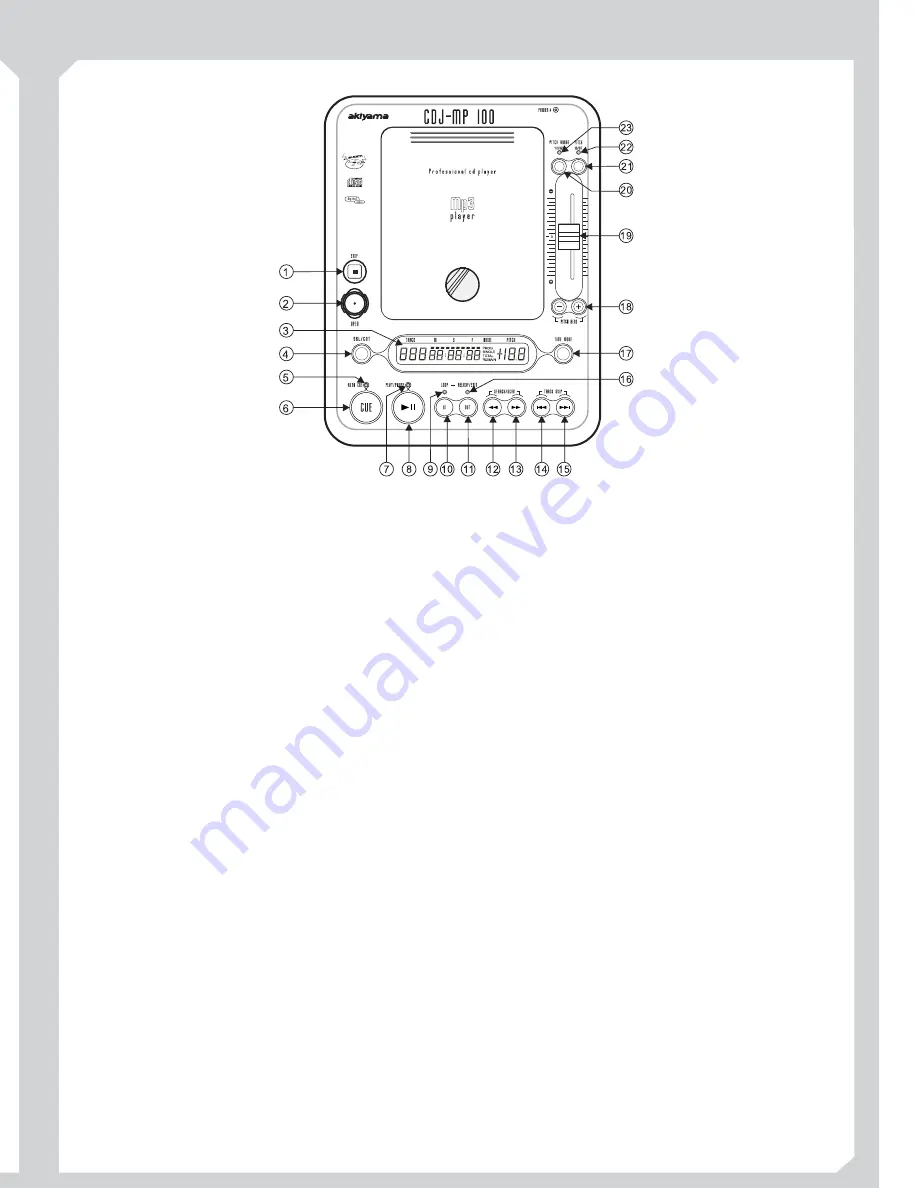
FRONT PANEL
memmory
1. STOP
2. OPEN
NOTE:
3. LIQUID CRYSTAL DISPLAY (LCD)
4. SGL/CTN
5. AUTO CUE LED
6. CUE
7. PLAY/PAUSE LED
8. PLAY/PAUSE BUTTON
9. LOOP LED
10. LOOP IN BUTTON
11. LOOP OUT BUTTON
12. SEARCH/SCAN BUTTON
13. SEARCH/SCAN BUTTON
14. TRACK BUTTON
15. TRACK BUTTON
16. RELOOP/ EXIT LED
17. TIME MODE
18. PITCH BEND
(+) PITCH BEND
(-) PITCH BEND
19. PITCH SLIDER
- The stop button is used to stop CD playback. Never open
the transport door without stopping playback first.
(Transport Tray Open) - This button is used to open the disc
door.
When a disc is loaded, the tray will not open unless the unit is
in pause or cue mode.
- This high quality LCD
indicates all the functions (play, pause, etc.), as they occur. This
display is viewable at several comfortable angles. The LCD will be
described in the next section.
- This button changes the play mode between Single and
Continuous. In single mode the unit will play a single track and return
to cue mode. In continuous mode the unit continues to play track by
track.
- The CUE LED will glow when the unit is in cue
mode. The LED will also flash every time a new CUE POINT is set.
- Pressing the CUE button during playback immediately
pauses playback and returns the track to the last set cue point. The
CUE button
can be held down to momentarily play the CD. When you release the
CUE button it instantly returns to the last set CUE POINT.
- While in play mode the play LED will glow,
and while in pause mode the play LED will flash.
- Each press of the PLAY/PAUSE
BUTTON causes the operation to change from play to pause or from
pause to play.
- This LED will flash each time the loop “IN” button is
pressed indicated the cue point or loop starting point has been set.
- This button allows you to set a CUE
POINT. This button also sets the starting point of a loop.
- This button serves three functions. This
button is used to set the a loops ending point, to exit a loop once
engaged, or restart a loop once it has been exited.
- This button is user to reverse scan
or fast reverse a track. Holding down the button for a prolonged
amount
of time will increase the scanning speed. Tapping the button is the
preferred method for locating a specific cue point.
- This button is user to forward scan
or fast-forward a track. Holding down the button for a prolonged
amount of time will increase the scanning speed. Tapping the button is
the preferred method for locating a specific cue point.
- This buttons is used to select a track.
Tapping this button will back- skip to the previous track, holding
down this button will rapidly back-skip through the tracks on a CD.
- This buttons is used to select your desired
track. Tapping this button will forward skip to the next track, holding
down this button will rapidly forward skip through the tracks on your
CD.
- This LED will flash each time the loop
"OUT" button is pressed indicated the cue point or loop starting point
has been set.
- The TIME button is used to change the displayed
time values. Time can be displayed as elapsed track time, remaining
track time, and total disc remaining time.
- The (+) pitch bend function creates a momentary
“BUMP” in the CD’s pitch speed (Beats per minute - BPM) when the
PITCH function is activated. This function allows the beats between
two CD’s or any other music source to match. This is a momentary
function. When the button is depressed the pitch speed will
automatically return to PITCH SLIDER’S selected pitch. Holding
down this button down yields a maximum of +16% pitch. Be sure to
remember that this function is a momentary pitch adjustment, for a
more precise adjustment use the PITCH SLIDER'S to match the
BPM’s with another playing music source.
- The (-) pitch bend function creates a momentary
“Slow Down” in the Cd’s pitch speed (Beats per minute - BPM) when
the PITCH function is activated. This function allows
he beats between two CD’s or any other music source to match. This is
a momentary function. When the button is depressed the pitch speed
will automatically return to PITCH SLIDER’S selected pitch.
Holding down this button down yields a maximum of -16% pitch. Be
sure to
remember that mum of -16% pitch. Be sure to remember that for a
more precise adjustment use the PITCH SLIDER’S to match the
BPM’s
with another playing music source.
- This slider is used to adjust the playback pitch
percentage when the function is activated. The slider is a set
adjustment and will remain set until the pitch slider is moved or the
PITCH function has been turned off. This adjustment can be made
with or without a CD in the drive. The pitch adjustment will remain
even
if a disc has been remove, and will reflect on any other disc loaded into
the unit. That is to say, if you set a +2% pitch on one disc, remove that
disc and insert another, that disc too will have a +2% pitch. The
amount of pitch being applied will be displayed in the LCD. Use this
slider to match the BPM’s of this unit to that of another music source.
By changing the pitch of one disc with respect to the other in this way,
the beats can be matched.
MANEJO DE LOS DISCOS COMPACTOS
- Siempre coloque los discos en la bandeja correspondiente con la
marca impresa hacia arriba. Los discos s lo se pueden reproducir de
un lado.
- Para extraer un disco de su estuche, presione firmemente el centro
del disco, sujetándolo por los extremos y retírelo firmemente sin tocar
el centro.
- Las marcas dejadas por los dedos así como el polvo pueden ser
retirados de la superficie de los discos, limpiando la cara de lectura
con un paño suave y seco.
- Nunca trate de limpiar los discos compactos con líquidos
limpiadores de acetatos, sprays antiestáticos, disolventes diversos o
químicos, al hacer esto expone los discos a un daño irreparable en la
capa protectora de plástico.
- Los discos deben ser colocados nuevamente en su lugar después de
haber sido reproducidos para evitar que sufran rayones que pudieran
causar "saltos" a la hora de reproducirlos.
- No exponer los discos a los rayos directos del sol, la humedad o
temperaturas extremas por largos periodos de tiempo. Demasiado
calor puede provocar que los discos se dañen o se deformen.
ó
h
h
h
h
h
h
h
h
h
Al instalarlo en un rack, permita la salida de aire caliente del
aparato.
Maneje con cuidado el cable de la corriente.
Sujete el enchufe cuando desconecte el equipo de la corriente.
Mantenga el equipo alejado del agua, humedad y suciedad.
Desconecte el equipo de la corriente cuando no se use por un
periodo largo de tiempo.
No obstruya los agujeros de ventilación (en los equipos que tienen
agujeros de ventilación).
No introduzca objetos extraños en el equipo.
No deje insecticidas, gasolina… cerca del aparato.
el equipo bajo ningún concepto.
Nunca desmonte o modifique
INSTALACIÓN
CARACTERÍSTICAS DEL EQUIPO
h
h
h
h
h
h
h
h
h
h
h
h
h
h
h
Fader start
Memoria Antishock
Pitch Display
Robusta carcasa de Poliuretano
8 times over sampling 1 bit D/A converter
Pitch seleccionable: +/-4%, +/-8% or +/-16%
Auto cue
Función Loop IN/OUT (bucle)
4 velocidades de búsqueda
Carga de disco en panel superior
Reproducción Single/Continuous (Sencilla/Contínua)
Display LDC de gran intensidad lumínica y amplio ángulo
de visión
Búsqueda de precisión ( Frame Search)
Indicador de tiempo de reproducción, tiempo restante de
pista y tiempo restante total
Salida digital RCA coaxial
PREPARACIÓN DEL EQUIPO
1- Al revisar el contenido de la caja debemos encontrar:
2- Para instalar el equipo.
PRECAUCIÓN
h
h
h
h
Unidad reproductora de discos
Manual de Instrucciones
Un cable RCA
Un cable AC de conexión a red
1.
Instalar el equipo sobre una superficie horizontal.
2.
Asegúrese de que el reproductor se instala en una zona
ventilada y no expuesta a rayos solares directos, extrema
humedad o alta temperatura.
3.
Posicione el equipo lo más lejos posible de televisores y
aparatos de radio.
El aparato funcionará correctamente cuando esté montado con el
panel frontal a 15 grados de la vertical. Si el equipo está
excesivamente inclinado los discos pueden no funcionar
correctamente.
La pantalla luminosa LCD de la unidad está diseñada para verse
claramente con los ángulos de hasta 45º.

