4
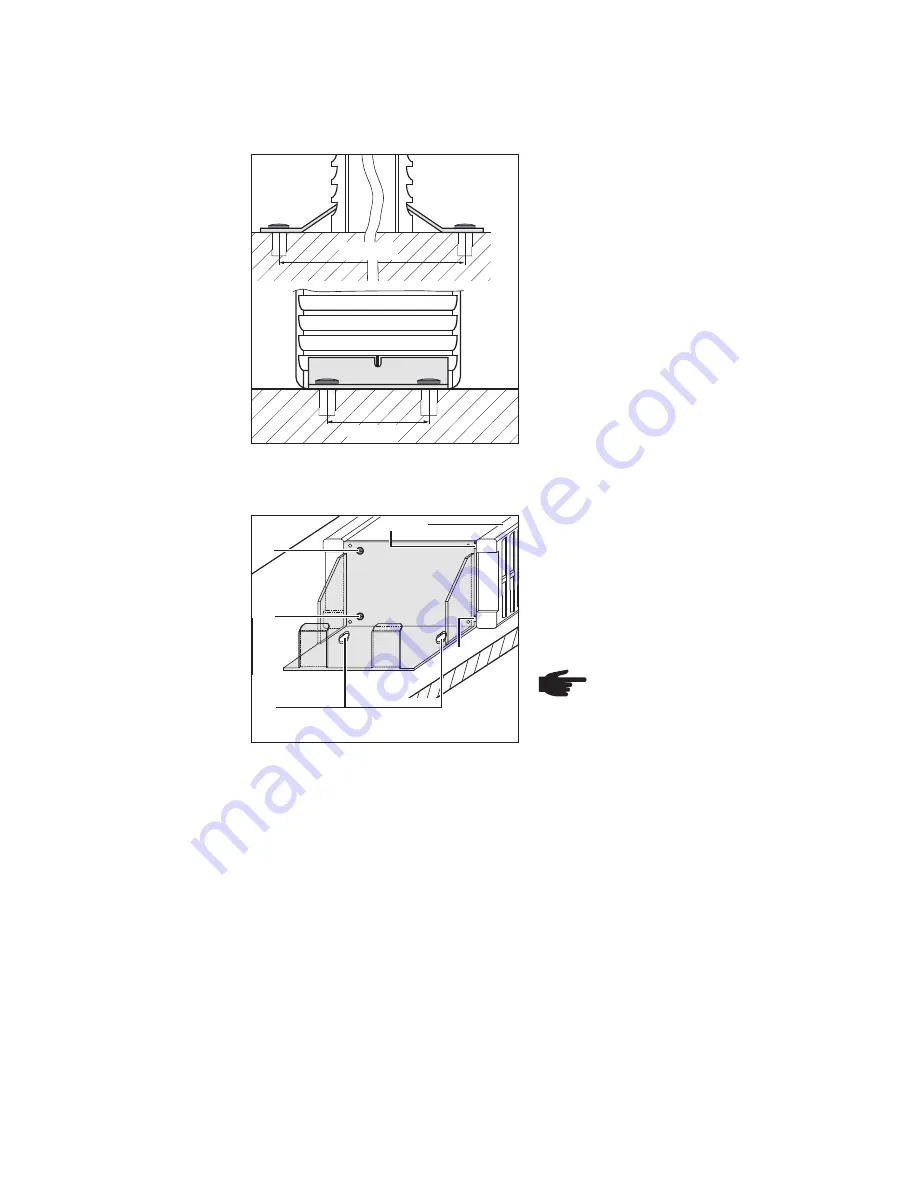
Fit the charger to the wall using the optio-
nal wall bracket:
1.
Place the charger onto the bracket
(insert wall bracket lug (A) into slot on
the plastic front panel (B))
2.
Fasten the charger to the bracket
using the two screws supplied (C)
(diameter 3.5 x 9.5 mm)
NOTE!
If fixing to the wall, please
note the weight of the charger.
Only fix to a wall that is suitable to
this purpose.
3.
The bracket is fitted using suitable
dowels and screws at the cut-outs (D)
Fitting options
Fitting to the
floor
Fit the charger to the floor using the
optional fitting brackets:
1.
Insert the fitting bracket into the left
and right-hand sides of the ventilation
grille on the charger’s front panel, and
do the same on the rear panel
2.
Mark the location of the holes on the
mounting surface (see diagram for
measurements)
3.
Drill holes
4.
Select the most suitable screws for
fastening the charger according to the
nature of the mounting surface
(diameter 5 mm)
5.
Fasten charger to the mounting
surface using fitting brackets, each
with two screws
Mounting on the
wall
370 mm
42 mm
(C)
(C)
(D)
(B)
(A)
(A)
Fitting to the floor
Mounting on the wall
Summary of Contents for VAS 5903
Page 2: ......
Page 8: ...VI ud_fr_ls_sv_00910 022007 ...
Page 42: ...VI ud_fr_ls_sv_01055 022007 ...
Page 46: ...IV ud_fr_ls_sv_01086 042006 ...
Page 80: ...VI ud_fr_ls_sv_01056 022007 ...
Page 84: ...IV ud_fr_ls_sv_01087 032006 ...
Page 118: ...VI ud_fr_ls_sv_01060 022007 ...
Page 152: ...VI ud_fr_ls_sv_01057 022007 ...
Page 186: ...VI ud_fr_ls_sv_01058 022007 ...
Page 220: ...VI ud_fr_ls_sv_01059 022007 ...
Page 254: ...VI ud_fr_ls_sv_01064 022007 ...
Page 288: ...VI ud_fr_ls_sv_01065 022007 ...
Page 317: ......

