background image

    -never to tug on the lead or appliance itself to unplug from the outlet 
    -not to leave the appliance plugged into the main power supply unattended 
    -never to submerge the appliance in water or in other liquids. 

·

The user must not replace the appliance lead. 

Contact a professionally qualified person in case of need. 

·

Switch off and do not mishandle the appliance if it should breakdown and/or work badly. Contact a authorized 

Service Centre for eventual repairs, asking for original spares. 

·

Put the appliance out of service at the end or its service life by cutting off the lead after unplugging from the 

outlet. Abide by local existing rules and regulations for its disposal. 

·

Our company may not be held liable for eventual damages to persons, animals or objects caused by incorrect 

installation or deriving from improper, erroneous or unreasonable use. 

·

Observe maximum of 1 mins for continues operation of the appliance, then rest 8 mins before restart. Thus 

after five period, the appliance should be keep rest for 30 mins.


TECHNICAL SPEC


Voltage

220

240V 50Hz


Power

:500W; 

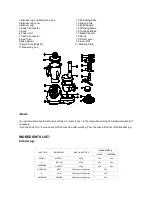
Structure: 


USING IT THE FIRST TIME 

-Read this handbook to familiarize yourself with all the parts of your new food processor.     

-Clean all the parts and accessories in contact with food before using the appliance for the first time (see paragraph 

Cleaning

). 


Warning! 

Always take care when you are handling the blades to fit them on, taking them out of the bowl (B1) after preparing 
the food and when cleaning them, as they are very sharp. 

!


Do not operate without the cover in place. 

.


HOW TO USE IT 

Your new food processor will help you to prepare a lot of basic mixtures that you can use for your recipes. 
Please abide by the following instructions to achieve the best results and to keep your appliance in good working 

condition. 
Attention! 
Never exceed the maximum quantities below and never pour liquids hotter than 75

 into the bowl and/or blender 

Follow the instructions given below every time you use it: 
-Never leave the appliance unattended while it is on. 
-Never make the appliance work while it is empty. 
-Never touch the moving parts. 
-Never put your fingers or utensils inside the lid opening. 
-Never press down the ingredients into the lid opening with your hands. 
-Do not use the appliance to work hard ingredients (e.g, frozen meat, crusts of cheese

), rubbery (e.g.candied 

peel

), uneatable parts of ingredients (e.g. bones,,        fishbones

)or crush ice.


-Do not remove the lid and never replace accessories without switching off the appliance and if the accessory being 
used has not stopped working. 
-Do not remove the ingredients from the bowl before removing the blade 


CLEANING 

Always unplug from power outlet before any cleaning jobs. 

Clean the Power Unit (6) with a soft slightly damp cloth. 

Do not wash it under running water and 

do not submerge it in water or other liquids. 

All accessories can be washed by hand or in the dishwasher: 
-for hand washing use tepid water and normal washing up detergent, being 

careful of the steel 

blade as it is very sharp; 

-

Washing in the dishwasher-

place accessories in the upper part and make sure the water never 

exceeds maximum temperature of 50


Do not use chemical or abrasive substances. 

Summary of Contents for MX725

Page 1: ... aandachtig de gebruiksaanwijzing alvorens uw toestel te gebruiken BELANGRIJKE VEILIGHEIDSVOORSCHRIFTEN GEBRUIKSAANWIJZING Please read these instructions carefully before using the appliance IMPORTANT SAFEGUARDS OPERATING INSTRUCTIONS appareil Pour votre sécurité lisez attentivement la notice avant utilisation de votre MODE D EMPLOI ...

Page 2: ......
Page 3: ...oedingskabel van het apparaat te vervangen Indien noodzakelijk neem contact op met een professioneel en gekwalificeerd persoon Schakel het apparaat uit en mishandel het niet mocht het defect raken en of slecht werken Neem contact op met een geautoriseerd Servicecentrum voor eventuele reparaties en vraag naar originele onderdelen Maak het apparaat onwerkzaam aan het einde van de levensduur ervan do...

Page 4: ...te werken Draai de knop op stand 0 wanneer het hakken voltooid is Schenk het voedsel eruit nadat het mes tot stilstand is gekomen II Klopfunctie De mixfunctie heeft vrijwel dezelfde gebruiksstappen als de hakfunctie U hoeft slechts het hakmes te vervangen door het schaafmes Deze wordt gebruikt voor het mixen en kloppen van etenswaren zoals eieren soep REINIGING Haal altijd de stekker uit het stopc...

Page 5: ...nd 0 Wacht totdat het mes volledig tot stilstand is gekomen en schenk het etenswaar uit de kom IV Persfunctie 1 Zet de kom eerst op de motorbasis en draai het vervolgens rechtsom totdat u het signaaltje hoort Bevestig dan het filterstuk en de fruitpers op de kom zoals afgebeeld in Figuur 13 14 2 Steek de stekker in het stopcontact en draai de schakelaar naar stand 1 3 Snij de sinaasappel doormidde...

Page 6: ...araat in het stopcontact en schakel de voedselverwerker aan Draai de knop naar het gewenste niveau De snelheid verhoogt per niveau PULSE is het hoogste niveau Draai de knop naar PULSE om met tussenpozen te werken 1 Maatbeker voor de blenderkom 2 Afdekking van de blenderkom 3 Blenderkom 4 Schakelaarconnector 5 Knop 6 Motorbasis 7 Schakelaarconnector 8 Aspijp 9 Mengkom 10 Cover van de kom Plastic 11...

Page 7: ...fmes op de messenhouder zoals afgebeeld in Figuur 9 Het snijmes snijdt het voedsel in plakjes Het schaafmes snijdt het voedsel in dunne reepjes Plaats de kom eerst op de motorbasis en draai het vervolgens rechtsom totdat u het signaaltje hoort Plaats dan de messenhouder op de as in het midden van de kom zoals afgebeeld in Figuur 10 Plaats de cover op de kom en draai het totdat u het signaaltje hoo...

Page 8: ...t pas remplacer le câble de l appareil Contactez une personne qualifiée professionelle en cas de besoin Débranchez et ne manipulez pas l appareil s il est cassé et ou fonctionne mal Contactez un centre de maintenance agree pour d éventuelles réparations en demandant les pièces détachées originales Rendez l appareil hors service à la fin de sa vie en coupant le cable d alimentation après l avoir dé...

Page 9: ... coupés en petits morceaux 2 cm x 2 cm x 2 cm Mettez le couvercle sur le bol et tournez le jusqu à ce que vous entendiez un signal comme indiqué sur la figure 7 Branchez la prise à la prise murale choisissez le niveau avec le commutateur comme indiqué sur la figure 8 La puissance augmente avec le degré PULSE est le plus haut niveau PULSE est un bouton poussoir utilisé pour un fonctionnement interm...

Page 10: ...ace et pour des modèles avec les cruches de mélangeur logement de cruche sur la base moteur la cruche de mélangeur et le couvercle ne sont pas obstruées par des déchets solides Utilisez au besoin une brosse douce pour nettoyer les éventuels résidus quand l appareil est débranché de la prise murale Les lames ne peuvent pas être aiguisées Remplacez les si elles ne coupent pas correctement ou sont us...

Page 11: ... danach mindestens 8 Minuten für eine weitere Benutzung Nach fünf Benutzungsvorgängen sollte das Gerät für mindesten 30 Minuten ausgeschaltet bleiben Schüssel INBETRIEBNAHME Lesen Sie sich diese Bedienungsanleitung sorgfältig durch und machen Sie sich mit allen Teilen Ihres neuen Küchengeräts vertraut Reinigen Sie vor der Inbetriebnahme alle Teile und Aufsätze die mit Lebensmitteln in Berührung ko...

Page 12: ...ittel wie z B von Eiern und Suppen verwendet III Scheiben Raspelfunktion Setzen Sie den Deckel fest auf den Motorblock Befestigen Sie dann das Scheiben Raspelmesser s Abbildung 9 Mit dem Scheibenmesser können Sie Lebensmittel in Scheiben schneiden Mit dem Raspelmesser können Sie Lebensmittel in Streifen schneiden Stellen Sie zuerst die Schüssel auf den Motorblock und drehen Sie sie dann im Uhrzeig...

Page 13: ...önnen nicht geschärft werden Ersetzen Sie sie durch Neue wenn sie abgenutzt sind oder nicht mehr richtig schneiden Wenden Sie sich an einen autorisierten Kundenservice für den Kauf von Zubehör Ersatzteilen oder Wartungsarbeiten an Ihrem Gerät AUFBEWAHRUNG Vergewissern Sie sich dass Ihr Gerät und alle Zubehörteile vollkommen trocken sind bevor Sie sie weglegen Ihre Küchenmaschine hat ein platzspare...

Page 14: ... very sharp Do not operate without the cover in place HOW TO USE IT Your new food processor will help you to prepare a lot of basic mixtures that you can use for your recipes Please abide by the following instructions to achieve the best results and to keep your appliance in good working condition Attention Never exceed the maximum quantities below and never pour liquids hotter than 75 into the bo...

Page 15: ...ing The blade in sharp Please only hold the plastic part while using Put the food eg Meet into the bowl as shown in Diagram 6 Big piece food needs to be cut into small pieces 2 cm x 2 cm x 2 cm Put the cover on the bowl and turn it until hearing the chattering sound as shown in Diagram7 Fix the plug to the electric socket Turn the knob to the required level as shown in Diagram 8 The speed is incre...

Page 16: ...ush down the cut orange slowly opposite to the juice drill as shown in Diagram15 4 Pure out the juice and mix with seasoning as you like B Blender jug Put the bowl on the power unit first Then turn the bowl in clock wise direction until hearing the chattering sound Put the cover on the bowl and turn it until hearing the chattering sound Put stuff into the Blender jug and fix the Blender jug cover ...

Page 17: ...G SHREDDING MURPHY 400g 50s 30s MELON 400g 50s 30s CARROT 400g 50s 30s CHOPPING WHISKING MEAT 300g about 10g piece 30s HAM 300g about 15g piece 30s ONIONS 400g about 20g piece 30s 1 Blender Jug Cup Measuring Cup 2 Blender Jug cover 3 Blender Jug 4 Switch Connecter 5 Knob 6 Power Unit 7 Switch Connecter 8 Axis Tube 9 Mixing Bowl 10 Bowl Cover Plastic 11 Measuring Cup 12 Shredding Knife 13 Slicing K...

Page 18: ...to progettato cioè per la preparazione di cibi domestici Far attenzione a non utilizzare il dispositivo con piedi o mani bagnate non utilizzare il dispositivo per scopi non previsti non lasciare il dispositivo esposto a agenti atmosferici sole pioggia non lasciare che bambini o persone incapaci utilizzino il dispositivo non poggiarli sul dispositivo per inserire la spina in una presa di corrente n...

Page 19: ...ima di rimuovere la lama A Recipiente I Funzione tagliare a pezzettini poggiare il coperchio sull alloggiamento come indicato in Fig 1 mettere il recipiente in plastica sull unità e girare il manico in senso orario come indicato in Fig 2 e 3 Mettere il supporto lama sull asse al centro del recipiente e premere il pulsante Fissare la lama per tagliare a pezzettini sul supporto lama come mostrato in...

Page 20: ...inché il supporto non sia connesso all unità correttamente Collegare la presa della macchina e accendere il dispositivo Girare la manopola al livello desiderato La velocità viene aumentata a livelli RITMO è il livello massimo Girare la manopola su RITMO per funzionamento ad intermittenza PULIZIA Tirare sempre la spina prima di pulire il dispositivo Pulire l unità 6 con un panno leggermente umido N...

Page 21: ...descalzo ni con los pies o las manos húmedos No utilice el aparato fuera de su hogar No deje el aparato expuesto a los agentes atmosféricos como el Sol la lluvia etc No deje que niños o personas discapacitadas utilicen el aparato No tire del cable ni del aparato para desenchufarlo de la toma No deje el aparato enchufado desatendido No sumerja el aparato en agua u otro líquido No cambie el cable de...

Page 22: ... accesorio se ha detenido No retire los ingredientes del bol antes de extraer la cuchilla A Bol de mezcla I Función picar Cierre bien la tapa protectora como se muestra en el Diagrama 1 Coloque el bol de plástico en la unidad del motor y gire el asa en la dirección de las agujas del reloj como se muestra en los Diagramas 2 y 3 Coloque el soporte de la cuchilla en el eje en el centro del bol y báje...

Page 23: ... a intervalos LIMPIEZA Antes de limpiar el aparato desenchúfelo de la toma de corriente Limpie la Unidad del motor 6 con un trapo suave y húmedo No la limpie bajo el chorro de agua ni la sumerja en agua u otro líquido Todos los accesorios pueden lavarse a mano o en el lavavajillas Para lavar a mano utilice agua tibia y un detergente de lavavajillas normal Si utiliza el lavavajillas coloque los acc...

Page 24: ...mergulhe o aparelho em água ou outros líquidos O utilizador não pode substituir o cabo do aparelho Caso seja necessário contacte um profissional qualificado Em caso de avaria e ou funcionamento incorrecto desligue o aparelho e não o manuseie de forma indevida Contacte um Centro de Assistência autorizado para eventuais reparações solicitando peças sobresselentes originais Inutilize o aparelho no fi...

Page 25: ... centro da taça e prima a em direcção à parte inferior Em seguida fixe a lâmina de picar ao respectivo suporte conforme indicado nos Diagramas 4 e 5 Aviso A lâmina é muito afiada Ao utilizá la segure apenas pela parte em plástico Coloque o alimento por exemplo carne na taça conforme indicado no Diagrama 6 Os alimentos em pedaços grandes têm de ser cortados em pedaços mais pequenos 2 cm x 2 cm x 2 ...

Page 26: ... aparelho da corrente eléctrica Limpe a Unidade de Alimentação 6 com um pano suave ligeiramente humedecido Não lave o aparelho sob água corrente nem o mergulhe em água ou outros líquidos Todos os acessórios podem ser lavados à mão ou na máquina na lavagem à mão utilize água morna e detergente normal tendo cuidado com a lâmina de aço que é extremamente afiada Lavagem na máquina coloque os acessório...

Page 27: ... and packaging puts your attention to this important issue The materials used in this appliance can be recycled By recycling used domestic appliances you contribute an important push to the protection of our environment Ask your local authorities for information regarding the point of recollection Avvertenza per la tutela dell ambiente Come indicato dal simbolo riportato sul prodotto sulle istruzi...

Page 28: ...93130 Noisy le Sec tel 01 48 12 65 50 30 rue Saint Just AKOR www akor fr sav akor 33 0 1 48 12 65 55 Français English HOTLINE MX725 FR EN NL DE ES IT PO 0111 ...

Reviews: