background image

ITEM

DESCRIPTION

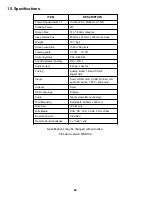
Power Requirements TV

100-240V AC 50/60 Hz (175W)

Standby Power

2W

Screen Size

31.5" (80cm) diagonal

Case dimensions

800mm x 610mm x 220mm inc base

Weight

15.7 Kg’s

Screen resolution

1366x 768 pixels

Viewing angle

V 176º


H 176º

Colour Systems

PAL, SECAM

Sound Systems (analog)

BG, I, DK, L

Audio Output

8 W per channel

Tuning

Analog. Band 1, Band 3, UHF                  
Digital UHF       

Inputs

Scart, HDMI, VGA, CVBS,S-Video, L/R 
audio.PC


Audio. Y,Pb,Pr


and audio.

Outputs

Scart,  

OSD Language

English

Audio

Nicam


stereo/Mono (Analog)

Wall Mounting

Adjustable  400mm x 200 mm

Disc size

12 CM only

Disc Media

DVD, CD, VCD, VCD2, CDG, JPEG

Remote Control

Infra Red

Remote Control batteries

2 x "AAA" cells

15. Specifications.

22

Specifications may be changed without notice.

Firmware version MSD109

Summary of Contents for APLDVD3221W-HDID

Page 1: ...Model APLDVD3221W HDID 32 81 3cm Digital LCD TV with DVD DVBt Freeview HDMI ...

Page 2: ...gh precision technology and 99 9 or more of the pixels are effective dots may appear These can be black or bright dots red green or blue and may appear constantly on the LCD screen This is a structural property of the LCD panel and is not a malfunction ...

Page 3: ...3 3 Accessories 4 4 User Controls 5 5 Remote Control 6 6 Connections 8 7 Menu Operation 11 8 Teletext 17 9 EPG Electronic Programme Guide 18 10 DVD Operation 18 11 DVD Setup menu s 18 12 Trouble Shooting Guide 20 13 Disc Care 21 14 Wall mounting 21 15 Specifications 22 16 Mains Plug Wiring 23 ...

Page 4: ...trolled waste disposal please keep separate from other household waste and recycle it responsibly to promote the sustainable reuse of material resources Household users should contact either the retailer where you purchased the product or their local government office for details of where and how you can take this item for environmentally safe re cycling Business users should contact their supplie...

Page 5: ...basements or other damp places Do not allow water or other fluids to enter the TV Do not touch the Mains plug or adaptor with wet hands Should moisture enter the TV disconnect from the supply and call the customer help line Cleaning Disconnect the TV from the mains supply Use a soft dry cloth for stubborn stains use a soft moist cloth with a dilute mild detergent Do NOT use petrol based fluids or ...

Page 6: ...3 Accessories Please check the contents of the TV before you continue If any item is missing please contact your point of purchase User Manual Remote Control Mains lead 4 ...

Page 7: ...menu mode will shift the selection upwards 5 Menu Selects the MENU function If in a sub menu will revert to previous level of menu 6 Input Selects the different input sources each press will select another input source 7 Power Switches TV On from standby Also returns TV to standby Side view DVD Controls 1 Press to play and pause disc If paused press to restart playing 2 Press to insert or eject di...

Page 8: ...he points of repeat in DVD mode Subpage selects subpage numbers in text mode 38 NEXT BLUE Next selects next chapter or track in DVD mode Blue fast text mode 1 STANDBY Switches TV to Standby and Operation 3 P MODE Selects picture modes 5 S MODE Selects sound modes 7 0 9 Numeric buttons for direct cannel selection or track chapter numbers 9 SOURCE Selects various input modes 11 UP Navigation button ...

Page 9: ... fire Do not place in the domestic waste consult your local waste disposal company Do not mix batteries old and new Carbon or Alkaline Do not use re chargeable batteries Remove batteries if not using the remote control for long periods to prevent leakage If the batteries do leak clean the compartment with soapy water and scrape any residue from the contacts To NOT touch or ingest battery residue 5...

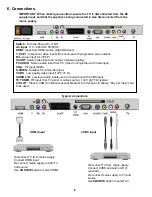
Page 10: ...junction with CVBS input TV TUNER RF input from TV aerial or cable source 1 m V 75 Ω typical CI SLOT Place a CAM Conditional Access Module into this point to allow a Pay per View card to be used HDMI Input CVBS Input IMPORTANT When making connections ensure the TV is disconnected from the DC supply input and that the appliance being connected is also disconnected from the mains supply Typical conn...

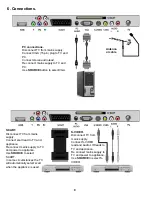
Page 11: ... mains supply Connect S VIDEO lead and Audio L R leads to TV and appliance Re connect mains supply to TV and power to appliance Use SOURCE to select S VIDEO 9 Antenna or cable SCART Disconnect TV from mains supply Connect scart lead to TV and appliance Re connect mains supply to TV and power to appliance Use SOURCE to select SCART In some circumstances the TV will automatically select scart when t...

Page 12: ...connect TV from mains supply Connect Y Pb Pr leads and audio leads to TV and appliance It is wise to use dedicated Y Pb Pr leads from your retailer Re connect mains supply to TV and power to appliance Use SOURCE to select Y Pb Pr ...

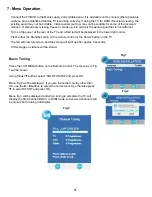
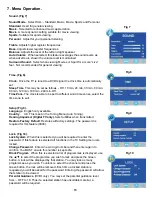
Page 13: ...wer right corner Press either the Standby button on the remote control or the Power button on the TV The led will now turn Green and the screen will light up after approx 5 seconds At this stage no stations will be stored Basic Tuning Press the LCD MENU button on the Remote Control The menu as in Fig 1 will be shown Using the buttons select AUTOTUNING and press OK Menu Fig 2 will be displayed If y...

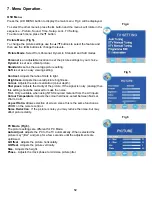
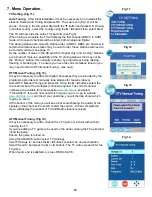
Page 14: ...picture brightness Colour Adjusts the colour saturation colour depth Sharpness Adjusts the clarity of the picture If the signal is noisy analog then this setting should be reduced to mask the noise Tint Only available when using NTSC sourced material from the AV inputs Colour Temperature Adjusts the colour hardness select between Normal Warm Cold Aspect Ratio Allows selection of screen sizes this ...

Page 15: ... Fig 9 Language English only available Country UK This is set in the Tuning Menu Auto Tuning Hearing Impaired Digital TV only Sets Subtitles when transmitted Restore Factory Default Restores all factory settings The password is required for this feature 0000 Lock Fig 10 Lock System When this is selected you will be required to enter the password If this feature is selected all functions in the TV ...

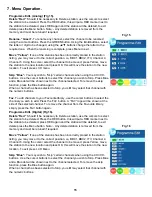
Page 16: ...ning see next DTV Manual Tuning Fig 13 It may be necessary to add more digital channels as they are provided by the programme providers or manually tune stations for reasons above Select DTV Manual Tuning and press Ok Using the buttons select the channel number of the multiplex channel required The correct channel numbers are available from the website www dtg org uk and select Transmitters If you...

Page 17: ...gain When a channel has been selected to Skip you still may select that channel with the numeric buttons Fav To add channels to your Favourite library use the cursor buttons to select the channel you wish to add Press the FAV button A FAV logo will be shown at the side of the selected channel To remove the channel from the Favourite library simply press the FAV button again Programme Edit Digital ...

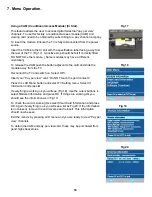
Page 18: ... the module away from the TV Reconnect the TV and switch on Select DTV Insert your Pay per view card Do NOT touch the gold contacts Press the LCD Menu button and select TV Setting menu Select CI Information and press If everything is working ok you will see Fig 18 Use the cursor buttons to select Module Information and press OK If things are working Ok you should see the information as in Fig 19 T...

Page 19: ... size REVEAL Press to reveal hidden answers in quizzes or puzzles SUBPAGE Some text pages may contain several sub pages To access these press this button and then enter the page number using the numeric buttons Press again to exit the feature COLOUR BUTTONS Red Green Yellow Blue are used as fast access buttons to pages of text which are highlighted at the bottom of each text page HOLD Press to hol...

Page 20: ...ectly may cause damage to the Laser Optic Do NOT place any damaged dirty or disc not 12 cm in diameter into the loader The mechanism will draw the disc in automatically In most cases the DVD Title will be displayed together with a Disc menu Select the feature required with the cursor buttons and press PLAY Pause To Pause play press the Play Pause button press again to continue playing To Stop play...

Page 21: ...the and buttons Default is English If the disc has that language it will play the soundtrack in that language SUBTITLES Select Subtitle using the buttons The languages available will be shown in the right column Select the required language using the and buttons Default is English If the disc has that language it will display the Subtitles in that language DISC MENU Select Disc menu using the butt...

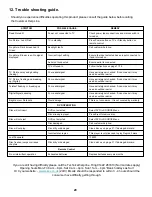
Page 22: ...e 11 14 TV Picture noisy and ghosting Analog Poor aerial signal Have aerial signal checked If indoor aerial it may need an outdoor aerial TV Picture freezing and breaking up Digital Poor aerial signal Have aerial signal checked If indoor aerial it may need an outdoor aerial Teletext freezing or breaking up Poor aerial signal Have aerial signal checked If indoor aerial it may need an outdoor aerial...

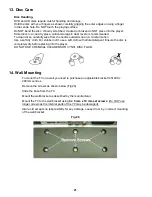
Page 23: ...a soft dry cloth For stubborn dirt use a soft cloth with dilute detergent Ensure the disc is completely dry before placing into the player DO NOT USE CHEMICAL CLEANERS OR VYNYL DISC FLUID 14 Wall Mounting To mount the TV on a wall you need to purchase an adjustable bracket to fit 400 x 200mm centres Remove the screws as shown below Fig 26 Slide the base from the TV Mount the wall bracket as descri...

Page 24: ... analog BG I DK L Audio Output 8 W per channel Tuning Analog Band 1 Band 3 UHF Digital UHF Inputs Scart HDMI VGA CVBS S Video L R audio PC Audio Y Pb Pr and audio Outputs Scart OSD Language English Audio Nicam stereo Mono Analog Wall Mounting Adjustable 400mm x 200 mm Disc size 12 CM only Disc Media DVD CD VCD VCD2 CDG JPEG Remote Control Infra Red Remote Control batteries 2 x AAA cells 15 Specifi...

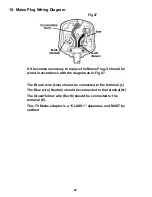
Page 25: ...n accordance with the diagram as in Fig 27 The Brown wire Live should be connected to the terminal L The Blue wire Neutral should be connected to the terminal N The Green Yellow wire Earth should be connected to the terminal E This TV Mains adaptor is a CLASS 1 apparatus and MUST be earthed 23 Fig 27 ...

Reviews: