12
2.3. Installation Steps
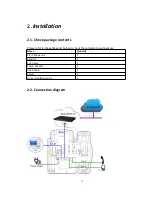
Step 1 – Connect to the power
Connect the provided power adapter to the Power port and plug the adapter into an
available power outlet. The LCD will display “Initializing, Please Wait…”
-------------------------------------------------------------------------------------------------------
Note1: Never use a power adapter other than the one provided with Akuvox SP-R50P
Note2: Only Internet port supports POE.
-------------------------------------------------------------------------------------------------------
Step 2 – Connect to the Internet
Connect one end of the RJ-45 Ethernet cable to the Internet port at the back of the
Akuvox SP-R50P and the other end to wall network jack.
Step 3 – Connect the computer
Connect one end of the RJ-45 Ethernet cable to the PC port at the back of the Akuvox
SP-R50P and the other end to the Ethernet port on your computer.
Step 4 – Configure the device
Launch the web browser on your computer, and enter the IP address of the phone
into the address bar. The login screen will appear if the address is correct. Enter the
user name and password to log into the web console.
NOTE: Each phone has its own IP address, you can check it by press the OK key on
the keyboard when the phone is idle
Summary of Contents for SP-R50P
Page 1: ...1 SP R50P IP Phone User Manual ...
Page 28: ...28 ...
Page 43: ...43 5 3 Account Advanced Path Web UI Account Advanced ...
Page 52: ...52 ...


