en
Translation of the original assembly instructions
14
476240_c
TRANSLATION OF THE ORIGINAL
ASSEMBLY INSTRUCTIONS
Contents
About this handbook........................................ 14
Unpacking the lawn tractor.............................. 14
Lawn tractor assembly..................................... 14
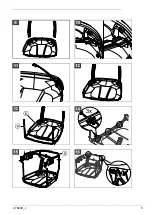
Mounting the rear wheels (20'')........................15
Mounting the steering wheel............................15
Mounting the operator's seat........................... 15
Mounting the cruise control lever.....................15
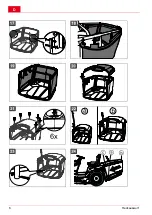
Hooking in the fill-level signal transmitter of the
grass catcher......................................... 15
Assembling grass catchers.............................. 15
Setting the catcher holder................................16
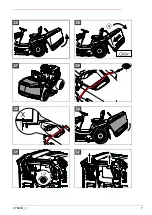
Installing the starter battery..............................16
Mounting the sun shield...................................17
ABOUT THIS HANDBOOK
Before assembling the lawn tractor, read
through these assembly instructions carefully
and perform all of the assembly work consci-
entiously. Please ask a dealer or the manu-
facturer if you have any questions or doubts
about assembly.
Comply with the lawn tractor's instructions for
use regarding operation of the lawn tractor.
Keep the assembly instructions to refer to du-
ring use of the product, and pass them on to
subsequent users.
The lawn tractors are supplied with different
levels of equipment. Please note that the il-
lustrations may differ somewhat from the ori-
ginal. Please contact a specialist workshop or
the manufacturer if you encounter difficulties
in following the descriptions.
Explanation of symbols
WARNING!
Observe this danger note in order to
avoid serious personal injuries.
CAUTION!
Following these warning instructions can
help to avoid personal injuries and/or da-
mage to property.
ADVICE
Special instructions for ease of under-
standing and regarding handling.
UNPACKING THE LAWN TRACTOR
The lawn tractor is supplied on a sturdy wooden
pallet.
Place the pallet on level ground in order to unpack
the tractor.
1 Remove all accessory kits and the packaging
materials.
2 Remove the lengths of wood and the lath on
the front. (20'' tyres only)
3 Remove the two wood blocks.
4 Remove the nails and screws from the board,
or knock them flat using a hammer so that the
tyres cannot be damaged.
5 Push the tractor forwards off the pallet.
6 Secure the tractor to prevent it from rolling
away. (e.g. with chocks)
LAWN TRACTOR ASSEMBLY
WARNING!
Danger if assembly is not carried out
completely!
Do not operate the tractor (even for
a test) before it has been fully as-
sembled!
Carry out all the work described in
the assembly instructions conscien-
tiously!
If you are uncertain about anything,
ask a specialist to confirm that the
assembly has been carried out cor-
rectly before the machine is started
up.
The following assembly jobs must have been car-
ried out correctly before the lawnmower can be
taken into operation as described in the operating
instructions for the tractor:
Mounting of the wheels
Mounting of the steering wheel
Mounting of the operator's seat
Assembly of the grass catcher
Sun shield installation
Mounting of the sensor rollers on the mower
mechanism
Connect the battery
Setting the catcher holding arms
Summary of Contents for 119589
Page 1: ...476240_c I 12 2014 Rasentraktor Montageanleitung Heckauswurf...
Page 2: ...D 2 Heckauswurf...
Page 4: ...D 4 Heckauswurf...
Page 5: ...476240_c 5...
Page 6: ...D 6 Heckauswurf...
Page 7: ...476240_c 7...
Page 8: ...D 8 Heckauswurf...
Page 9: ...476240_c 9...

