43
Cleaning the lawn tractor
WARNING!
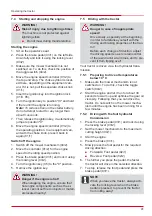
Risk of injury due to objects being
thrown out!
When crossing areas of gravel and
crushed stone, objects can be drawn into
the running mower mechanism and then
thrown out.
■
Always switch off the mower mecha-
nism if you are driving over surfaces
other than lawns.
7.5.4.4
Emptying the grass catcher
NOTE
An audible signal sounds when the grass
catcher is full. The catcher should be
emptied now if not before.
■
The grass catcher can be emptied from the
operator's seat.
■
The engine cuts out if the grass catcher is lift-
ed up or disconnected when the mower
mechanism is switched on.
■
The mower mechanism cannot be switched
on unless the grass catcher is engaged cor-
rectly.
Emptying the grass catcher with operating
lever
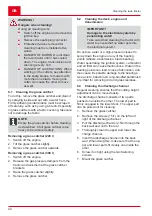
1. Pull the operating lever (09/1) out of the
grass catcher (09/a).
2. Push the lever in the driving direction so the
grass catcher opens (09/b).
3. Move the grass catcher backwards with the
lever (10/a) until the catcher engages (10/b).
7.5.4.5
Mulching
For optimum mulching results, the grass should
be mowed on a regular basis (approx. 1 or 2
times per week). When doing so, cut 1/3 of the
grass height (e.g. if grass height is 6 cm, mow
2 cm). This will ensure that the mown grass will
be properly intermixed in the remaining grass.
Mulching keys are optionally available for all lawn
tractors.
Reconfiguring the rear discharge for
mulching mode
1. Remove the grass catcher.
2. Insert the mulching key (13/1) into the dis-
charge channel (13/2).
3. Secure both tensioning straps (14/1) at the
eye bolts (14/2).
4. Hook in the grass catcher.
7.5.4.6
Mowing interval
Please take into account that grass grows differ-
ently at different times. We recommend using a
shorter interval between mowing during early
spring. You can increase the mowing intervals as
the growth rate of the grass begins to decline
during the course of the year.
If you are unable to mow the grass for an extend-
ed period, you should initially select a higher cut-
ting height setting, then re-mow two days later
with a lower cutting height setting.
7.5.4.7
Mowing high grass
Mow with a higher cutting height adjustment
when the grass is longer than normal or when it
is wet. Then re-mow the grass with a lower, nor-
mal setting.
7.5.4.8
Cutting blade maintenance
Make sure that the cutting blade remains sharp
for the entire mowing season to avoid shredding
or tearing the blades of grass. Shredded grass
blades turn brown on the edges. This reduces
their growth and leaves the lawn prone to diseas-
es.
■
Check the cutting blade for sharpness and
signs of wear or damage after each use!
Have it serviced if necessary.
■
If replacement is required, only use original
manufacturer replacement blades.
8
CLEANING THE LAWN TRACTOR
The lawn tractor must be cleaned regularly to en-
sure optimum function and a long service life.
Clean the lawn tractor after each use to remove
adhering dirt and detritus.
Do not use a high-pressure cleaner for cleaning.
The water jet from a high-pressure cleaner or a
garden hose can damage the electrical system or
bearings.
In particular, make sure that no water comes into
contact with the engine, transmission and deflec-
tion pulleys, as well as the entire electrical sys-
tem.
Summary of Contents for Comfort 220 I
Page 3: ...3 01 1 2 3 4 5 02 1 2 03 1 2 04 1 2 05 06 1 07 a 1 08 1 2 3 a b...
Page 4: ...4 09 1 a b 10 a b Click 11 1 2 12 1 13 1 2 1 14 1 2 15 1 1 2 16 1 2 3...
Page 5: ...5 17 1 18 1 2 19 1 20 1 2 21 1 1 1 22 1 23 1 24 1...
Page 6: ...6 25 1 2 3 26 27 a b c d 28 29 1 1 30 1 31 1 32 1 2 a b c d...
Page 7: ...7 33 1 34 1 2 35 1 a 36 1 37 38 1 1 39...
Page 403: ...403 1 1 1 2 T3 T2 220 300 2 1 10 18 CE...
Page 404: ...RU 404 2 2 2 3 10 18 2 4...
Page 406: ...RU 406 3 3 1 16 3 2 3 3 3 4...
Page 407: ...407 3 5 3 6 3 7...
Page 408: ...RU 408 3 4 5 5 1 01 01 2 01 2 01 1 01 3 05 0 I II III II...
Page 412: ...RU 412 1 2 15 15 1 15 2 3 4 03 1 03 2 01 5 5 7 7 1 7 2 7 3 12 1 1 12 1 2 3 12 1 7 4...
Page 416: ...RU 416 8 8 1 220 1 2 3 300 1 2 3 4 8 2 8 3 1...
Page 417: ...417 2 15 1 3 15 2 4 5 6 7 9 10...
Page 418: ...RU 418 10 1 5 25 50 X X X X X X X X X X X X X X X X...
Page 422: ...RU 422...
Page 423: ...423 7 3 412...
Page 424: ...RU 424 2 1 2...
Page 425: ...425 13 xxxxxx x...
Page 428: ...UA 428 1 1 1 2 T3 T2 220 300 2 1 10 18 CE 2 2...
Page 429: ...429 2 3 10 18 2 4...
Page 431: ...431 3 3 1 16 3 2 3 3 3 4...
Page 432: ...UA 432 3 5 3 6 3 7 3 4...
Page 434: ...UA 434 02 1 02 2 5 5 04 1 1 04 1 04 2 6 6 1 6 2 6 3 ROZ 91 1 2 3 4 06 1 5 06 1 6 6 4 1 1 0 07...
Page 440: ...UA 440 8 8 1 220 1 2 3 300 1 2 3 4 8 2...
Page 441: ...441 8 3 1 2 15 1 3 15 2 4 5 6 7 9 10...
Page 442: ...UA 442 10 1 5 25 50 X X X X X X X X X X X X X X X X...
Page 446: ...UA 446 p 7 3 437...
Page 447: ...447 1 2 13 xxxxxx x...
Page 470: ...470...
Page 471: ...471...
Page 472: ......


