en
Safety instructions
16
Switch the motor off when an area other than
the area to be mowed is crossed
Never lift or carry the mower while the motor
is running
Never leave the mower unattended when it is
ready for operation
ASSEMBLY
Assemble according to enclosed assembly in-
structions.
CAUTION!
The mower must only be operated after
it has been fully assembled!
STARTUP
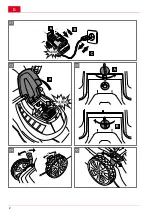
Charging the battery (1)
ADVICE
The battery is supplied partially charged!
Fully charge the battery before the first
use.
The battery can be charged in any
charge level. Interrupting charging does
not damage the battery.
CAUTION!
When pulling out the battery, press and
hold the engagement button on the un-
derside of the battery so the battery will
be unlocked.
1. Push the battery into the charger and connect
the charger to the mains. Charging starts, and
is indicated by the green light-emitting diode
(LED) flashing.
2. The battery is fully charged when the LED of
the charger lights up green without flashing.
3. Disconnect the plug from the mains.
4. Pull the battery out of the charger.
ADVICE
The temperature range for the charging
process should between -5 °C and +60°
C.
The maximum time for a full charge is
1.5 hours. If the operating period of the
battery is greatly reduced in spite of a
full charge, the battery is worn out and
should be replaced with a new original
battery.
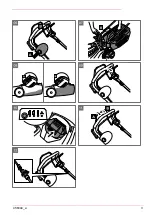
Inserting the battery (2, 3)
OPERATION
Adjusting the cutting height
CAUTION!
Risk of injury
Adjust the cutting height only while motor
is switched off and the cutting blade has
stopped!
ADVICE
Always adjust all wheels to the same
cutting height.
Cutting height adjustment depends
on the model.
Individual wheel quick adjustment or axle ad-
justment (4, 5)
To unlock, press the lever to the side and
hold.
Slide the lever to the left or right in the desired
cutting height.
Allow the lever to engage.
Make sure all wheels engage at the same po-
sition.
Switching on the motor (6)
Start the lawn mower only on level ground, and
not in high grass. The ground must be free from
foreign objects, such as stones. Do not lift or tilt
the lawn mower to start it.
1. Insert the safety key again and turn it
(3B)
.
2. Keep the start button pressed
(6A)
.
3. Pull the safety bar toward the handle bar and
hold it there
(6B)
.
4. Release the start button.
Mowing with grass catcher (7)
CAUTION!
Risk of injury
Remove or replace the grass catcher
only while the motor is switched off and
the cutting blade has stopped.
1. Lift up the baffle plate and hang the grass cat-
cher into the holders.
Fill level indicator
The level indicator is pressed upwards by the air
stream during mowing
(8A)
. When the grass cat-
cher is full, the level indicator rests against the cat-
cher
(8B)
. The grass catcher needs to be emptied.
Summary of Contents for Moweo 42.5 Li
Page 2: ...D 2...
Page 3: ...456344_a 3...
Page 121: ...456344_a 121 O...
Page 122: ...sr 122 1 7 2 8 3 9 4 10 5 11 6 Simboli na ure aju...
Page 123: ...456344_a 123 O Pre ko enja uklonite sva strana tela sa trav njaka...
Page 128: ...sr Pomo kod smetnji 128 POMO KOD SMETNJI AL KO AL KO AL KO AL KO...
Page 129: ...Pomo kod smetnji 456344_a 129 AL KO ADVICE n xxx xxx x...
Page 191: ...456344_a 191 191 191 193 194 194 194 195 196 196 196 197 197 199 201 ADVICE...
Page 192: ...ru 192 1 7 2 8 3 9 4 10 5 11 6...
Page 193: ...456344_a 193...
Page 194: ...ru 194 ADVICE AL KO 1 ADVICE 1 2 3 4 ADVICE 5 C 60 C 1 5 2 3 ADVICE 4 5...
Page 196: ...ru 196 3 5 ADVICE ADVICE ADVICE 0 C 25 C 0 C 25 C 40 60 3 1 5 AL KO...
Page 197: ...456344_a 197 AL KO 55 5 1 12 2 3 CCR 100...
Page 198: ...ru 198...
Page 199: ...456344_a 199 AL KO AL KO AL KO...
Page 200: ...ru 200 AL KO AL KO ADVICE...
Page 201: ...456344_a 201 xxx xxx x ADVICE...
Page 202: ...uk 202...
Page 203: ...456344_a 203 1 7 2 8 3 9 4 10 5 11 6...
Page 204: ...uk 204...
Page 205: ...456344_a 205 ADVICE AL KO 1 ADVICE 1 2 3 4 ADVICE 5 C 60 C 1 5 2 3 ADVICE 4 5 6...
Page 206: ...uk 206 1 3B 2 6A 3 6B 4 7 1 8A 8B 7 1 2 3 4 9 1 2 3 3a 10 1 9 2 2A 3 10 1 11A 1 11B ADVICE 20...
Page 207: ...456344_a 207 3 5 ADVICE ADVICE ADVICE 0 C 25 C 0 C 25 C 40 60 3 1 5 AL KO AL KO 55 5...
Page 208: ...uk 208 1 12 2 3 CCR 100...
Page 209: ...456344_a 209 AL KO AL KO AL KO AL KO...
Page 210: ...uk 210 AL KO AL KO ADVICE n xxx xxx x...
Page 211: ...456344_a 211 ADVICE...
Page 212: ...bg 212 1 7 2 8 3 9 4 10 5 11 6...
Page 213: ...456344_a 213...
Page 214: ...bg 214 ADVICE AL KO 1 ADVICE 1 LED 2 3 4 ADVICE 5 C 60 C 1 5 2 3 ADVICE 4 5 6...
Page 216: ...bg 216 3 5 cm ADVICE ADVICE ADVICE 0 C 25 C 0 C 25 C 40 60 3 1 5 AL KO...
Page 217: ...456344_a 217 AL KO 55 Nm 5 1 12 2 3 CCR 100 Wh Li Ion...
Page 218: ...bg 218 AL KO AL KO AL KO AL KO...
Page 219: ...456344_a 219 AL KO ADVICE...
Page 230: ...el 230 ADVICE...
Page 231: ...456344_a 231 1 7 2 8 3 9 4 10 5 11 6...
Page 232: ...el 232...
Page 234: ...el 234 3 6B 4 7 1 8A 8B 7 1 2 3 4 9 1 2 3 3a 10 1 9 2 2A 3 LED LED 10 1 11A 1 11B ADVICE 20...
Page 235: ...456344_a 235 3 5 cm ADVICE ADVICE ADVICE 0 C 25 C 0 C 25 C 40 60 3 1 5 AL KO AL KO 55 Nm 5...
Page 236: ...el 236 Bowden Bowden Bowden 1 Bow den 12 2 3 CCR 100 Wh Li Ion...
Page 237: ...456344_a 237 AL KO AL KO AL KO AL KO...
Page 238: ...el 238 AL KO ADVICE xxx xxx x...
Page 239: ...456344_a 239 ADVICE...
Page 240: ...mk 240 1 7 2 8 3 9 4 10 5 11 6...
Page 241: ...456344_a 241...
Page 242: ...mk 242 ADVICE AL KO 1 ADVICE 1 2 3 4 ADVICE 5 C 60 C 1 5 2 3 ADVICE 4 5 6...
Page 244: ...mk 244 3 5 cm ADVICE ADVICE ADVICE 0 C 25 C 0 C 25 C 40 60 3 1 5 AL KO AL KO 55 Nm 5...
Page 245: ...456344_a 245 1 12 2 3 AL KO CCR 100 Wh...
Page 246: ...mk 246 AL KO AL KO AL KO AL KO...
Page 247: ...456344_a 247 AL KO ADVICE...
Page 248: ...mk 248 xxx xxx x...
Page 249: ...456344_a 249...
Page 250: ...D 250...
Page 251: ......
Page 252: ......

