GB
16
R7-62.5 | R7-63.8 A | R7-65.8 HD
Start-up
WARNING!
Danger if the starter battery is not
handled correctly!
The following points must be complied
with to avoid the dangers arising from in-
correct handling of the battery!
■
Do not store the starter battery in the immedi-
ate vicinity of naked flames, do not burn it or
place it on heaters. Risk of explosion.
■
Store the starter battery in a cool, dry room
(10 - 15 °C) over the winter. Avoid storing at
temperatures below the freezing point.
■
Do not leave the starter battery without
charge for a long period. If the starter battery
is not used for a long period, it should be
charged using a suitable charger.
■
Do not smash the starter battery. The electro-
lyte (sulphuric acid) causes chemical burns to
the skin and clothing – immediately rinse
away with plenty of water.
■
Keep the starter battery clean. Only wipe
clean with a dry cloth. Do not use water, pet-
rol, thinners or similar for this purpose.
■
Keep the connection terminals clean and
grease them with terminal grease.
■
Do not short-circuit the connection terminals.
CAUTION!
Danger of a short circuit!
To avoid a short circuit, always discon-
nect the negative cable (-) of the battery
first, and reconnect it last!
Always remove the ignition key before
starting work on the battery!
1. Unscrew screw (24/1) of the bonnet.
2. Move control lever (24/2) of the mower deck
into the upper position.
3. Swing bonnet (24/3) to the side to access the
battery holder.
4. Install the battery (25/2) in the holder provid-
ed. Secure the battery with the rubber strap
(25/3) provided.
5. Connect the battery cables to the terminals of
the battery; connect plus terminal (25/1) first,
then minus terminal (25/4).
6. Close the bonnet, insert and tighten screws
(24/1) again and move control lever (24/2) of
the mower deck back into the lower position.
NOTE
Check the polarity:
■
Red terminal = positive terminal (+)
■
Black terminal = negative terminal
(-)
6
START-UP
See also the ride-on mower operating instructions.
WARNING!
Danger if assembly is not carried out
completely!
Do not operate the ride-on mower before
it has been fully assembled!
Carry out all the work described in the
assembly instructions. If you are uncer-
tain about anything, ask a specialist to
confirm that the assembly has been car-
ried out correctly before the machine is
started up!
Check whether all safety and protective
devices are in place and functioning cor-
rectly!
6.1
Check tyre pressure (26)
The correct tyre pressure is an important prereq-
uisite for a correctly levelled mower deck, and
hence for a uniformly mown lawn. Check the tyre
pressure at regular intervals.
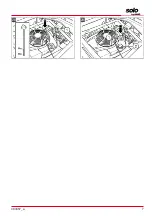
1. Park the ride-on mower on firm and level
ground and remove the ignition key.
2. Wait for approx. 1 hour after operation to al-
low the tyre to cool down. The tyre pressure
can only be measured correctly when the tyre
is cool.
3. Unscrew the valve cap and press a tyre pres-
sure meter onto the open valve.
4. Read off the tyre pressure and compare it
with the values given on the tyre:
1.0 –
1.4 bar
.
5. If the tyre pressure is too low: Pump up the
tyre using a commercially available foot
pump.
NOTE
1 PSI = 0.07 bar.
Summary of Contents for SOLO R7-62.5
Page 3: ...493357_a 3 01 2 a 1 3 02 1 2 3 03 11...
Page 5: ...493357_a 5 14 a 2 1 15 2 2 2 2 1 16 17 18 19 12 1 13 1 2 3...
Page 6: ...6 R7 62 5 R7 63 8 A R7 65 8 HD 22 23 a 24 2 3 25 26 1 0 1 4 bar 27 a 1 20 a 21 a...
Page 7: ...493357_a 7 28 29...
Page 67: ...493357_a 67 6 6 1 26 1 2 1 3 4 1 0 1 4 5 1 0 07 6 2 27 28 1 27 1 27 a 2 28 1 3 MIN MAX 4 5 27...
Page 68: ...RU 68 R7 62 5 R7 63 8 A R7 65 8 HD 6 3 27 29 ROZ 91 1 2 3 27 1 27 a 4 29 1 29 2 5 6 27...
Page 69: ...493357_a 69...
Page 70: ...70 R7 62 5 R7 63 8 A R7 65 8 HD...
Page 71: ...493357_a 71...


