1
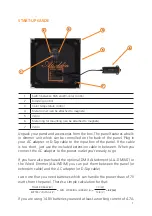
Switch between RGB and Bi-Color control
2
Dimming control
3
Color temperature control
4
Metal corner (can be attached to magnets)
5
Velcro
6
Metal ring for mounting (can be attached to magnets)
7
Velcro
4
6
7
1
2
3
5
Unpack your panel and accessories from the box. The panel features a built-
in dimmer unit which can be controlled on the back of the panel. Plug in
your AC adapter or D-Tap cable to the input box of the panel. If the cable
is too short, just use the included extension cable in between. When you
connect the AC adapter to the power outlet you’re ready to go.
If you have also purchased the optional DMX Attachment (ALL-DMXAT) or
the Wired Dimmer (ALL-WDIM) you can put them between the panel (or
extension cable) and the AC adapter (or D-Tap cable).
Just note that you need batteries which can handle the power draw of 70
watts from the panel. There’s a simple calculation for that:
If you are using 14.8V batteries you need at least a working current of 4.7A.
START-UP GUIDE
1
POWER DRAW (W)
= MIN. WORKING CURRENT (A) =
BATTERY VOLTAGE (V)
70 (W)
=
4.7 (A)
14.8 (V)


