8/00 7 33072C
i30SE Direct Vent Gas-Fired Fireplace Insert (Firebox Only)
A Division of Hearth Technologies Inc.
V. STEP-BY-STEP INSTALLATION
A. CONNECTING THE VENT PIPE.
The damper of
the masonry or factory-built chimney may have to be
removed to allow installation of the flexible-vent pipe.
Before installing the 3” flex vent pipe, mark or label
the exhaust pipe at both ends.
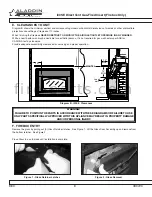
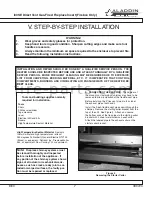
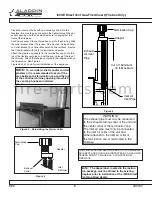
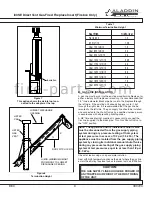
Install the 3-inch flexible vent pipes down through the
chimney. Remove the starting collar bracket from the
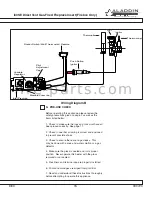
top of the unit. See Figure 3. Attach and secure
the bottom ends of the flex pipes to the starting collar
bracket with 3 sheet metal screws on each collar.
Attach the labeled pipe to the exhaust collar on the
starter collar bracket.
Note:
Fireplace chimney systems must
be cleaned thoroughly and inspected
before installation of the appliance. If
any portion of the chimney system shows
signs of structural or mechanical weak-
nesses, such as cracks, leaky joints, cor-
roded or warped surfaces, the faulty por-
tion must be repaired or replaced.
INSTALLATION AND REPAIR SHOULD BE DONE BY A QUALIFIED SERVICE PERSON. THE
HEATER SHOULD BE INSPECTED BEFORE USE AND AT LEAST ANNUALLY BY A QUALIFIED
SERVICE PERSON. MORE FREQUENT CLEANING MAY BE REQUIRED DUE TO EXCESSIVE
LINT FROM CARPETING, BEDDING MATERIAL, ETC. IT IS IMPERATIVE THAT CONTROL
COMPARTMENTS, BURNERS AND CIRCULATING AIR PASSAGEWAYS OF THE HEATER BE
KEPT CLEAN.
Tools and building supplies normally
required for installation.
Tools
Pliers
Phillips screwdriver
Tape measure
Level
Electrical drill and bits
Square
High Temperature Sealant Material
High Temperature Sealant Material.
Sealants
that will withstand high temperatures (at least
350 degrees Fahrenheit); General Electric RTV103
(Black), or equivalent. Rutland, Inc. Fireplace Mortar
#63, or equivalent; Dow Corning 732 or equivalent.
Figure 3
Removing the Starter Collar
WARNING!
1.
Wear gloves and safety glasses for protection.
2.
Keep hand tools in good condition. Sharpen cutting edges and make sure tool
handles are secure.
3.
Always maintain the minimum air space required to the enclosure to prevent fire.
4.
Read the following installation instructions.
f i r e - p a r t s . c o m

