background image

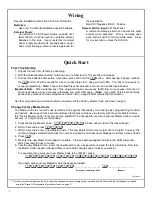
Quick Start 

First Time Start Up 

1.  Unpack the lock from its factory packaging. 


2.  With the batteries disconnected, hold down any number key for 10 seconds and release. 
3.  Connect the batteries and--within 3 seconds--press and hold the 

;

 button.  After hearing 6 beeps, release 

the 

;

 button.  Wait 5 seconds for lock to re-lock (listen for 1 beep and red LED).  The lock is now ready to 

accept programming.  

Note:

  Failure to follow this exact procedure can result in erratic lock behavior.   

Important Note:  

When entering any of the programming key sequences that follow, 

do not pause more than 5 

seconds between any key presses

--otherwise you must start again.  (

Note:

  If you wish, this 5-second delay 

between key presses can be extended--see 

Pass Time 

on page 9 after completing this section). 

 
No other programming commands will be accepted until the Factory Master Code has been changed. 


Change Factory Master Code 

The Master Code is a "secret" code (entered at the keypad) that allows you to change ALL programming functions 
and options.  Because all locks are manufactured identically (and leave the factory with the 

same 

Master Code), 

this "factory Master Code" is not very secret--and MUST be changed to your own personal Master Code to ensure 
security.  A 6 digit Code is recommended.


1.  Press the factory Master Code:  

1


2


3


4


5

.  A beep will sound and the lock will open. 

2.  Within 5 seconds, press 

;


1


;

3.  Within 5 seconds, enter a new Master Code.  This new Master Code may consist of 3 to 6 digits*, however, the 

number of digits selected determines the number required for all subsequent Manager and User Access Codes.  

4.   Press 

;

5.  Re-enter the new Master Code again to validate.  A 6-beep acknowledgement (with a red LED) will sound.  

Wait 5 seconds for lock to re-lock. 

6.  Test the new Master Code.  Enter the new Master Code; a beep will sound and the lock will unlock.  Now that 

the Master Code has been changed, there is no need to change it again (unless you want to).  


For example, if you want your new Master Code to be "44444", press: 

1


2


3


4


5


;


1


;


44444


;


44444

 
If you wish, write your new Master Code in the spaces provided: 

1


2


3


4


5


;


1


;

   ___ ___ ___ ___ ___ ___  

;

 ___ ___ ___ ___ ___ ___  


Write your new Master Code 

(Repeat) 

*

 Once the number of digits is selected, it cannot be changed unless all programming is erased and the Factory Default settings are re-loaded 

using the "Erase All Programming" procedure found on page 11. 

See the Installation Instructions for more information. 


Batteries: 

Use only 1.5 volt Duracell Alkaline size-AA batteries. 


External Power: 

An external 7.5 VDC Power Source, capable of at 
least 100mA, must be used for operation without 
batteries in the lock.  Use an external UL-Listed 
power supply provided with backup battery power 
and current limiting protection that is approved for 

the application.   
BLACK


= Negative, RED = Positive. 


Remote Switch Input 

(2 White Wires)  

A remote momentary switch can be wired to allow 
access when activated.  Wire a normally open 
push button switch to the two white wires.  Press 
for one second to unlock the DL5200. 

Wiring 

Continued 

Summary of Contents for DL5200

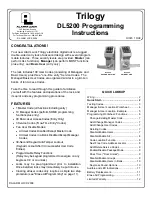
Page 1: ... Lockout After 3 Unsuccessful User Code Entries Programmable Relay Functions Relay may be keypad programmed to energize on any keypress 0 9 or on unlock Locks may be pre programmed prior to installation Once installed locks may immediately be put into use Clearing all user codes only requires a simple two step procedure see Erase All Programming on page 11 Trilogy DL5200 Programming Instructions O...

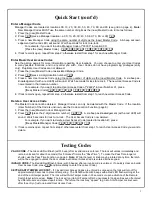
Page 2: ...e This new Master Code may consist of 3 to 6 digits however the number of digits selected determines the number required for all subsequent Manager and User Access Codes 4 Press 5 Re enter the new Master Code again to validate A 6 beep acknowledgement with a red LED will sound Wait 5 seconds for lock to re lock 6 Test the new Master Code Enter the new Master Code a beep will sound and the lock wil...

Page 3: ...es can only be deleted with the Master Code If the location User Number of the Code is unknown use the Code Location Function page 8 1 Press the new Master Code or Manager Code 2 Press press the 2 digit location number A six beep acknowledgement with a red LED will sound Wait 5 seconds for lock to re lock The User Access Code is now deleted For example if you want to delete a User Access Code loca...

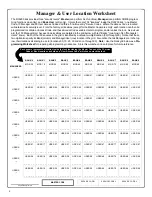
Page 4: ... _ _ _ USER 62 _ _ _ _ _ _ USER 72 _ _ _ _ _ _ USER 82 _ _ _ _ _ _ USER 92 _ _ _ _ _ _ USERS USER 13 _ _ _ _ _ _ USER 23 _ _ _ _ _ _ USER 33 _ _ _ _ _ _ USER 43 _ _ _ _ _ _ USER 53 _ _ _ _ _ _ USER 63 _ _ _ _ _ _ USER 73 _ _ _ _ _ _ USER 83 _ _ _ _ _ _ USER 93 _ _ _ _ _ _ USERS USER 14 _ _ _ _ _ _ USER 24 _ _ _ _ _ _ USER 34 _ _ _ _ _ _ USER 44 _ _ _ _ _ _ USER 54 _ _ _ _ _ _ USER 64 _ _ _ _ _ _ U...

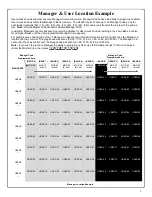
Page 5: ...e Disable Groups Function on page 9 Enter the Master Code then press 211 Manager User Location Example Manager Location Example MANAGERS MGR 10 BLANK MGR 20 BLANK MGR 30 BLANK MGR 40 BLANK MGR 50 BLANK MGR 60 MGR 70 BLANK MGR 80 BLANK MGR 90 BLANK USERS USER 11 USER 21 USER 31 USER 41 USER 51 USER 61 USER 71 USER 81 USER 91 USERS USER 12 USER 22 USER 32 USER 42 USER 52 USER 62 USER 72 USER 82 USER...

Page 6: ...ice Code 1 Press Master or Manager Code 3 0 1 Enter new Service Code _ _ _ _ _ _ Service Code 2 Press Master or Manager Code 3 0 2 Enter new Service Code _ _ _ _ _ _ Service Code 3 Press Master or Manager Code 3 0 3 Enter new Service Code _ _ _ _ _ _ Clear Service Codes Press Master or Manager Code 3 0 0 Enable Passage Mode Press Master or Manager Code 4 Disable Passage Mode Press Master or Manage...

Page 7: ...ser Row 1 9 Add Change Manager Codes __ 0 Follow the Quick Start on page 3 Note You can also add change the Manager Code in location 00 by entering the Master Code 2 then the new Manager Code __ __ __ __ __ __ __ 0 __ __ __ __ __ __ Master Code New Manager Code User Row Always zero for Managers Manager Bank Column 0 9 Deleting Manager User Codes _ _ Follow the Quick Start on page 3 __ __ __ __ __ ...

Page 8: ...from 0 9 times 3 To signify the end of the Bank number ID sequence the lock will flash both the GREEN and RED LED s and will emit a low tone 4 The lock will identify the User number by flashing the GREEN LED and beeping the sounder from 0 9 times 5 To signify the end of the Code Location function the lock will flash both the GREEN and RED LED s and will emit a low tone If no free address is found ...

Page 9: ...02 to 20 seconds The Pass Time factory default is 5 seconds NOTE The Pass Time will also determine the amount of time allowed between keypresses during programming Pass Time Door Unlock __ __ __ __ __ __ 4 __ __ Master Code Pass Time Pass Time Allows passage without the need to enter a Code into the keypad Enable Disable Passage Mode Disable Passage Mode __ __ __ __ __ __ 5 Normal Operation Master...

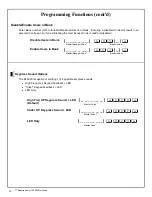
Page 10: ...r Code __ __ __ __ __ __ 223 Master Code High Freq KP Keypress Sound LED Default Click KP Keypress Sound LED LED Only Disable Enable Users in Bank Enter Bank number 0 9 to Enable Disable all Users in Bank Entering a disabled Code will result in an accented five beep error tone indicating the User Access Code is valid but disabled Disable Users in Bank __ __ __ __ __ __ 8 5 __ Master Manager Code B...

Page 11: ... sounder will sound for 4 seconds DL5200 Series locks use five 5 AA size 1 5 volt alkaline batteries Always replace weak batteries as soon as possible The DL5200 is equipped with special non volatile memory Thus if power is lost for ANY length of time such as discon necting the battery pack when replacing batteries or if the batteries die completely all existing User Codes are retained indefinitel...

Page 12: ...on purporting to act on its behalf to modify to change or to assume for it any other warranty or liability concerning its products In no event shall ALARM LOCK be liable for an amount in excess of ALARM LOCK s original selling price of the product for any loss or damage whether direct indirect incidental consequential or otherwise arising out of any failure of the product Seller s warranty as here...

Reviews: