3
Install Cylinder
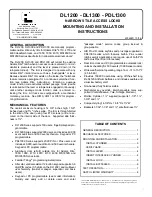
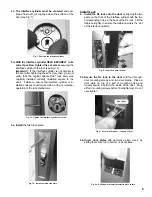
1. Install Cylinder if not already installed at the fac-
tory.
Screws A & B (see Fig. 1) are correctly set at
factory. If it is difficult to screw in the cylinder, loosen
the two screws near the actuator (A) one turn. If you
find the cylinder is still difficult to screw in, then loosen
the other screws (B) one turn.
Do not loosen the
screws all the way or it may be difficult to replace
them properly! Note:
The trim is manufactured to
use a 1-1/8" or 1¼"
Alarm Lock
mortise cylinder with a
HW-1302 cam. If the cylinder that will be used is
longer than 1¼", a collar must be utilized. Please see
the collar information on the previous page.
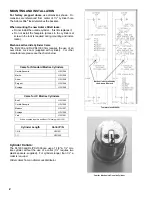
1a. Insert key
half-way
into the cylinder, then screw it
in.
See Fig. 1a. If cylinder will not seat flush, the cylin-
der back stop screw may require loosening. Cylinders
that are longer than 1¼"
will require a collar, which
will stick out from the sur-
face when correctly in-
stalled. Please see the
cylinder information on
the previous page.
1b. After the cylinder is screwed in all the way, center
the keyway toward the bottom
(see Fig. 1b). If an
interchangeable core cylinder is utilized, then center
the interface toward the bottom. Tighten the screws
that were loosened in step 1.
1c. Remove the key. Use a 1/16" hex wrench to screw
the cylinder
back stop
screw in fully. (See Fig. 1c)
The key should now only rotate
counterclockwise
.
NOTE:
To remove cylinder, reverse steps 1a-1c.
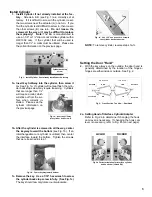
Setting the Door "Hand"
2.
With the key always on the outside, the door
hand
is
generally determined by the location of the hinges--
hinges are either inside or outside. See Fig. 2.
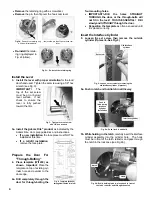
2a. Setting Hand of Interface Cylinder/Adapter
Refer to Fig. 2a to determine if changing the hook
cam lever is necessary. If changing the hook cam
lever is necessary, refer to Fig. 2b (on next page).
Fig. 1: Install Cylinder if not already installed at the factory
A
B
Fig. 1b: Center keyway toward bottom
Fig. 1c: Use 1/16" hex wrench to screw in
the cylinder back stop screw
RIGHT HAND
LEFT HAND
STANDARD
RH
LH
REVERSE
RHR
LHR
Fig. 2: Cross Section Top View -- Door Hand
(Hinges)
(Keys)
(Keys)
STANDARD
REVERSE
Cylinder
back stop
screw
Fig. 1a: Insert key 1/2 way
into cylinder and screw in
Fig 2a: Correct orientation for Interface cylinder
and hook cam (LH and RH)
LH/LHR RH/RHR

