background image

8

BEFORE FIRST USE

• 

Remove all packaging materials and retain for future use.

Warning!

Packaging materials are not toys. Children should not play with the packaging materials, as they 

pose a risk of swallowing and suffocation!

• 

Check for the presence of all parts and for transport damage. In case of damages or incomplete 

delivery, please contact your dealer (  Warranty).

• 

Clean the appliance (  Cleaning and care).

Charging the built-in battery

hours

24

Note: 

This appliance is capable of continuous charging. To maintain peak 

performance of the battery it is recommended to charge the battery for 

about 24 hours before first use or when used again after a long time.

Caution! 

• 

Before charging: Make sure to switch the appliance off.

• 

Only charge the appliance using the provided power adaptor (9)!

• 

Do not start the appliance when it is being charged.

• 

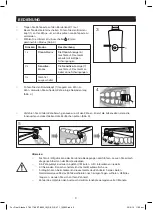
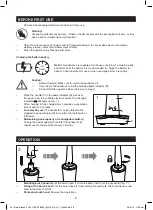
Place the handle (3) in the power adaptor (9). Connect 

the power plug to a suitable electrical outlet. The charging 

indicator 

 (8) lights up (fig. 

1

).

• 

After charging: A fully charged brush provides an operation 

time of about 40 minutes.

• 

For everyday use:

 The handle (3) can be stored on the 

plugged-in power adaptor (9) to maintain the toothbrush at 

full power. 

• 

Maintaining peak capacity of rechargeable battery:


Unplug the power adaptor (9) and let the handle (3) by 

regular use discharge at least every 3 months.

Sensitive

Clean

3

8

9

1

OPERATION

1

2

3

2

• 

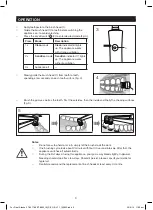
Mounting brush head:

 Mount the brush head (1) onto the drive shaft (2) of the handle (3) (fig. 

2

). 

• 

Fixing of the brush head:

 Turn the brush head (1) from setting 

I

 to setting 

II

. The brush head is now 

fixed to the drive shaft (2).

• 

Removing brush head:

 Reverse the operations.

For_Real_Alaska_37-001788_ET8800_IM_DE_GB_V11_140923.indb   8

23/9/14   11:29 am

Summary of Contents for ET8800

Page 1: ...Gebrauchsanweisung Elektrische Zahnb rste ET8800 For_Real_Alaska_37 001788_ET8800_IM_DE_GB_V11_140923 indb 1 23 9 14 11 29 am...

Page 2: ...g und Pflege 10 Fehlerbehebung 10 Entsorgung 11 Technische Daten 12 Gew hrleistung 12 WICHTIGE SICHERHEITSHINWEISE Bevor Sie Ihr neues Ger t benutzen lesen Sie sich diese Gebrauchsanweisung sorgf ltig...

Page 3: ...digt ist 8 Versuchen Sie nie das Ger t selbst zu reparieren Lassen Sie das Ger t im Falle von St rungen nur von qualifizierten Fachleuten reparieren 9 Verhindern Sie eine Besch digung des Kabels durch...

Page 4: ...den Netzadapter als Trennvorrichtung 19 Verwenden Sie nur den mitgelieferten Netzadapter mit diesem Ger t 20 Die Netzanschlussleitung dieses Ger tes kann nicht ersetzt wer den Bei Besch digung der Lei...

Page 5: ...wenden Sie sich an Ihren Zahnarzt 31 Wenden Sie sich bei medizinischen Fragen vor Gebrauch des Ger ts an Ihren Arzt 32 Falls Sie Fragen bez glich des Gebrauchs dieses Ger ts zusammen mit einem Herzsch...

Page 6: ...6 LIEFERUMFANG 1 B rstenkopf x 4 2 Handst ck x 1 3 Ladestation mit Netzkabel x 1 4 Gebrauchsanweisung x 1 For_Real_Alaska_37 001788_ET8800_IM_DE_GB_V11_140923 indb 6 23 9 14 11 29 am...

Page 7: ...1 B rstenkopf 2 Antriebswelle 3 Handst ck 4 Ein Ausschalter 5 Akkufach 6 Clean Anzeige Reinigen 7 Sensitive Anzeige Empfindlich 8 Ladeanzeige 9 Ladestation mit Netzkabel For_Real_Alaska_37 001788_ET88...

Page 8: ...ferten Ladestation 9 auf Nehmen Sie das Ger t w hrend des Aufladens nicht in Betrieb Stellen Sie das Handst ck 3 auf die Ladestation 9 Stecken Sie den Netzstecker der Ladestation in eine geeignete Ste...

Page 9: ...en lang Abb 4 1 4 Verfahren Sie mit dem Zahnfleisch genauso wie mit den Z hnen Zuerst die Au enseiten dann die Innenseiten und abschlie end die Kaufl chen putzen Abb 5 5 Hinweise Nicht zu kr ftig dr c...

Page 10: ...1 und das Handst ck 3 separat unter flie endem Wasser ab Abb 7 1 6 1 3 7 Setzen Sie den B rstenkopf 1 wieder auf das Handst ck 3 Reinigen Sie die Ladestation 9 gelegentlich mit einem weichen leicht an...

Page 11: ...der M lltonne stehen f r Pb Batterie enth lt Blei Cd Batterie enth lt Cadmium Hg Batterie enth lt Quecksilber Warnung Nehmen Sie das Ger t nicht auseinander Nichtbeachtung f hrt zur einer irreparablen...

Page 12: ...beiliegen empfehlen wir dringend diese zu lesen und zu beachten Hinweise 1 Sollte Ihr Produkt nicht mehr richtig funktionieren pr fen Sie bitte zun chst ob andere Gr nde wie z B eine unterbrochene St...

Page 13: ...Instruction manual Electric Toothbrush ET8800 For_Real_Alaska_37 001788_ET8800_IM_DE_GB_V11_140923 indb 1 23 9 14 11 29 am...

Page 14: ...rts list 7 Before first use 8 Operation 8 9 Cleaning and care 10 Troubleshooting 10 Disposal 11 Technical data 12 Warranty 12 IMPORTANT SAFETY INSTRUCTIONS Read this instruction manual carefully befor...

Page 15: ...ntact your retailer if it is damaged 8 Do not attempt to repair the appliance yourself In case of malfunction repairs are to be conducted by qualified personnel only 9 To avoid damaging the cord do no...

Page 16: ...utlet to completely switch off the appliance Use the power adaptor as the disconnection device 19 Only use this appliance with the supplied power adaptor 20 The supply cord cannot be replaced If the c...

Page 17: ...r one week of use 31 Consult your physician prior to using the appliance if you have any medical concerns 32 Consult your physician or implant device manufacturer prior to using this appliance if you...

Page 18: ...6 SCOPE OF DELIVERY 1 Brush head x 4 2 Handle x 1 3 Base with motor x 1 4 Instruction manual x 1 For_Real_Alaska_37 001788_ET8800_IM_DE_GB_V11_140923 indb 6 23 9 14 11 29 am...

Page 19: ...1 Brush head 2 Drive shaft 3 Handle 4 On off switch 5 Battery compartment 6 Clean indicator 7 Sensitive indicator 8 Charging indicator 9 Power adaptor with power plug For_Real_Alaska_37 001788_ET8800...

Page 20: ...he provided power adaptor 9 Do not start the appliance when it is being charged Place the handle 3 in the power adaptor 9 Connect the power plug to a suitable electrical outlet The charging indicator...

Page 21: ...ds on each tooth surface fig 4 1 4 Brush the gums as well as the teeth First the outsides then the inside and finally the chewing surfaces fig 5 5 Notes Do not press too hard or scrub simply let the b...

Page 22: ...rush head 1 and handle 3 separately under running water Fig 7 1 6 1 3 7 Put back the brush head 1 on the handle 3 Occasionally clean the power adaptor 9 with a soft damp cloth If the appliance is not...

Page 23: ...Doing so earlier will destroy the appliance and cause injuries The battery must be removed from the appliance before it is scrapped Let the removal of the battery only be performed by a qualified pers...

Page 24: ...the operating instructions as it contains important information Note 1 In case this product does not function correctly please firstly check if there are other reasons e g for electrical appliances in...

Reviews: