
NOTICE D’UTILISATION – HORLCDNEO
☞
Modèle : HORLCDNEO
Description : Horloge radio pilotée LCD
Piles : 2 x AAA
Dimensions : 20 x 15 x 3 cm
☞
Spécifications :
- Réception automatique du signal horaire radio
- Réglage automatique de l’heure et de la date
- Précision : 1 seconde lors de la réception de
signal, 60 secondes avec le quartz
- Calendrier : du 1
er
Janvier 2009 au 31 Décembre
2099
- Affichage de la température de 10 °C (14 °F)
à 60 °C (140 °F)
- Affichage du jour de la semaine en plusieurs
langues
- Affichage de l’heure au format 12 ou 24 heures
- Fonction Réveil intégré
MERCI DE LIRE ATTENTIVEMENT LES INDICATIONS SUIVANTES AVANT D’UTILISER LE PRODUIT
☞
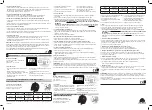
Précautions de localisation :
Cette horloge reçoit une onde radio.
Assurez-vous de la placer dans un endroit
où la réception est bonne.
Pays
Nom Signal
Fréquence
Localisation
de l’émetteur
Puissance
Portée
Estimée
Allemagne
DCF, 77.5kHz
Mainflingen
50°01’N 09°00’ E
50 kW
2 000 km
Royaume-Uni
MSF, 60kHz
Anthorn
54°55’N 3°15’ W
25 kW
1 000 km
La réception peut être affectée par le mauvais temps et si vous êtes dans l’une des conditions suivantes :
• Longue distance du point d’émission
• A proximité de montagnes ou vallées
• A proximité d’une voie ferrée,
de câble à haute tension, etc.
• A proximité d’une autoroute, d’un aéroport…
• A proximité d’un chantier de construction
• A proximité d’un immeuble de grande hauteur
• A l’intérieur d’un bâtiment en bêton
• A proximité d’appareils électriques
• A l’intérieur d’un véhicule en mouvement
☞
Mise en marche
• Ouvrez le couvercle des piles à l’arrière de l’horloge; insérez deux piles AAA ; refermez le couvercle.
• L’icône « radio-pilotée » se met à clignoter indiquant que le signal radio est recherché. Veuillez régler
l’horloge dans un emplacement approprié pour le recevoir rapidement.
-
Si un signal radio est disponible, l’icône cesse de clignoter et disparait. L’HORLOGE SE REGLE
ALORS AUTOMATIQUEMENT ET AFFICHE L’HEURE, LA DATE ET LE JOUR DE LA SEMAINE.
-
La recherche se poursuit pendant 7 minutes, mais si aucun signal n’est disponible, l’icône
cesse de clignoter et disparaît. Vous devez alors configurer manuellement l’heure, la date et jour de
la semaine.
☞
Changer la langue d’affichage :
• Appuyez et maintenez le bouton « SET » jusqu’à ce que vous entendiez un son aigu. La lettre initiale.
de la langue commence à clignoter : «
E » si la langue utilisée est l’anglais, « D » pour l’allemand, « F »
pour le français, «
I » pour l’italien ou « S » pour l’espagnol.
• Appuyez sur la touche « UP » pour changer la langue.
☞
Modifier le mode d’affichage de l’heure (12 ou 24 heures) :
• Cliquez sur le bouton « SET » et l’affichage 12/24 heures se met à clignoter.
• Appuyez sur la touche « UP » pour basculer entre les deux types d’affichage.
☞
Effectuer manuellement les réglages si aucun signal radio n’est disponible :
• Appuyez successivement sur la touche « SET » pour sélectionner l’heure, la date ou le jour de la
semaine.
• Appuyez sur la touche « UP » pour régler l’heure, la date ou le jour de la semaine, lorsque ces fonc-
tions sont sélectionnées et clignotent.
☞
Activer ou désactiver le réveil :
• Appuyez sur la touche « MODE » jusqu’à ce que vous entendiez un son aigu. L’écran du réveil appa-
raît. Appuyez sur la touche « UP » pour activer ou désactiver le réveil.
*** Le réveil sonne pendant 2 minutes. Appuyez sur la touche « SNOOZE » pour signaler l’alarme.
Appuyez sur n’importe quelle touche pour désactiver l’alarme.
☞
Régler le réveil :
• Appuyez et maintenez le bouton « SET » jusqu’à ce que vous entendiez un son aigu.
L’heure du réveil se met à clignoter (« AL »). Utilisez le bouton « UP » pour l’ajuster.
• Pour changer les minutes sur le réveil, appuyez à nouveau sur le bouton « SET ».
Appuyez sur le bouton « UP » pour régler les minutes.
ATTENTION : Risque d’explosion si la batterie est remplacée par une batterie incorrecte. Les produits
électriques et électroniques en fin de vie peuvent avoir des effets sur l’environnement et la santé. Ne
les jetez pas avec vos déchets ménagers mais dans les lieux de collecte prévus à cet effet. Les piles
ne doivent jamais être jetées ou incinérées mais mises au rebut conformément aux règlements locaux
concernant les déchets chimiques. Ce produit est un produit conforme à la directive DEEE et ROHS.
Lorsque vous mettez cet appareil au rebut, respectez les lois et règlements locaux.
INSTRUCTION MANUAL – HORLCDNEO
☞
Model: HORLCDNEO
Description: LCD radio-controlled clock
Batteries: 2 x AAA batteries
Dimensions: 8” x 6” x 1”
☞
Specifications:
- Automatic reception of the radio time signal
emitted
- Time and date automatic adjustment
- Time accuracy: within 1 second when receiving
signal, within 60 second on quartz
- Calendar from January 1
st
, 2009 to December
31
st
, 2099
- Temperature display from 10 °C (14 °F) to 60 °C
(140 °F)
- Multilingual weekday display
- 12 or 24-hour format
- Alarm with snooze function
PLEASE READ THIS CAREFULLY BEFORE USING THE PRODUCT
☞
Location Precautions:
This clock receives a radio wave.
Country
Signal name
Frequency
Transmitter
Location
Power
Estimated
Coverage
Germany
DCF, 77.5 kHz
Mainflingen
50°01’N 09°00’ E
50 kW
2.000 km
United Kingdom
MSF, 60 kHz
Anthorn
54°55’N 3°15’ W
25 kW
1.000 km
Be sure to locate it in locations where the reception is good. The receiving ability may be affected by
the following conditions:
• Long transmitting distance
• Nearby mountains and valleys
• Bad weather
• Near railway, high voltage cable, etc.
• Near freeway, airport, etc.
• Near construction site
• Among tall buildings
• Nearby metallic structures
• Inside concrete buildings
• Near electrical appliances
• Inside moving vehicles
☞
Getting started
• Open the batteries lid on the back of the clock; insert two AAA batteries; close back the lid.
• The “radio controlled” icon will start blinking indicating that a radio signal is being searched. Please
set the clock in a proper location in order for the signal to be picked up rapidly.
-
If a radio signal is available, the icon stops blinking and stays visible on the display. THE CLOCK
AUTOMATICALLY SETS THE CORRECT TIME, DATE AND WEEKDAY.
-
The search continues for 7 minutes, but if the signal cannot be picked up, the icon stops
blinking and disappears. You have to manually set up the time, date and weekday.
☞
To change the language of the weekday display:
• Press and hold the“SET” button until you hear a high pitch sound. The initial letter of the language will
start blinking: “
E” if the current language is English, “D” for German, “F” for French, “I” for Italian or
“
S” for Spanish.
• Press the “UP” button to change the language.
☞
To switch between the 12 hours display and the 24 hours display:
• Click on the “SET” button and the 12/ 24 hours display will start blinking.
• Press the “UP” button to switch between the two types of display.
☞
To manually make the settings when no radio signal is available:
• Press sequentially the “SET” button to select the time, the date or the weekday.
• Press the “UP” button to set the time, the date or the weekday, when these functions are selected
and blinking.
U.K
Germany
FRA
☞
To activate or deactivate the alarm clock:
• Press the “MODE” button until you hear a high pitch sound. The alarm clock display will appear.
Press the “UP” button to activate or deactivate the alarm clock.
*** Alarm rings for 2 minutes. Press the “SNOOZE” button to report the alarm. Press any other key
to turn off the alarm.
☞
To set the alarm clock:
• Press and hold the “SET” button until you hear a high pitch sound. The alarm clock hour starts
blinking (“AL”). Use the “UP” button to adjust it.
• To change the minutes on the alarm clock, press again the “SET” button. Press the “UP” button
to adjust the minutes.
CAUTION: Risk of explosion if battery is replaced by an incorrect battery. Electrical products contain
harmful substances for health and environment. Batteries should never be thrown away or incinerated
but disposed of in accordance with the local regulation concerning chemical waste. Bring it to the
nearest collecting place. The product constitutes the applicable product according to the WEEE
and ROHS directives. When discarding the unit, comply with the local rules or regulations.
BEDIENUNGSANLEITUNG – HORLCDNEO
Modell : HORLCDNEO
Beschreibung : Funkgesteuerte LCD-Uhr
Batterien : 2 x AAA
Abmessungen : 20 x 15 x 3 cm
☞
Spezifikationen :
- Automatischer Empfang des Funkzeitsignals
- Automatische Einstellung der Uhrzeit und des
Datums
- Genauigkeit : 1 Sekunde beim Signalempfang,
60 Sekunden mit Quarz
- Kalender : vom 1. Januar 2009 bis zum 31.
Dezember 2099
- Anzeige der Temperatur von 10 °C (14 °F) bis
60 °C (140 °F)
- Anzeige des Wochentages in mehreren Sprachen
- Anzeige der Uhrzeit im 12- oder 24 Stunden-
Format
- Eingebaute Weckfunktion
BITTE LESEN SIE DIE FOLGENDEN HINWEISE SORGFÄLTIG DURCH,
BEVOR SIE DAS PRODUKT VERWENDEN
☞
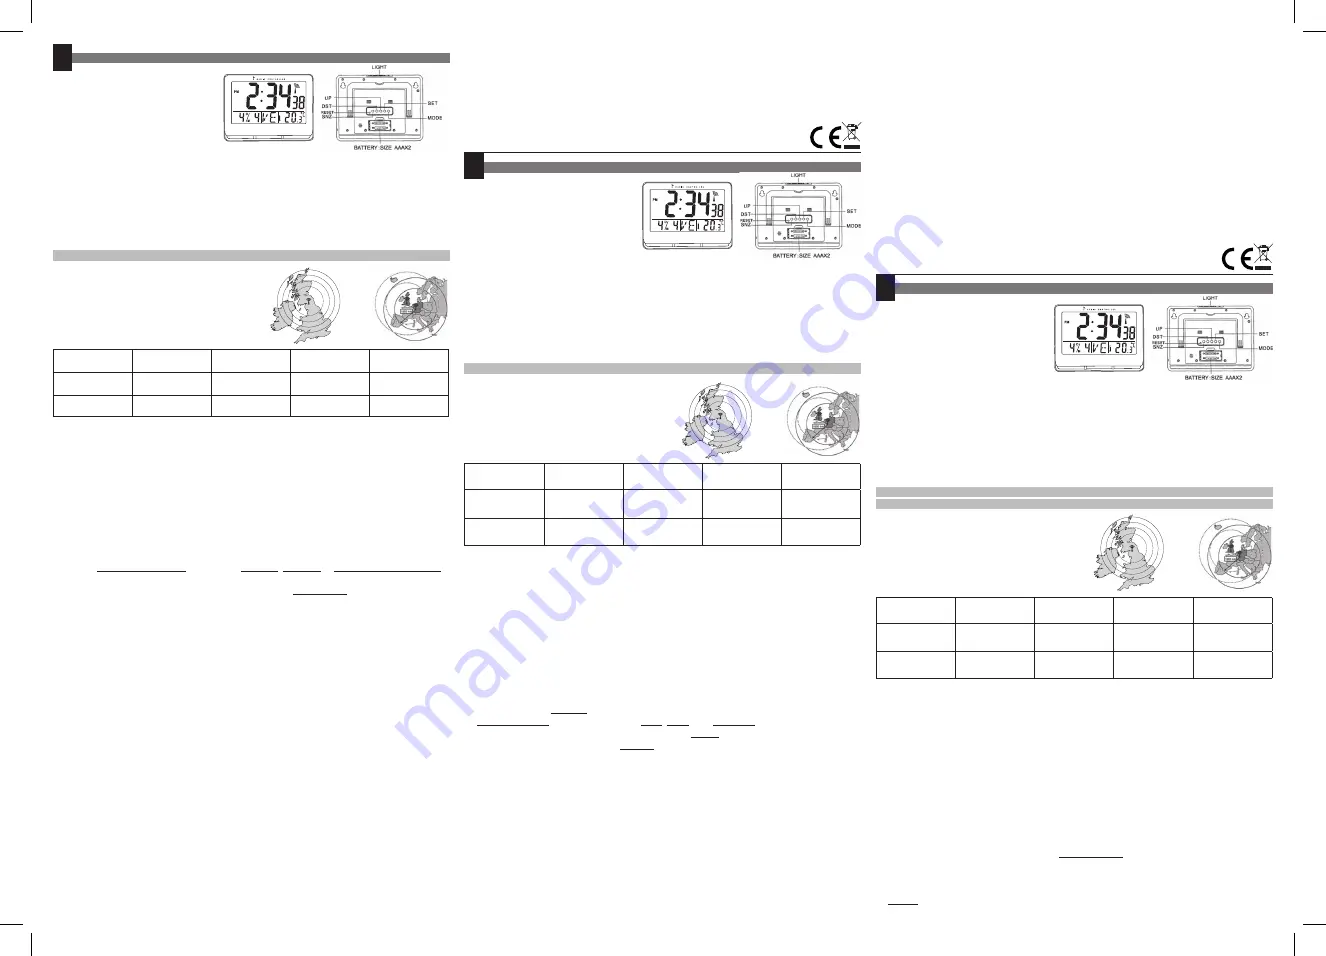
Vorkehrungen zur Peilung:
Diese Uhr empfängt eine Funkwelle.
Achten Sie darauf, sie an einem Standort aufzustellen,
wo der Empfang gut ist.
Land
Signalname
Frequenz
Standort
des Senders
Leistung
Geschätzte
Reichweite
Deutschland
DCF, 77.5 kHz
Mainflingen
50°01’N 09°00’ E
50 kW
2.000 km
Vereinigtes
Königreich
MSF, 60 kHz
Anthorn
54°55’N 3°15’ W
25 kW
1.000 km
Der Empfang kann durch schlechtes Wetter beeinträchtigt werden, und wenn bei Ihnen eine der
folgenden Standortbedingungen vorliegt :
• Weit von der Sendestelle entfernt
• In der Nähe von Bergen oder Tälern
• In der Nähe einer Bahnstrecke, einer Hochspan-
nungsleitung, usw.
• In der Nähe einer Autobahn, eines Flughafens…
• In der Nähe einer Baustelle
• In der Nähe eines Hochhauses
• Innerhalb eines Betongebäudes
• In der Nähe elektrischer Geräte
• In einem sich bewegenden Fahrzeug
☞
Inbetriebnahme
• Öffnen Sie den Deckel des Batteriefaches auf der Rückseite der Uhr; legen Sie zwei AAA-Batterien
ein ; schließen Sie wieder den Batteriefachdeckel.
• Das Symbol “funkgesteuert” beginnt zu blinken und zeigt an, dass das Funksignal gesucht wird. Bitte
stellen Sie die Uhr an einem geeigneten Standort, damit es rasch empfangen wird.
-
Sobald ein Funksignal verfügbar ist, hört das Symbol zu blinken auf und erlischt.
ANSCHLIESSEND STELLT SICH DIE UHR AUTOMATISCH UND ZEIGT DIE UHRZEIT, DAS
DATUM UND DEN WOCHENTAG AN.
-
Die Suche wird 7 Minuten lang fortgesetzt, wenn jedoch kein Signal empfangen wird, hört das
Symbol zu blinken auf und erlischt. Dann müssen Sie die Uhrzeit, das Datum und den Wochentag
manuell einstellen.
ENG
DEU
U.K
Germany
U.K
Germany


