Version 2.0
Manual #6410T0021
6
Albany High Speed Doors
Installation & Operation
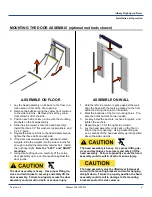
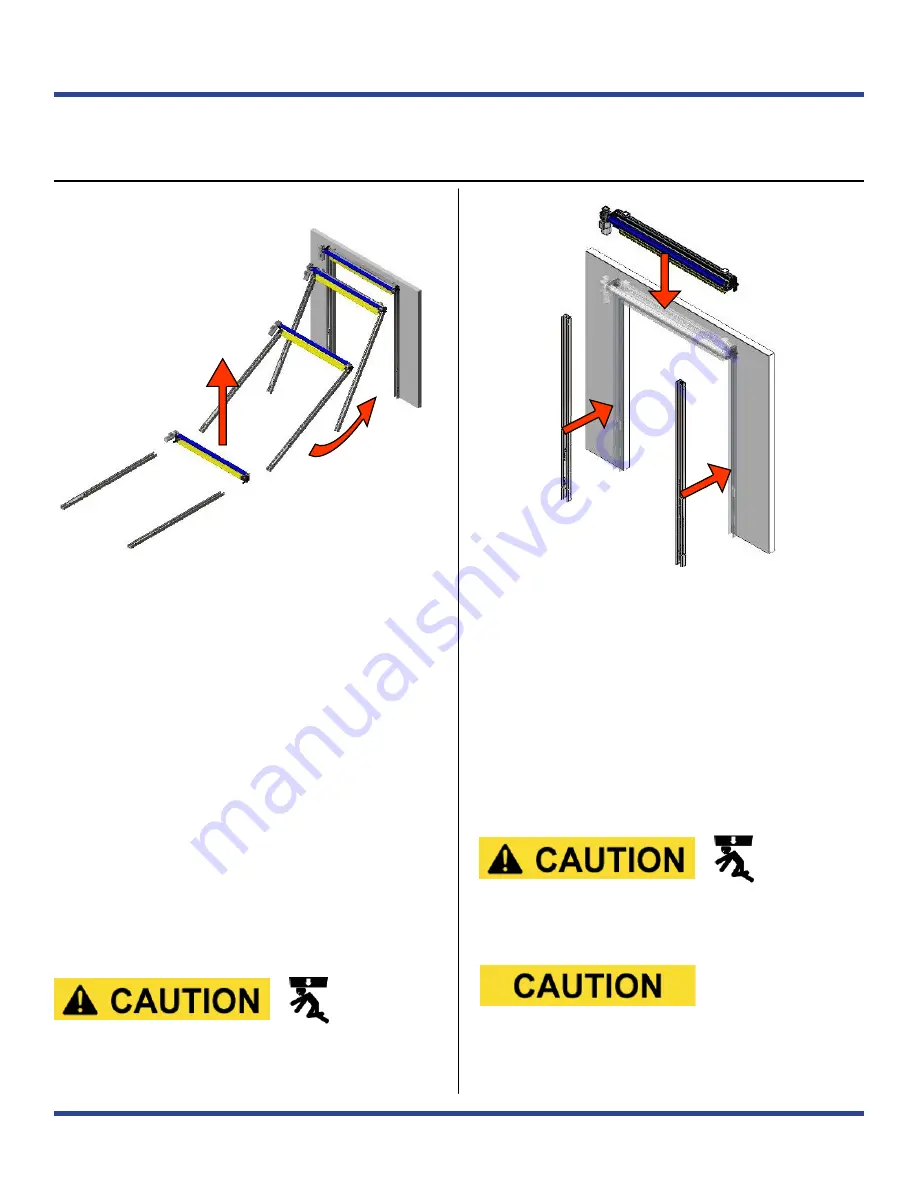
MOUNTING THE DOOR ASSEMBLY (optional methods shown)
ASSEMBLE ON FLOOR
ASSEMBLE ON WALL
1. Lay the head assembly on its back on the floor in a
clean area in front of the door opening.
2. Remove the bolts securing the yellow front columns
to the side columns. Remove and set the yellow
front columns off to the side.
3. Position each side column in line with the mounting
brackets on the head assembly.
4. Slide the side columns onto the head assembly.
Install the three 1/2” flat washers, lock washers, and
1/2”x1” bolts.
5. Square the side columns to the head assembly and
tighten the three bolts on each side.
6. If the door was ordered with the optional counter-
weights, slide the weights into the side columns far
enough to install the temporary retainer bolt. Install
the nut finger-tight.
Note the “LEFT” and “RIGHT”
markings.
7. Using a safe lifting device, carefully lift the entire
door assembly up to a vertical position against the
door jambs.
1. Hold the left side column in place against the wall.
Align the base with the marking placed on the floor
earlier and bring the column into plumb.
2. Mark the locations of the four mounting holes. Pre-
pare the holes and anchor as needed.
3. Loosely install the anchors, recheck for plumb, and
tighten the anchors.
4. Repeat steps 1-3 for the right side column.
5. Lay the head assembly on its back on the floor in
front of the door opening. Using a safe lifting de-
vice, carefully lift the head assembly up into position
above the side columns.
The head assembly is heavy. Use proper lifting de-
vices and techniques to securely and safely lift the
head assembly. Failure to properly secure the head
assembly could result in death or serious injury.
The door assembly is heavy. Use proper lifting de-
vices and techniques to securely and safely lift the
door assembly. Failure to properly secure the door
assembly could result in death or serious injury.
The head assembly must be lifted level (balanced)
and with the mounting brackets and motor hanging
straight down. Failure to properly position the head
assembly could result in damage to the mounting
brackets and/or the side columns.
Summary of Contents for RapidRoll 355
Page 14: ...13 Manual 6410T0021 1 5 2011 ...
Page 15: ...Version 2 0 Manual 6410T0021 14 Albany High Speed Doors Installation Operation ...
Page 16: ...15 Manual 6410T0021 1 5 2011 ...
Page 17: ...Version 2 0 Manual 6410T0021 16 Albany High Speed Doors Installation Operation ...
Page 18: ...17 Manual 6410T0021 1 5 2011 ...
Page 19: ...Version 2 0 Manual 6410T0021 18 Albany High Speed Doors Installation Operation ...


