background image

41

Appendix B – Swivel arm for the control unit

To make it easier to drive up to the table edge we recommend fitting the optional swivel 
arm. This enables the control unit to be swivelled out, away from its original position.


‡

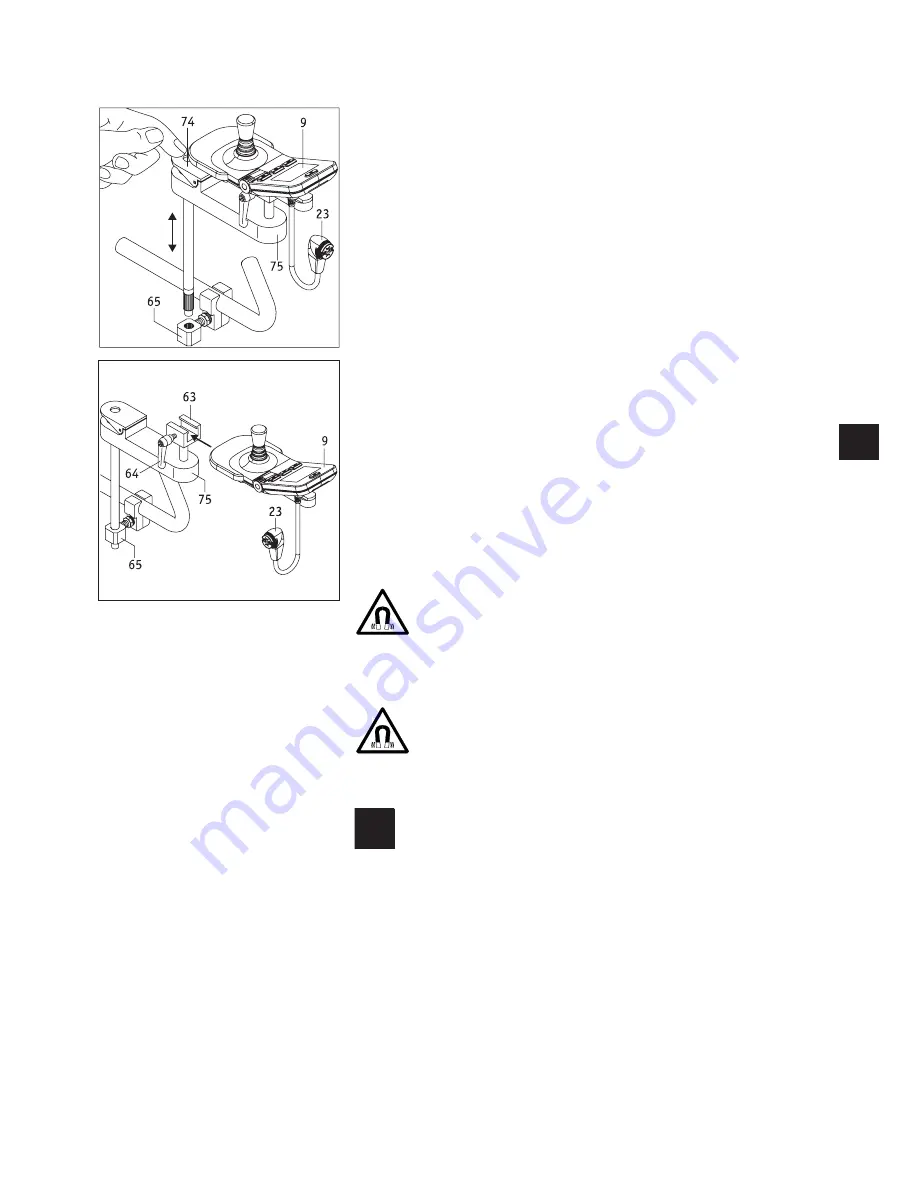
 Press the cap [74] and swivel the control unit [9] completely to the side.


‡

 Swivel the control unit [9] to return it to its initial position; the cap [74] lifts up and 
automatically locks the pivoting mechanism. 


‡

 By releasing the locking lever [64] you can move the control unit within the sliding 
part [29] a little more lengthways as required. 


‡

 After setting the best position for you the control unit needs to be fixed in the sliding 
part [63] by pulling the locking lever [64].


‡

If the swivel arm [75] is entirely removed together with the control unit [9], you can 
take it out of the holder [65]. However, first remove the plug [23] of the control unit 
from the battery (see chapter 4.2).

Removing the control unit from the swivel arm


‡

Swivel the control unit [9] to the side.


‡

 Take the plug [23] of the control unit out of the battery (see chapter 4.2).


‡

 Release the locking lever [64] and slide the control unit [9] out of the sliding part 
[63].

Attaching the control unit to the swivel arm


‡

 Slide the control unit [9] into the sliding part [63] and secure it by pulling the locking 
lever [64].


‡

Reconnect the plug [23] of the control unit to the battery (see chapter 5.1).

Before inserting the plug [23] into the socket [29] of the battery 
pack, ensure that both parts are clean and there are no metallic 
particles on them. If you detect such particles, use a dry and clean 
cloth to remove them.

The control unit plug [23] is magnetic. Therefore prevent the plug 
coming into contact with medical implants, electronic storage 
media, bank cards or similar items.

The swivel arm can be fitted 

to virtually all wheelchair models. Your spe-

cialist dealer can provide more detailed information.

i

Summary of Contents for e-fix

Page 1: ...e User manual en Instructions d utilisation fr Manual de instrucciones es Istruzioni per l uso it Brugsvejledning dk Gebruiksaanwijzing nl Bruksanvisning no Instruktionsbok se KLEIN LEICHT WENDIG Elektrischer Zusatzantrieb ...

Page 2: ...Service Center Deutschland Montag bis Donnerstag von 8 00 18 00 Uhr Freitags von 8 00 16 00 Uhr erreichbar unter Telefon 0800 9096 250 gebührenfrei ...

Page 3: ......

Page 4: ...vel of even 30 V m IT IS VERY IMPORTANT THAT YOU READ THIS INFORMATION REGARDING THE POSSIBLE EFFECTS OF ELECTRO MAGNETIC INTERFERENCE ON YOUR POWERED WHEELCHAIR Electromagnetic Interference EMI From Radio Wave Sources Powered wheelchairs and motorized scooters in this text both will be referred to as powered wheelchairs may be suscep tible to electromagnetic interference EMI which is interfering ...

Page 5: ...ructions for the battery pack 21 4 10 Storing the battery pack 21 4 11 Safety instructions and precautions on how to transport and ship the battery pack 21 5 Control unit 22 5 1 Fitting and removing the control unit 22 5 2 Control unit functions 22 5 2 1 Switching on the system 22 5 2 2 Switching off the system 23 5 2 3 Driving with the joystick 23 5 2 4 Spotlight 23 5 2 6 Limiting the speed 24 5 ...

Page 6: ...t of Alber GmbH 1 2 Proper use of the e fix Wheelchairs that are fitted with e fix wheels are designed exclusively for transporting persons with a walking disability The e fix must only be fitted to and operated by wheelchairs that are listed in Alber s bracket database 1 3 Handling instructions Do not attach any parts other than the accessories that have been approved for use by Alber Similarly t...

Page 7: ...sible hazards to your safety and health and indication of possible injury risks Warning against possible technical problems or damage Observe these indications and warnings at all times to avoid injury to people and damage to the product The symbols used on the labels see chapter 10 and in some parts of this operating manual are explained in the following The e fix conforms to the requirements lai...

Page 8: ... capability maximum permissible height of obstacles max user weight etc must also be observed when using the e fix The e fix must only be used at temperatures between 25 C and 50 C Therefore do not expose the e fix to any heat sources such as intense sunlight as this may cause surfaces to reach high temperatures Avoid using the wheelchair on soft ground e g loose chipping sand mud snow ice or deep...

Page 9: ...heelchair and e fix wheel Battery and battery holder Bracket on wheelchair 1 Handle 25 e fix wheel 2 Info button 26 Viewing panel on the e fix wheel 3 Capacity indication 27 Releasing device 4 Fault indication 28 Coupling ring 5 Socket for connecting the control unit Wheelchair parking brake 6 the attendant control and the charger 29 Battery holder 7 Insertion aid on the battery holder 30 Battery ...

Page 10: ...ur specialist dealer will show you how to operate the system and any accessories you ordered You will also be given this operating manual which in addition to the technical information also contains important driving instructions The brackets 1 must be attached to the wheelchair by Alber or its authorised specialist dealers Regularly check the brackets 1 to ensure that they are firmly secured to t...

Page 11: ... receiver 13 without pressing the releasing device 4 If so the e fix wheel is not sitting correctly in the wheel receiver 13 and needs to be inserted again as described previously Attach the second e fix wheel on the other side of the wheelchair Check the colour displayed in the viewing panel 3 of the e fix wheel The colours green or red indicate the respective set operating mode The following ind...

Page 12: ...ow switch on the system using the control unit 9 see chapter 5 2 1 and start using your wheelchair If you are not yet familiar with the e fix and its driving characterist ics you should start by reducing the maximum speed to a minimum using the rotary switch 22 see chapter 5 2 6 When travelling with the e fix you must observe the safety instruc tions and precautions in chapter 3 When first startin...

Page 13: ...hair Proceed in accordance with instructions provided by the manufacturer of your anti tippers The e fix wheel must be engaged to remove it from the wheelchair 2 5 Transporting and storing the wheels as vehicle luggage Before removing the e fix wheels the control unit must be switched off When laying the e fix wheels down or setting them aside take care of the stub axle 11 and the socket 10 on the...

Page 14: ...n using your wheelchair with its manual wheels you may therefore need to readjust the parking brakes 6 The diameter of the stub axle of the e fix wheels is 12 7 mm 1 2 You must not use manual wheelchair wheels with other stub axle diameters 2 6 2 Travelling with the e fix wheels in pushing mode In addition to motorised operation the e fix wheels can also be manually operated for example to push th...

Page 15: ...mum speed As soon as the charging process has finished you can also accelerate for a short time when driving on level ground The e fix cannot be pushed manually in motorised operation The e fix must only be used at temperatures between 25 C and 50 C Therefore do not expose the e fix to any heat sources such as intense sunlight as this may cause surfaces to reach high tem peratures When not in use ...

Page 16: ...l across steep hillsides or similar conditions Unintentionally shifting the centre of gravity could result in the wheelchair tip ping over on its side When driving on inclined kerbs or in similar circumstances you may need to countersteer a little Never drive over minor obstacles such as kerbs by driving parallel to them drive at a right angle to the respective obstacle This means that both wheels...

Page 17: ... optional Alber anti tippers to your wheelchair Before every journey check the e fix wheels If the tyres have reached their wear limit you can no longer see the tread the e fix must not be used Before every journey check that your wheelchair parking brakes are working correctly You must not travel without functioning parking brakes that are adjusted to the e fix wheels Check the air pressure of th...

Page 18: ...fix in the vicinity of strong magnetic fields such as those induced by holding solenoids transformers tomographs etc is prohibited Avoid travelling using the e fix in adverse conditions for example in storms hail and in high undergrowth After using the e fix make sure that you Switch off the e fix when not in use to prevent inadvertently triggering drive pulses when the joystick is touched and to ...

Page 19: ... to them as the wheels could get stuck in the rails Proceed with special caution when driving over ramps or lifting platforms of vehicles Before lifting or lowering the wheelchair on the ramp or lifting platform keep the e fix a safe distance from the kerb and switch it off Also apply the wheelchair parking brakes This prevents inadvertent movement or drive commands Never drive your wheelchair dir...

Page 20: ...ht up as soon as the control unit is switched on If the control unit is switched off the capacity can be displayed by quickly pressing the info button 26 The following indications mean 5 LEDs light up the battery pack is charged to 100 Avoid high speeds when driving down slopes as the current feedback in the wheels may lead to overvoltage in the battery pack and force the wheels to shut down 4 LED...

Page 21: ...e connection is locked automatically by a magnetic closure These few steps mean that your e fix is once again ready for use There is a socket 29 on the left and right of the battery pack 8 Both sockets are the same in terms of their electrics and can be used for inserting plugs of the control unit charger and accessories Ensure that the charger plug 33 and the sockets 29 on the bat tery pack are c...

Page 22: ...rking brakes Insert the plug of the charger 33 into one of the sockets 29 of the battery pack Complete the charging process following the instructions contained in the operating manual that is included with the charger The capacity display 27 on the battery pack enables you to follow the charging pro gress The following indications mean The lowest LED flashes the battery is charged to less than 20...

Page 23: ...g to be used for an extended period more than one day the battery pack should not be left charging Disconnect the charger from the mains socket first before discon necting it from the battery pack Before using the device always check the charge status of the battery pack This should be fully charged at the start of your trip 4 6 Energy recovery recuperation When braking and especially when travell...

Page 24: ...arger by its power cable or the charger cables Never tug at the power cable to disconnect the charger from the mains socket Lay the mains cable and charging cable so that no one can tread on it or trip over it Do not expose the two cables to any other harm ful influences or stresses Do not operate the charger if the power cable the charging cable or the plugs attached to the cables are damaged Dam...

Page 25: ...0 Storing the battery pack The service life of a battery pack is partly dependent on its storage location Therefore do not leave the battery pack or the e fix wheels in hot locations for prolonged periods In particular use the boot of a car parked in the sun only for transport rather than as a storage location Store the battery pack and the e fix wheels in a cool and dry location where they are sa...

Page 26: ...ching on the system If the two e fix wheels have been correctly attached to your wheelchair as described in chapter 2 1 you can now switch on the system using the control unit 9 Do not touch the joystick or controls of the control unit when switching the system on If you do you will get an error message Press the on off button 19 briefly The system is switched on and the Alber e fix start screen i...

Page 27: ...ent for safety reasons In the display 18 the speed is shown in position 60 as follows the pre set speed as a green bar chart and briefly as a green number current speed when driving as a white number When travelling in reverse 0 km h is displayed as a white number Start your first travelling attempt at a low speed to get used to the driving characteristics of the e fix Adapt the speed to the respe...

Page 28: ...n bar chart The maximum speed that you specify in this way is achieved as soon as you fully extend the joystick 14 When travelling in reverse the speed is automatically reduced to 50 per cent for safety reasons The maximum speed can be set when the wheelchair is idle and when you are travelling The set value is then shown in the display for about 3 seconds before the actual speed you are travellin...

Page 29: ...n the display until the e fix is directly switched off by you or by the automatic cut off However the immobiliser remains active When the e fix is switched on again the immobiliser which is still active is shown once again in the display Deactivating the immobiliser Place the key 24 for about 2 seconds directly on the key symbol 20 on the control unit This deactivates the immobiliser and the displ...

Page 30: ... 28 06 14 50 5 Start screen optional DISTANCE RANGE SPORT User screen Travel mode Display Setting Tour Eco Sport Custom Daily kilometres Range Time Date Start screen Bluetooth Lang selection Date time On off Date and time setting Signal tone Units Programming On off Access for specialist dealers only KM counter Reset Daily kilometre counter RESET Screen brightness brighter darker The control unit ...

Page 31: ...ith the displayed residual capacity of the battery pack 57 Indication of the capacity of the battery pack in per cent 58 Bar display system is ready for use 59 Pre set user mode 60 Pre set maximum speed displays as a number and circular bar chart see chapter 5 2 6 Most of the displays in the user screen are presented in a white colour on a black back ground The displays 54 59 and 60 appear in a gr...

Page 32: ... Select the display menu and press the menu function button 16 to access the associated sub menu The sub menu lists the parameters daily kilometres range time date and start screen Move the joystick 14 forwards or backwards to move the parameters through a black bar on the display The parameter highlighted by the black bar is activated by moving the joystick 14 to the left or right or pressing but...

Page 33: ...k 14 to the left or right you can turn the receive Bluetooth signals function on or off The function is not used at present Lang selection sub menu By moving the joystick 14 to the left or right you can set the language to be used in the display screens Date Time sub menu By moving the joystick 14 to the left or right you can navigate through the individual parameters By moving the joystick 14 for...

Page 34: ...ol unit This permanently saves the selected language You are then taken auto matically back to the user menu By pressing button 17 you can skip the language selection However when you next start up the system the language selection will be displayed again You can change the selected language at any time see chapter 5 3 7 for more details If you did not save any language when you first started up t...

Page 35: ...peed is reduced Continue to drive carefully and avoid driving uphill B15 Discharge current high Reduce your speed and avoid driving uphill B16 to B18 Battery pack voltage is too low Charge the battery pack B19 to B21 Voltage in the battery pack is too high during recovery Switch the system off and then on again Continue to drive carefully B22 Battery temp too low Speed is reduced Continue to drive...

Page 36: ...or the drives Prevent overloading M20 to M51 Check electronics drive failure Switch the system off and then on again Swap the two wheels from the left to the right and from the right to the left hand side M52 Right drive disengaged Engage the right wheel M53 Left drive disengaged Engage the left wheel M54 Left and right drive disengaged Engage both wheels M55 M56 High drive temperature Reduce your...

Page 37: ...STK are intended to verify the operation and safety of the product uncover any defects and if necessary initiate steps repairs that will restore the product to proper working order Section 6 of the MPBetreibV stipulates that the manufacturer has to specify an interval at which this STK is to be performed which must not exceed 2 years with regard to the products listed in Annex 1 of the MPBetreibV ...

Page 38: ...mage damage caused by fire water force majeure and other events that are outside the control of Ulrich Alber GmbH Parts that may need to be serviced or replaced as part of normal use e g tyre change Device inspection without detection of a fault or defect 8 3 Liability Alber GmbH as the e fix manufacturer shall not be liable for the safety of the product if The e fix is incorrectly handled The e f...

Page 39: ...albe Downtown HS 342 Active Line black grey wired 22 x 1 3 8 or 24 x 1 3 8 puncture proof Wheel tyres of e fix E36 Name Model and type Size inches Air pressure in bar and kPa Schwalbe Marathon Plus HS 440 Evolution Line black grey wired 24 x 1 3 8 min 6 0 max 10 0 bar min 600 max 1000 kPa The range depends on the terrain and the prevailing driving conditions The specified maximum range is valid fo...

Page 40: ...acent diagram when replacing the component within the Alber exchange parts pool Battery charger For technical information and other information on charging please refer to the separate operating manual of the battery charger Miscellaneous All e fix components are protected against corrosion The e fix conforms to the requirements laid down in the European Medical Device Directive 93 42 EEC as well ...

Page 41: ...le battery Nennspannung 36 V Rated voltage 36 V Nennkapazität 7 5 Ah Rated capacity 7 5 Ah Nennenergie 270 Wh Rated energy 270 Wh Betriebstemperatur 25 C 50 C Operating temperature 13 F 122 F Ladetemperatur 0 C 40 C Charging temperature 32 F 104 F Kurzschluss vermeiden Avoid short circuit Nur Original Ladegerät gemäß Gebrauchsanweisung verwenden Use only the original battery charger provided with ...

Page 42: ...anti tippers Switch off the e fix wheels before fitting the anti tippers Remove the quickpin 70 from the bracket mounting fork 71 by pressing on the pin with your thumb whilst pulling it out using your index and middle finger Push the clamping piece for the anti tipper 72 into the bracket mounting fork 16 Lock the bracket mounting fork 71 using the quickpin 70 To do this press the pin with your th...

Page 43: ...i tippers click into a fixed position Now you can fit or remove a wheel If you are fitting or removing e fix wheels these need to be switched off Repeat the process with the second anti tipper on the other side of the wheelchair Once the wheels are fitted you can return the anti tippers to their starting position To do this push the wheelchair forwards and at the same time push back the holding ro...

Page 44: ...tippers are not transfer rollers Do not move the wheelchair when it is jacked up Caution must be exercised when moving or collapsing the anti tip pers particularly when manually adjusting or activating As a res ult of the necessarily high spring force there is a crushing hazard between the holding rod 73 and the clamping piece 72 73 72 ...

Page 45: ...plug 23 of the control unit from the battery see chapter 4 2 Removing the control unit from the swivel arm Swivel the control unit 9 to the side Take the plug 23 of the control unit out of the battery see chapter 4 2 Release the locking lever 64 and slide the control unit 9 out of the sliding part 63 Attaching the control unit to the swivel arm Slide the control unit 9 into the sliding part 63 and...

Page 46: ...th the attendant control symbol see diagram in the attendant s control unit display 5 Battery symbol indication of battery capacity to the right of this the currently selected travel direction arrow symbol see diagrams to the bottom left The attendant control is now active the control unit inactive The wheelchair can now only be moved by an attendant 3 Driving mode with attendant control Specify t...

Page 47: ...f the e fix and sounds an acoustic warning signal After releasing the driving lever 8 you can immediately continue driving with the e fix 7 Removing the attendant control from the wheelchair Switch off the e fix via the control unit see chapter 5 2 2 Remove the attendant control plug 3 from the adapter cable socket 2 Release the fixing lever 9 turn it several times and remove the attendant control...

Page 48: ...user themselves and by an attendant This just requires the control unit to be installed in a holder attached to the wheelchair handle This is not included in the standard scope of delivery but can be fitted sub sequently by your specialist dealer at any time If an attendant should control the e fix proceed as follows Switch off the e fix Remove the control unit see chapter 5 1 Push the holder brac...

Page 49: ...45 ...

Page 50: ...6 0 Telefax 49 0 7432 2006 299 info alber de www alber de Ihre Alber Vertretung Your Alber representative Votre représentation Alber Vostra rappresentanza Alber Su representación Alber Din Alber representant Din Alber agenturene Uw distributeur Alber Deres Alber repræsentation Alber GmbH Albstadt ...

Reviews: